
 2939
2939
Branch Plans provide members of a branch with access to one or more learning elements - known as Learnables for a specific period of time.
Learnables include:
Console admins have the ability to create and manage branch plans for all branches in their tenant, while branch managers (provided they have the correct permissions) can add/remove members of the branch they manage from its branch plan. Other users with custom roles may be able to work with branch plans, depending on the permissions associated with their role. A full breakdown of the permissions is below:
Permissions needed to create a branch plan:
- Create branch plans
- Read branch plans
- Update branch plans
- Create plans
- Read plans
- Update plans
- Read content packages
- Read branches
- Update branches
Permissions needed to add a branch member to a branch plan:
- Read branches
- Read branch plans
- Read users
- Create licenses
- Read licenses
- Update licenses
- Remove licenses
- Read content packages
- Update enrollments
Creating Branch Plans
To create a branch plan, follow these steps:
- Open Console and go to the Plans section.
- Select the Add Plan button, then select Branch Plan from the drop-down list.

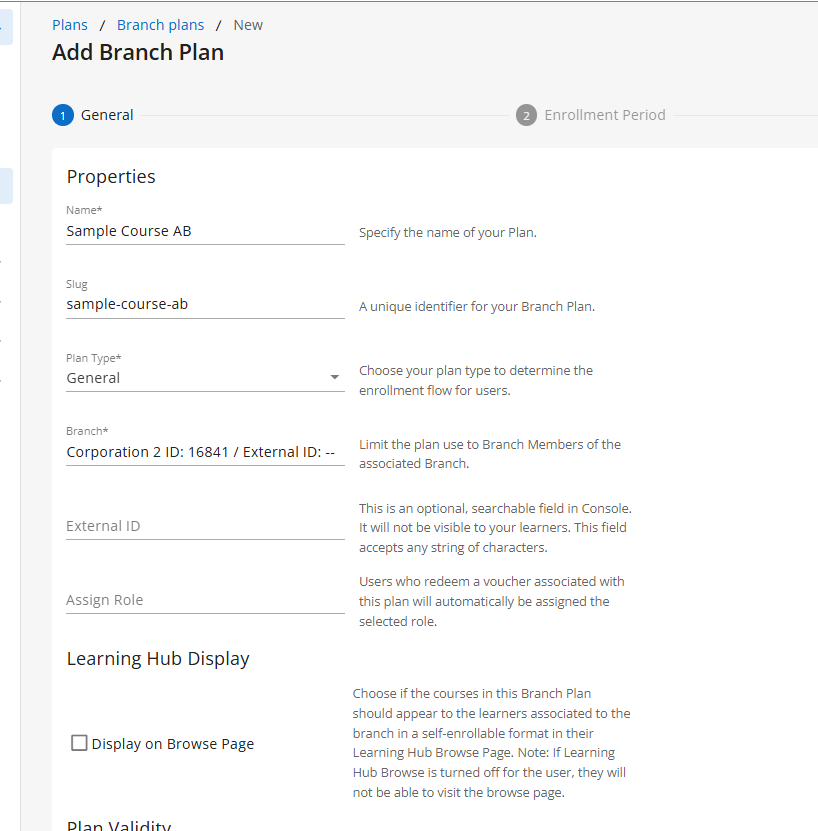
- On the next page, fill out the following required fields:
- Name: Give the plan a descriptive name. Best practice is to include the name of the branch and the year or time period the plan is valid for at a minimum.
- Slug: Once the name has been given to the plan the slug field will generate based on the plan name. The slug must consist of only lowercase alphanumeric characters, and hyphens. If the plan name does not meet the slug requirements the slug will need to be edited.
- Plan Type: This field is auto-set to General. No further action is needed.
- Branch: After selecting this field, a pop-up window will appear to help you select the branch this plan is for. Either search via keyword or use the listing displayed to find your branch. Check the box next to the branch’s name, then select the Save button.
- External ID: Optional field not visible to learners.
- Assign Role: Assign Role: Optional field. Automatically assigns the selected role to users who redeem a voucher associated with this plan. Users enrolled without redeeming a voucher will not be assigned this role.
- Learning Hub Display: Check the box if you would like the courses associated with this plan (determined in step 9) to appear on the Browse Page of Learning Hub (if both Learning Hub and Browse Page feature accesses have been enabled). Learn more about branch level content configuration in Learning Hub here.
- Plan Validity: These two fields define the time range during which admins can edit the plan. The “Valid From” and “Valid To” dates do not control when branch members on the plan gain or lose access to courses. Note that this field is optional for tenant plans, but mandatory for branch plans.
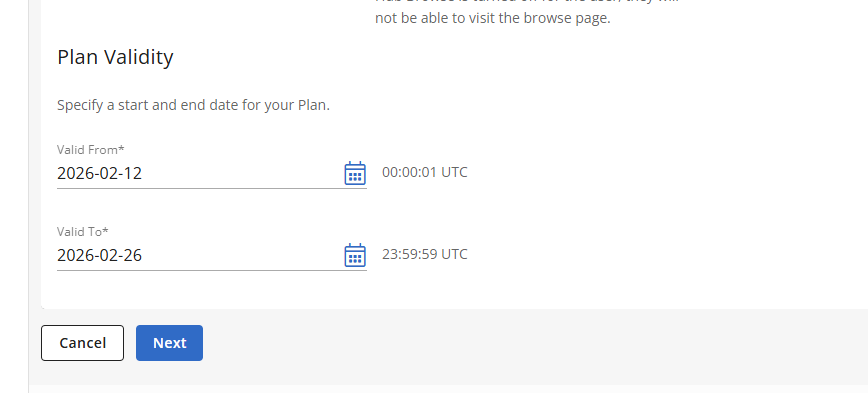
- Select the Next button to continue to the Enrollment Period section.
- In the Enrollment Period section, fill out the following fields:
- Duration Unit: This field is auto-set to “month.” No action is required.
- # of Months: After a branch member is added to the plan, how many months should they have access? Enter that number here.
- Final Access Date: This is an optional field. If you want all users on this plan to lose access on the same date, regardless of when they were added to the plan, enter that date here.

- Select the Next button to continue to the Utilization section.
- In the Utilization section, fill out the following fields:
- Seat Count Type: How many users should be able to be added to this plan? Select “Unlimited” if no restrictions are necessary. Select “Limited” and enter a number in the Seat Count field if only a specific number of users should be able to be added to the plan.
- Concurrent User Limit: This is an optional field. If you want to restrict the number of users on this branch plan that can access their course(s) at the same time, enter that limit here.
- Final Admin Access Date: This is the date that branch managers will lose the ability to add users to the plan.
- First Activation Date: This is the earliest date that a branch member added to the plan may activate their access. This is useful if you want to create a branch plan and add users to it in advance, but notify those users at a later date.
- Last Activation Date: This is the latest date that a branch member added to the plan may activate their access.

- Select the Next button to continue to the Learnables section.
- In the Learnables section, add courses, events, and/or resources that users on this branch plan should have access to.

- Expand the Courses section to add courses to your plan. Only published courses can be added. Move courses from the Available Courses to the Selected Courses section by clicking on the + icon next to a course. Selecting the - icon will remove the course from the selected content side. You can use the search bar or navigation arrows to find specific courses quickly.

NOTE: All users added to this plan will have access to all courses on the plan. If certain branch members should have access to only some courses, or if different branch members need access to different courses, we recommend creating and adding them to separate plans. - Expand the Events section to add events to your plan. Only Learning Hub Events can be added. Move events from the Available Events to the Selected Events section by clicking on the + icon next to an event. Selecting the - icon will remove the event from the selected content side. For more information about events, check out our articles here.

- Expand the Resources section to add resources to your plan. Move resources from the Available Resources to the Selected Resources section by clicking on the + icon next to a resource. Selecting the - icon will remove the resource from the selected content side. For more information about resources, check out our article here.

- Expand the Courses section to add courses to your plan. Only published courses can be added. Move courses from the Available Courses to the Selected Courses section by clicking on the + icon next to a course. Selecting the - icon will remove the course from the selected content side. You can use the search bar or navigation arrows to find specific courses quickly.
- Select the Create Plan button to finalize the branch plan.

Viewing Branch Plans
To view all branch plans, follow these steps:
- Open Console and go to the Plans section.
- Click on the Branch Plans tab.
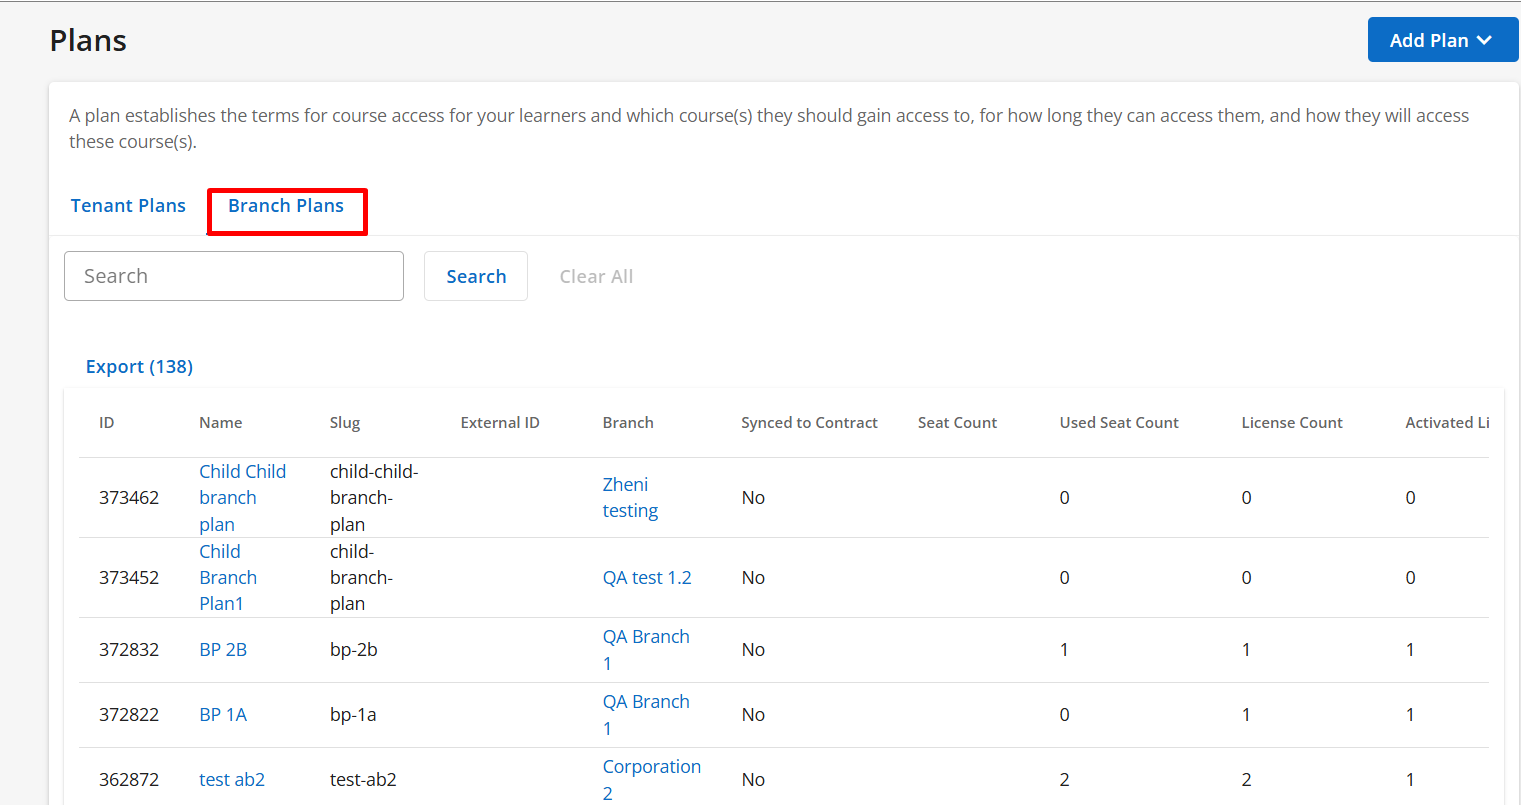
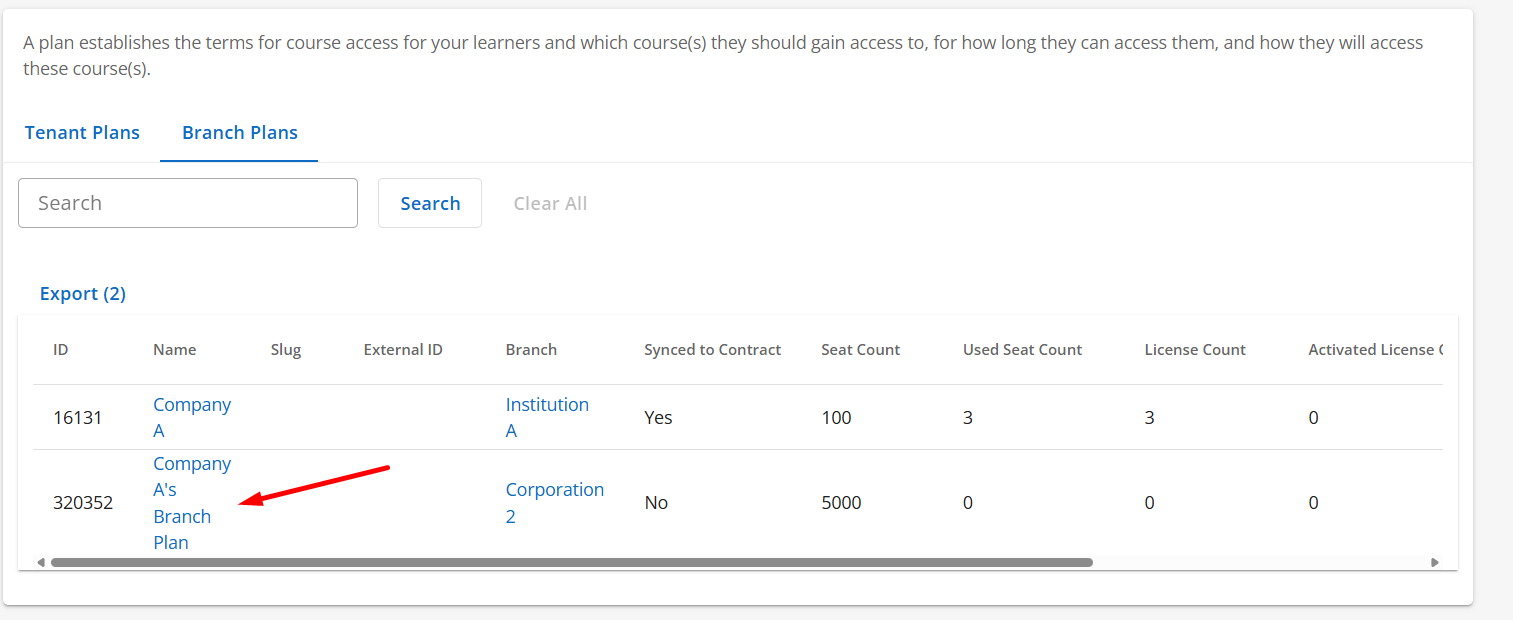
- From here, you'll be able to see the following information for each branch plan:
- ID, name, slug, and external ID
- What branch the plan is associated to
- Synced to contract (yes/no)
- Seat Count - Number of users that can be added to the branch plan
Used Seat Count - Licenses consuming paid seats (excludes seat-exempt & removed licenses)
License Count - Total licenses loaded into the system
Activated License Count - Users who have logged in at least once - Status (active/expired)
- When the branch plan is valid from and to
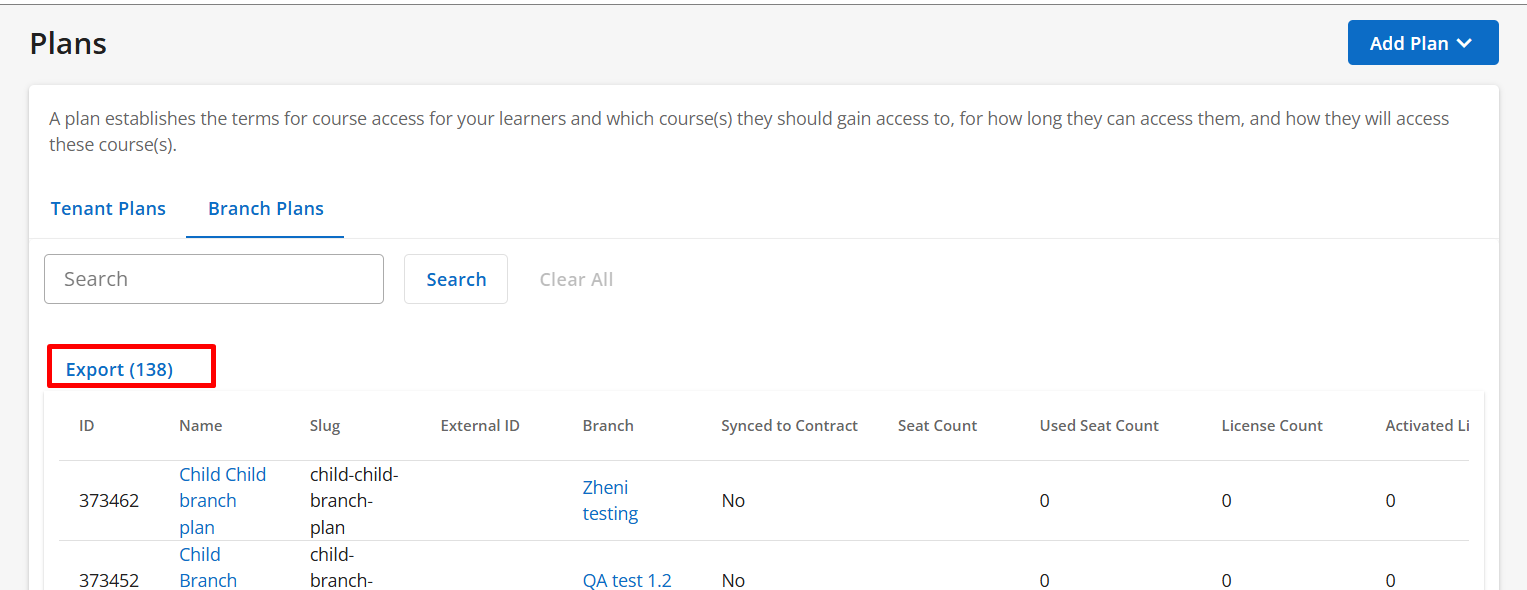
- Click on Export link if you want to export plan details into a CSV.
- Click on the name of a branch plan to view more details about it.

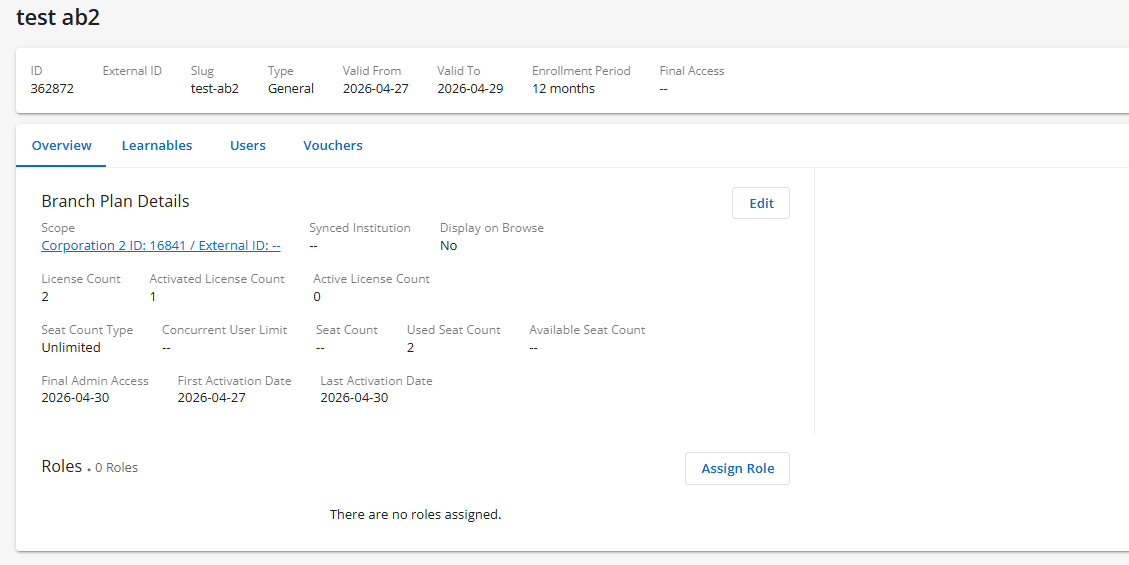
- From here you can see the following information:
- License Count - Total licenses loaded into the system
- Activated License Count - Users who have logged in at least once
- Active License Count - Users who have at least one activity in the course
- Seat Count Type - Number of users who can be added to the plan (limited or unlimited)
- Concurrent User Limit - The number of users on this branch plan that can access their course(s) at the same time.
- Seat Count - Number of seats/licenses in this contract. A license takes up a seat
- Used Seat Count - Licenses consuming paid seats (excludes seat-exempt & removed licenses
- Available Seat count - Number of seas left in the plan
- Final Admin Access Date - The date that branch managers will lose the ability to add users to the plan
- First Activation Date - The earliest date that a branch member added to the plan may activate their access
- Last Activation Date - The latest date that a branch member added to the plan may activate their access
Editing Branch Plans
After a plan is created, you'll be able to edit all of its settings except for the branch the plan is associated with.
To edit an existing branch plan, follow these steps:
- Open Console and go to the Plans section.
- Select the Branch Plans tab.

- Select the branch plan that you want to work with.
- The next steps will vary based on the branch plan settings you want to change.
- To edit the plan’s name, external ID, valid from/to dates, enrollment duration, or final access date, select the Edit button in the upper right-hand corner.

- To edit the plan’s seat count, seat count type, concurrent user limit, final admin access date, first activation date, or last activation date, select the Edit button in the Overview tab.

- To edit the Learnables included in the plan, click on the Learnables tab. Expand the Courses, Events, or Resources section to view learnables currently associated to the plan.

- Click on Manage next to Courses, Events, or Resources to update what learnables are included in the plan.

- Move learnables from the Available section to the Selected section by clicking on the + icon next to an item. Selecting the - icon will remove the item from the selected content side.

- Checking the Apply the update to existing users enrolled in this branch plan checkbox will apply the update to existing users with a valid license who have redeemed access to the branch plan, as well as new users. If this box is not checked, the update will only affect new users. Users with invalid licenses will not be affected by any branch plan modifications.
NOTE: If a course is removed, this will only be reflected for new users added to the branch plan. Existing users who have been licensed to the branch plan will be unaffected and will still have access to the course. - Click Save after making your edits.
- Click on Manage next to Courses, Events, or Resources to update what learnables are included in the plan.
- To edit the plan’s name, external ID, valid from/to dates, enrollment duration, or final access date, select the Edit button in the upper right-hand corner.

