
 4795
4795
What is a Plan?
A Plan defines the access terms for your learners, outlining which learning elements—known as Learnables—they can access, for how long, and how they will access them.
Learnables include:

Plan Permissions
Admins or users assigned a custom role with the following permissions will be able to view and manage plans in Console:
- Create plans
- Read plans
- Update plans
- Read content packages
- Read users
- Read subscriptions
- Read licenses
If your plan will include vouchers, you'll also need the following permissions:
- Create vouchers
- Read vouchers
- Update vouchers
Plan Types
There are two types of Plans: Free and Voucher Redemption.
Free Plans do not require a voucher. Once you create a free plan, learners can go to your marketing URL to enter their credentials or log in to redeem access to your plan.
Voucher Redemption Plans allow you to create and distribute vouchers that your learners can redeem for access. A voucher tied to a Plan grants access to the courses, events, and/or resources in the Plan at that time. Learn how to generate vouchers here.
NOTE: For Purchase plans are currently read-only. You can edit details for this plan except for the price. You cannot create For Purchase Plans from scratch in Console at this time.
Creating Plans
Follow this step-by-step guide to create both a Free and/or a Voucher Redemption Plan in Console.
- Expand Manage Users and select Plans.
- Click on Add Plan and choose Tenant Plan from the dropdown.
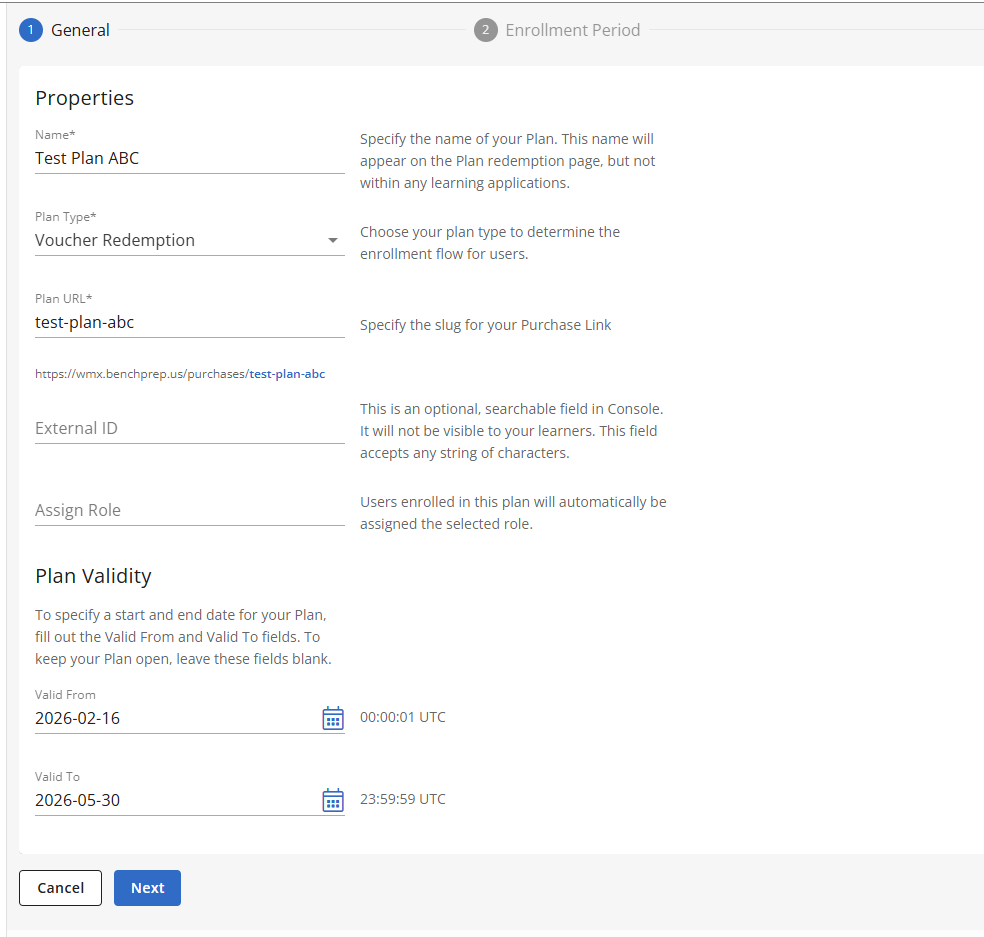
- Follow the guided form for the General set-up:
- Select Free or Voucher Redemption for the Plan Type.
- Select Next.
- Follow the guided form for the Enrollment Period:
- Select Next.
- Fill out First Activation Date field.

NOTE: Optional: You can set the First Activation Date which controls when a user can activate/enroll into the plan. If neither Valid From nor First Activation Date are set the user can activate immediately.
1. Select Next. - Add Learnables to your Plan that you want your learners to be able to access. You can add courses, events, and/or resources.

- Expand the Courses section to add courses to your plan. Only published courses can be added. Move courses from the Available Courses to the Selected Courses section by clicking on the + icon next to a course. Selecting the - icon will remove the course from the selected content side.

- Expand the Events section to add events to your plan. Only Learning Hub Events can be added. Move events from the Available Events to the Selected Events section by clicking on the + icon next to an event. Selecting the - icon will remove the event from the selected content side. For more information about events, check out our articles here.

- Expand the Resources section to add resources to your plan. Move resources from the Available Resources to the Selected Resources section by clicking on the + icon next to a resource. Selecting the - icon will remove the resource from the selected content side. For more information about resources, check out our article here.

- Expand the Courses section to add courses to your plan. Only published courses can be added. Move courses from the Available Courses to the Selected Courses section by clicking on the + icon next to a course. Selecting the - icon will remove the course from the selected content side.
- Select Create Plan.
You have successfully created a Plan. Your learners will redeem access to all learnables in your plan after enrolling them.
NOTE: If you created a Voucher Redemption plan, you can access the Voucher Redemption Link on the Plan’s detail page. To generate vouchers for a Voucher Redemption plan, click here.

Editing a Plan
To edit an existing plan, follow these steps:
- Open Console and go to the Plans section.
- Select the plan that you want to work with.

- The next steps will vary based on the plan settings you want to change.
- To edit the plan’s name, external ID, valid from/to dates, enrollment duration, or final access date, select the Edit button in the upper right-hand corner.

- To edit the plan’s URL, select the Edit button in the Overview tab.

- To edit the Learnables included in the plan, click on the Learnables tab. Expand the Courses, Events, or Resources section to view learnables currently associated to the plan.

- Click on Manage next to Courses, Events, or Resources to update what learnables are included in the plan.

- Move learnables from the Available section to the Selected section by clicking on the + icon next to an item. Selecting the - icon will remove the item from the selected content side.

- Checking the Apply the update to existing users enrolled in this plan checkbox will apply the update to existing users with a valid license who have redeemed access to the plan, as well as new users. If this box is not checked, the update will only affect new users. Users with invalid licenses will not be affected by any plan modifications.
NOTE: If a course is removed, this will only be reflected for new users added to the plan. Existing users who have been licensed to the plan will be unaffected and will still have access to the course. - Click Save to update your plan.
- Click on Manage next to Courses, Events, or Resources to update what learnables are included in the plan.
- To edit the plan’s name, external ID, valid from/to dates, enrollment duration, or final access date, select the Edit button in the upper right-hand corner.
Adding Users
To add users to your plan, follow these steps:
- Open Console and go to the Plans section.
- Select the plan that you want to work with.
- Switch from the Overview tab to the Users tab, then select the Add Users button.

- On the next page, select the + icon next to all users that you want to add to this plan. You can use the search bar or navigation arrows to find specific users quickly.


- Select the Add Users button to finalize your selections and enroll the users in your plan.


