
 1850
1850
Once you’ve set up your Recognition Types in your tenant, you can create recognitions for your courses by checking the recognition course attribute in the desired course. If you haven’t set up your Recognition Types yet, follow the instructions here. The recognition course attribute can be enabled while building a brand new course, or while an existing course is in conversion. Review both flows below:
Creating a Course with Recognitions
To create a course that will use recognitions, follow these steps:
- Navigate to BluePrint, and click on Create Course.

- Select your course type (BenchPrep Course or Asset-Based course). For more info on each course type, check out our article here.

- Under “Utilize Recognition Issuance?,” select the Yes checkbox.

NOTE: Once enabled, recognitions cannot be turned off for a course. - Click on Create Course.
- Create or import your course content (e.g. lessons, practice questions, tests, etc.).
Enabling Recognitions for an Existing Course
If you have an existing course that you’d like to use recognitions for, you can still enable this option as long as the course is still in conversion. Once the course is published, it can no longer be enabled. To enable the option:
- Navigate to your course in BluePrint.
- Click on Edit Course on the Course Details page.

- Under “Utilize Recognition Issuance?,” select the Yes checkbox.

NOTE: Once enabled, recognitions cannot be turned off for a course. - Click on Save.
Creating a Recognition
Creating a Recognition involves specifying the unlock criteria; what needs to be completed in order to earn the recognition and unlockable criteria; the credit amount for the credit unit that will be awarded after completing criteria specified in the unlock criteria section. For Credly and Accredible Badges, input the external ID of the badge that will be earned after completing criteria specified in the unlock criteria section.
If you’ll be using certificates for your recognitions, the certificate templates will first need to be uploaded to your tenant. Please reach out to BenchPrep Support for further assistance. Once your certificates are added, you’ll be able to add them to your recognitions.
To create a new recognition for your course, follow the steps below. You will need to be assigned as an owner or collaborator to the course to access recognitions. Steps on how to assign a BluePrint role can be found here.
- Navigate to your course in BluePrint. Click on the Recognitions tab under Course Details.

- This page will display all created recognitions for this course. You can search for existing recognitions by ID or Name. Click on New Recognition to create a recognition.

- Input the name of your recognition. This name will be visible to learners in Learning Hub. Click on Next.

NOTE: The Display Recognitions Learning Hub configuration will need to be enabled for your course in Console for learners to see recognitions. - Add your unlock criteria. More than one content type can be added for your criteria.
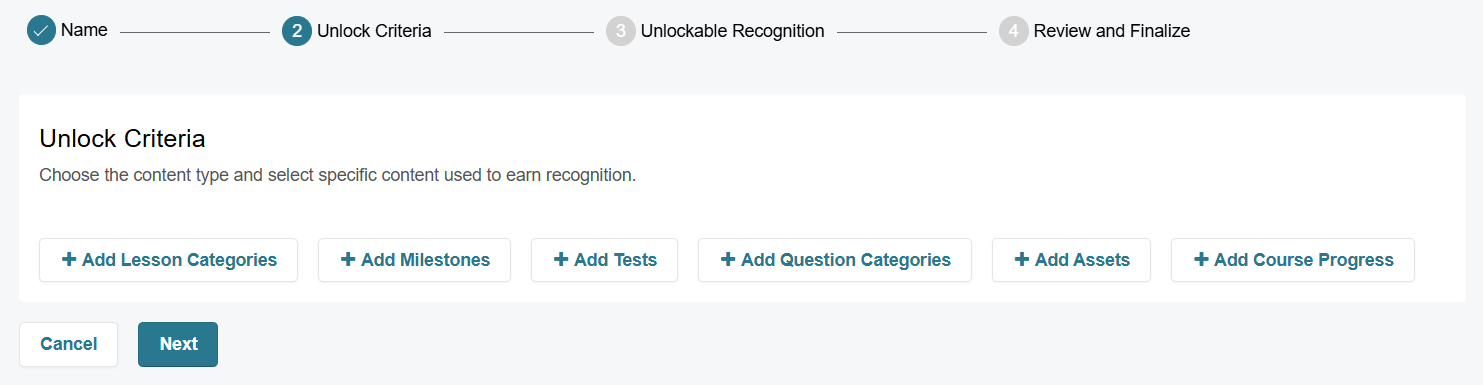
NOTE: If your course does not use a content type, no content will appear when attempting to add that criteria (e.g. If you have no milestones in your course, clicking on + Add Milestones will display no results). If you have an Asset-Based course, only the + Add Assets and + Add Course Progress options will appear.- Lesson Categories
- Move content from the Available Content to the Selected Content section by clicking on the + icon next to a lesson category. Selecting the - icon will remove the lesson category from the selected content side.

- Add a passing requirement that learners need to obtain for their lesson categories, and select the Add button.
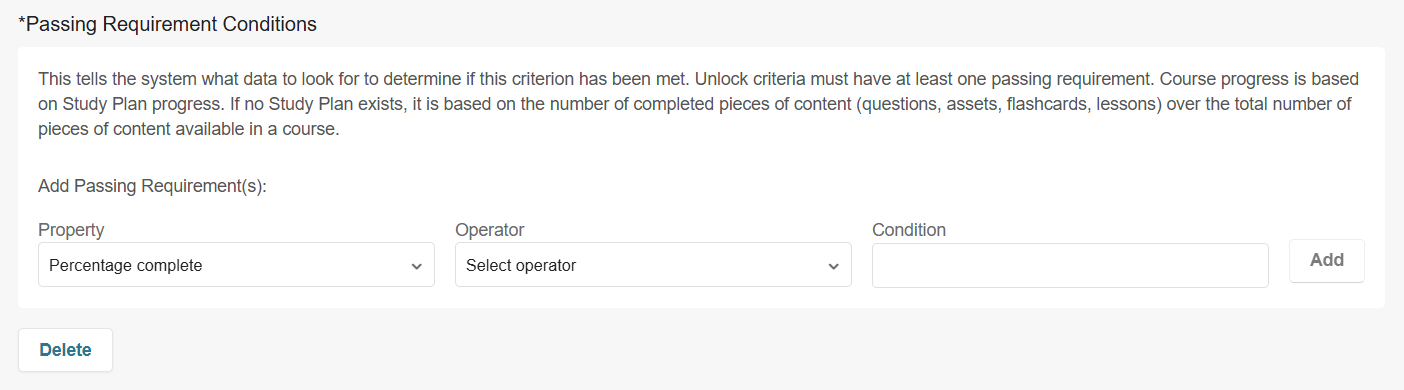
- Property - Percentage complete
- Operator - Choose one option from: equals, greater than, less than, etc. to establish completion criteria.
- Condition - Specify a numerical value a learner has to meet to pass the requirement. Do not include the % symbol, the field accepts numerical values only.
- Move content from the Available Content to the Selected Content section by clicking on the + icon next to a lesson category. Selecting the - icon will remove the lesson category from the selected content side.
- Milestones
- Move content from the Available Content to the Selected Content section by clicking on the + icon next to a milestone. Selecting the - icon will remove the milestone from the selected content side.

- Move content from the Available Content to the Selected Content section by clicking on the + icon next to a milestone. Selecting the - icon will remove the milestone from the selected content side.
- Tests
- Move content from the Available Content to the Selected Content section by clicking on the + icon next to a test. Selecting the - icon will remove the test from the selected content side.

- You can also add a passing requirement, and select the Add button.

Note that the state equals complete tag is automatically applied, as the test has to be completed in order for other requirements to be applied.- Property - Correct Answer Count or Percentage Correct
- Operator - Choose one option from: equals, greater than, less than, etc. to establish completion criteria.
- Condition - Specify a numerical value a learner has to meet to pass the requirement. Do not include the % symbol, the field accepts numerical values only.
- Move content from the Available Content to the Selected Content section by clicking on the + icon next to a test. Selecting the - icon will remove the test from the selected content side.
- Question categories
- Move content from the Available Content to the Selected Content section by clicking on the + icon next to a question category. Selecting the - icon will remove the question category from the selected content side.

- Add a passing requirement that learners need to obtain for their question categories, and select the Add button.

- Property - Percentage complete
- Operator - Choose one option from: equals, greater than, less than, etc. to establish completion criteria.
- Condition - Specify a numerical value a learner has to meet to pass the requirement. Do not include the % symbol, the field accepts numerical values only.
- Move content from the Available Content to the Selected Content section by clicking on the + icon next to a question category. Selecting the - icon will remove the question category from the selected content side.
- Assets
- Move content from the Available Content to the Selected Content section by clicking on the + icon next to an asset. Selecting the - icon will remove the asset from the selected content side.

- Select a passing condition.
NOTE: This will depend on the asset(s) you've selected, as not all assets will have a pass/fail status configured.

- If you selected "State = Completed," you can also add a passing requirement, and select the Add button.

- Property - Score
- Operator - Choose one option from: equals, greater than, less than, etc. to establish completion criteria.
- Condition - Specify a numerical value a learner has to meet to pass the requirement. Do not include the % symbol, the field accepts numerical values only.
- Move content from the Available Content to the Selected Content section by clicking on the + icon next to an asset. Selecting the - icon will remove the asset from the selected content side.
- Course progress
- Add a passing requirement that learners need to obtain in their course progress.

NOTE: Course progress is based on Study Plan progress. If no Study Plan exists, it is based on the number of completed pieces of content (questions, assets, flashcards, lessons) over the total number of pieces of content available in a course.- Property - Percentage complete
- Operator - Choose one option from: equals, greater than, less than, etc. to establish completion criteria.
- Condition - Specify a numerical value a learner has to meet to pass the requirement. Do not include the % symbol, the field accepts numerical values only.
- Add a passing requirement that learners need to obtain in their course progress.
- To remove an unlock criteria, click on Delete below the criteria you’d like to delete.
- Lesson Categories
- Click on Next.
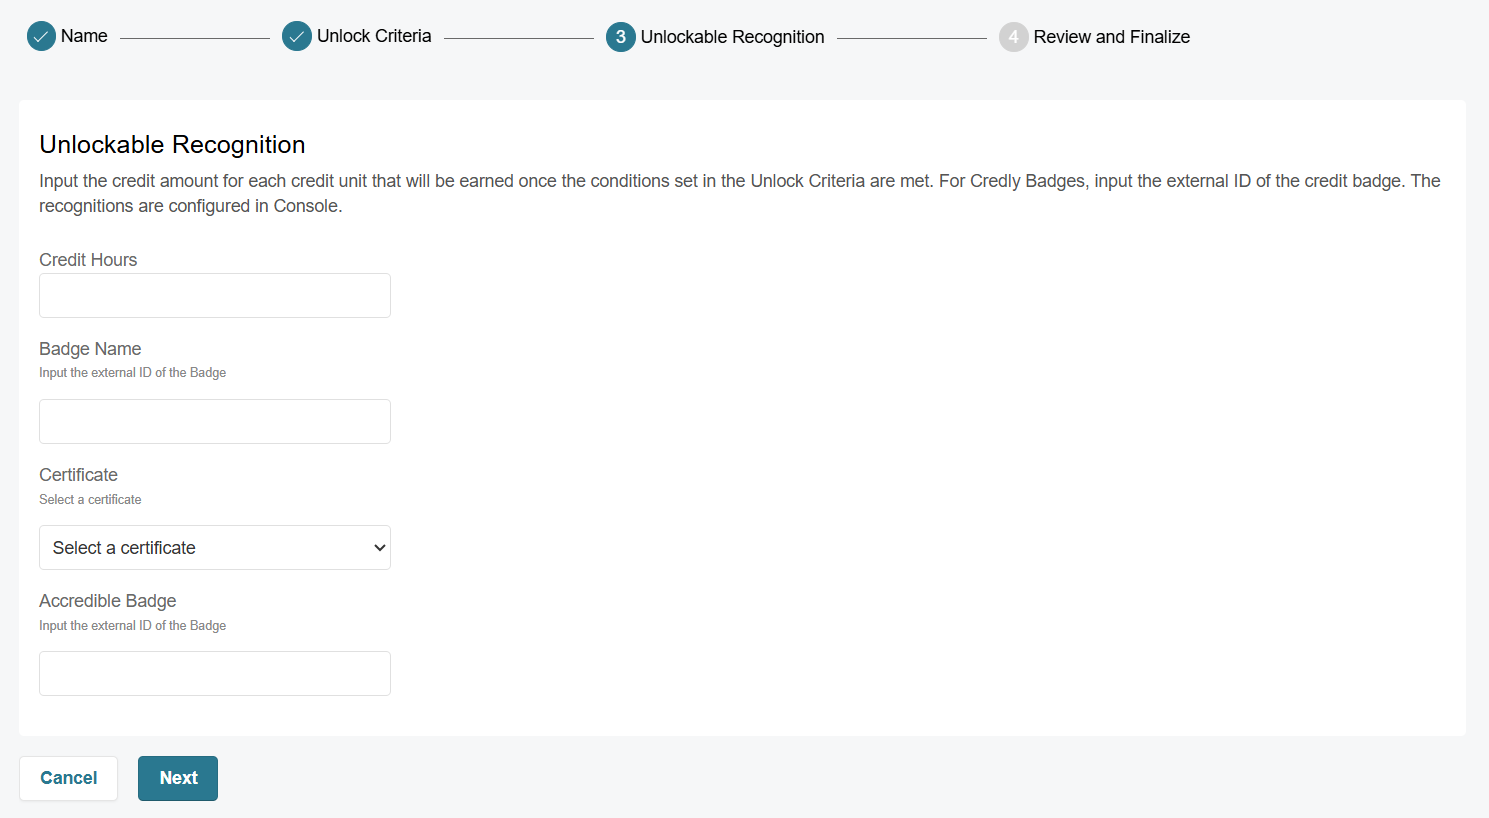
- For unlockable recognition, input your Credit Hours, the external ID of your Credly Badge, the external ID of your Accredible Badge, and/or select a certificate. The Credit Hours field will only accept a numerical value (including decimals), and any characters can be inputted in the fields for badges. Click on Next.
- Review and finalize your recognition details. If you need to edit anything, click on the appropriate section to navigate to that page.
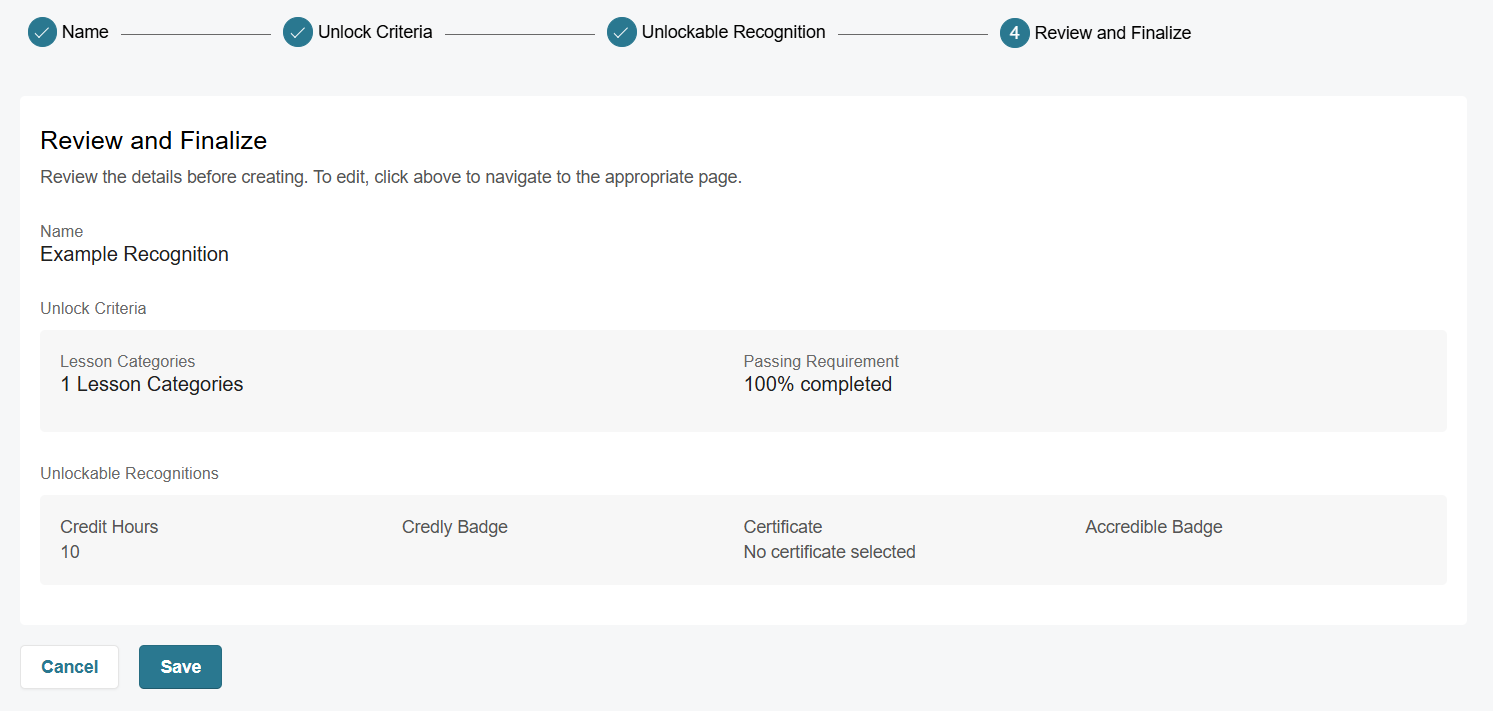
- Click on Save to complete creating your recognition.
- Repeat the steps above to create each of your recognitions if your course will have more than one.
- Once you’ve created all of your recognitions, publish changes to the course.
- Publish your course. Learners will now be able to start earning recognitions.
- Create a webhook for your course so that once learners earn their recognitions, this information will be sent to your external system. If you use Credly Badges or Accredible Badges, you’ll also be able to set up an integration with their platform. Our article here will cover next steps.
Editing a Recognition
To edit a recognition, follow these steps:
- Navigate to your course in BluePrint. Click on the Recognitions tab under Course Details.
- Next to the recognition you’d like to edit, click on the pencil icon.

- From here, you can edit the recognition’s name, unlock criteria, or unlockable recognition. However, the unlock criteria type (i.e. milestones, tests, etc.) cannot be changed once the recognition has been created.
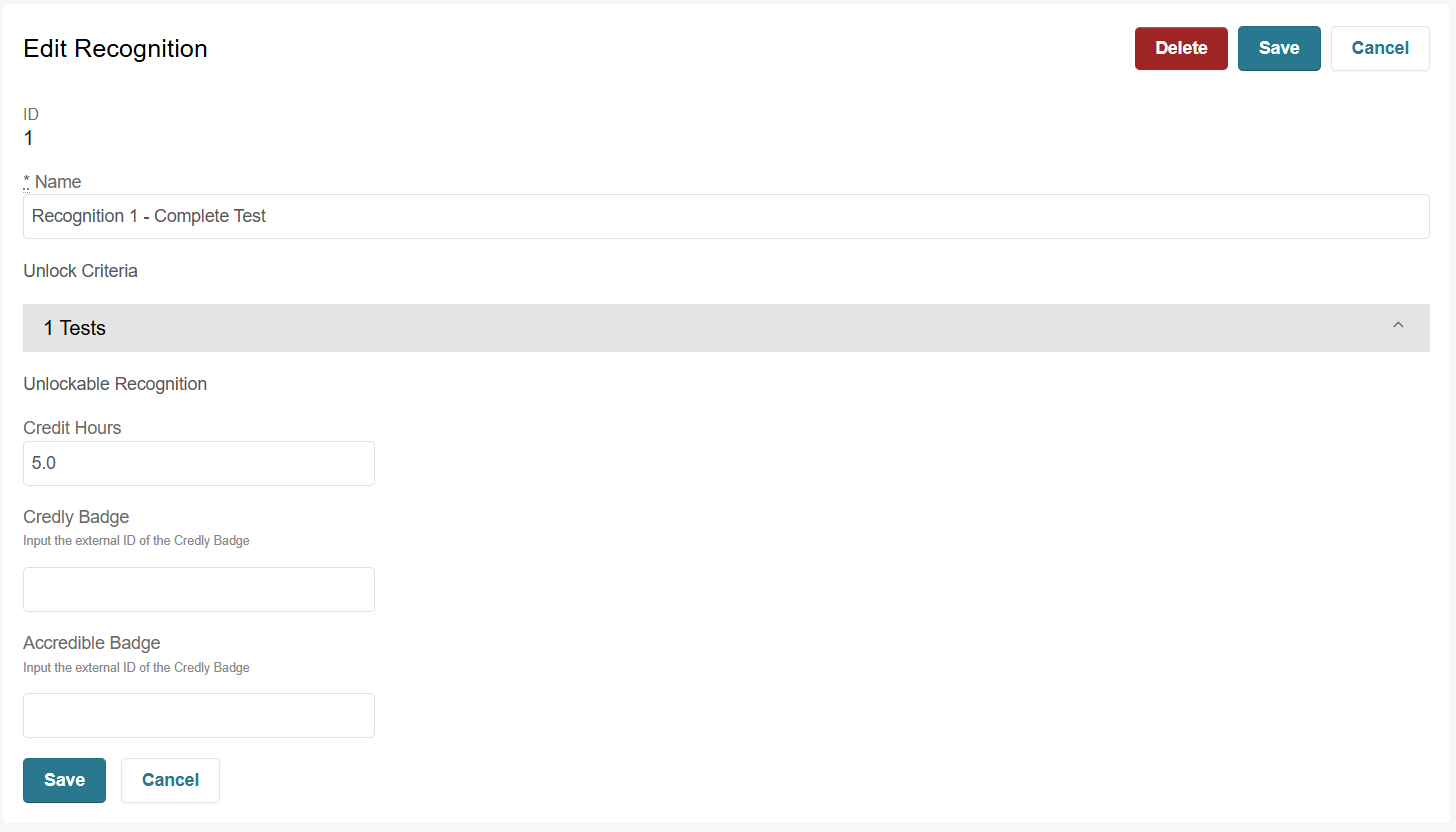
- Click on Save.
Deleting a Recognition
To delete a recognition, follow these steps:
- Navigate to your course in BluePrint. Click on the Recognitions tab under Course Details.
- Next to the recognition you’d like to edit, click on the pencil icon. Click on Delete.

OR - Select the recognition(s) you’d like to delete, and click on Delete near the top.

- Click on Yes, delete permanently to confirm.


