7412
7412
The Structured Study Plan is a linear pathway through all course material. The plan is composed of Study Tasks, which can exist alone or within Study Task Groups.
A Study Task contains one module of content - lessons, flashcards, practice questions, an exam, an essay topic, OR an external asset.
A Study Task Group organizes a group of Study Tasks by topic. We recommend naming Groups by topic and naming Tasks by sub-topic and module type. The topics ideally correspond to content categories.
There are three steps to creating a Structured Study Plan within BluePrint:
- Build your Study Task Groups
- Build and place your Study Tasks
- Fill those Study Tasks with the appropriate content
Depending on the size of the course and the volume of content the course will contain, you can add pre-existing content first (See Step 3: Method 1 and 2 below) or you can build your content directly from the Study Plan interface (Method 3).
We recommend leveraging flexibility of the Study Plan page to seamlessly add, edit and organize content all within one interface.
Step 1: Build your Study Task Groups
To create your Structured Study Plan, navigate to your course within BluePrint, and click on the Study Plan tab.

To expand all groups and tasks on this page, click on Expand All. To expand an individual Study Task to see its task items, click on the arrow icon to its left. The above image is an example of what a Study Plan can look like:
- “Course Introduction” is a Study Task Group as indicated by the dark folder icon. It contains one study task, which you can tell by the number in parentheses.
- "How to Use This Course" is a Study Task as indicated by the white folder icon. It contains 2 items inside of it.
- The 2 Task Items are lessons as indicated by the lesson icon. Task Items will show the appropriate icon depending on what kind of content it is. To view Task Items, you can also click on the eye icon next to the “How to Use This Course” Study Task.
To create a Study Task Group:
- Type in the group name in the text box that says “Type a study task group name and hit enter…” and hit Enter. This will create a temporary Study Task Group.

- Create all of the groups that your course requires.
- Click on Save at the bottom. Each of the n1, n2 numbers next to your groups will be assigned an ID number, and a green success banner will appear at the top.


OR
- Click on New Study Task Group near the top-right.
- Type in the group name, and select a Prerequisite Type (optional).
- Click on Create.

Step 2: Build and place your Study Tasks
Now that you have the skeleton of your Structured Study Plan, it’s time to fill it in with the Study Tasks.
-
Type in the name of your first Study Task in the “Type a study task name and hit enter…” and hit Enter.

-
Drag and drop that Study Task underneath the appropriate Study Task Group — make sure the study task locks into place indented underneath the group.

-
Create all of the study tasks that your course requires by repeating steps 1 and 2.
-
Click on Save.
NOTE: We recommend starting with creating the first study task of each study task group. This way you can directly enter tasks under the appropriate groups without having to drag and drop them each time.

OR
- Click on New Study Task near the top-right.
- Type in the study task name, and select a Task Item from the dropdown.
- Click on Create.

Step 3: Fill those Study Tasks with the appropriate content
Now that you’ve built out the structure of your study plan, it’s time to add the appropriate content to the correct study task. There are four methods to do this: Add Existing Content, Batch Edit Content, Create New Content, and Link to Content.
Method 1 - Add Existing Content
If you have already created your content and just need to add them to the study tasks:
-
Click on the pencil icon to edit the Study Task OR click on the + icon.
-
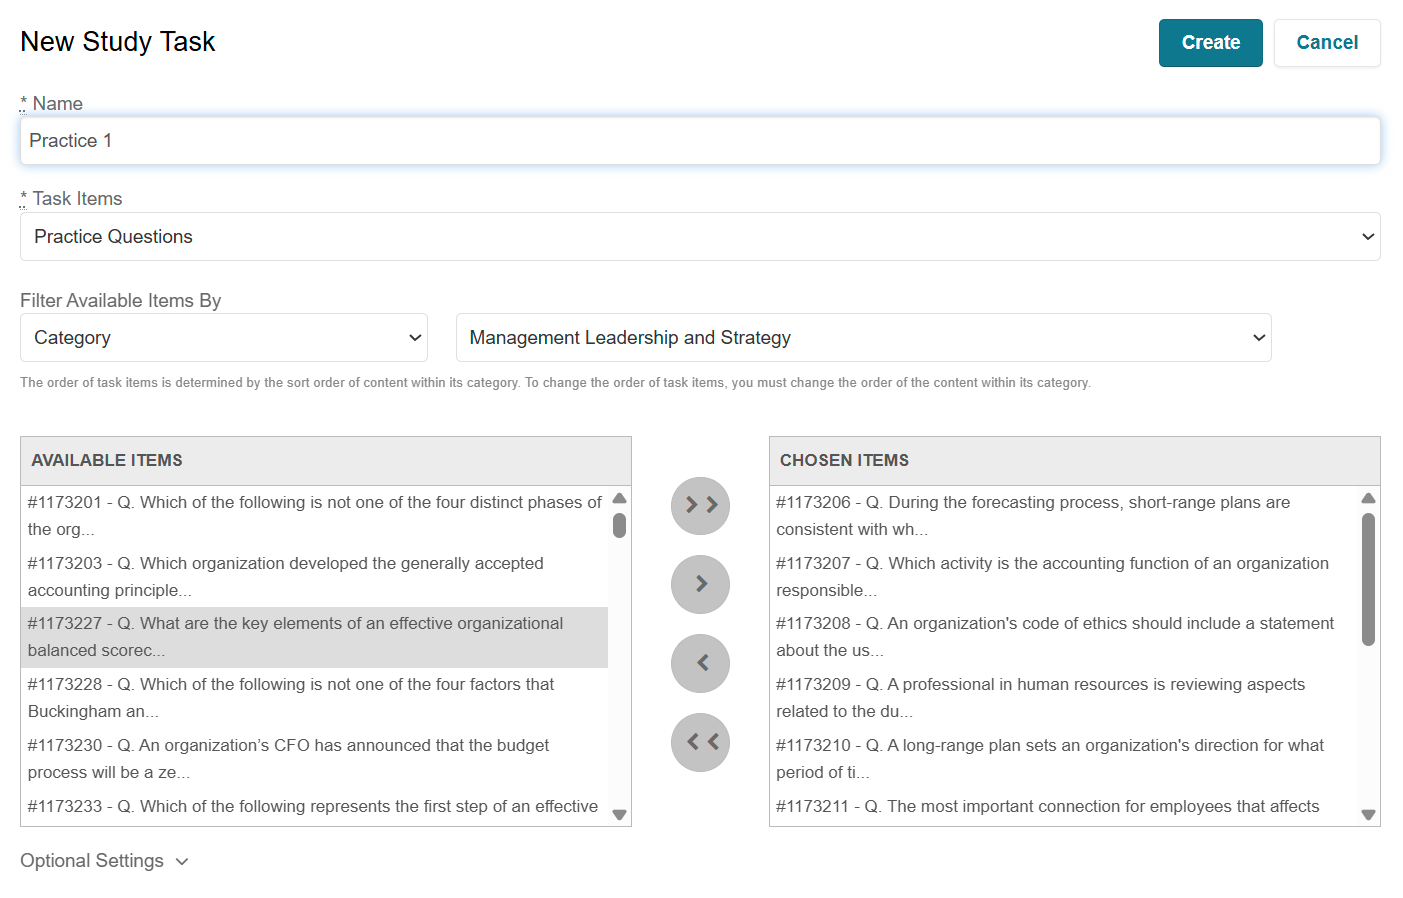
Choose the "Task Items" type you want to add for that Study Task.
-
For Practice Questions, Lessons, and Flashcards, select and move content items from the “Available Items” to the “Chosen Items” list.
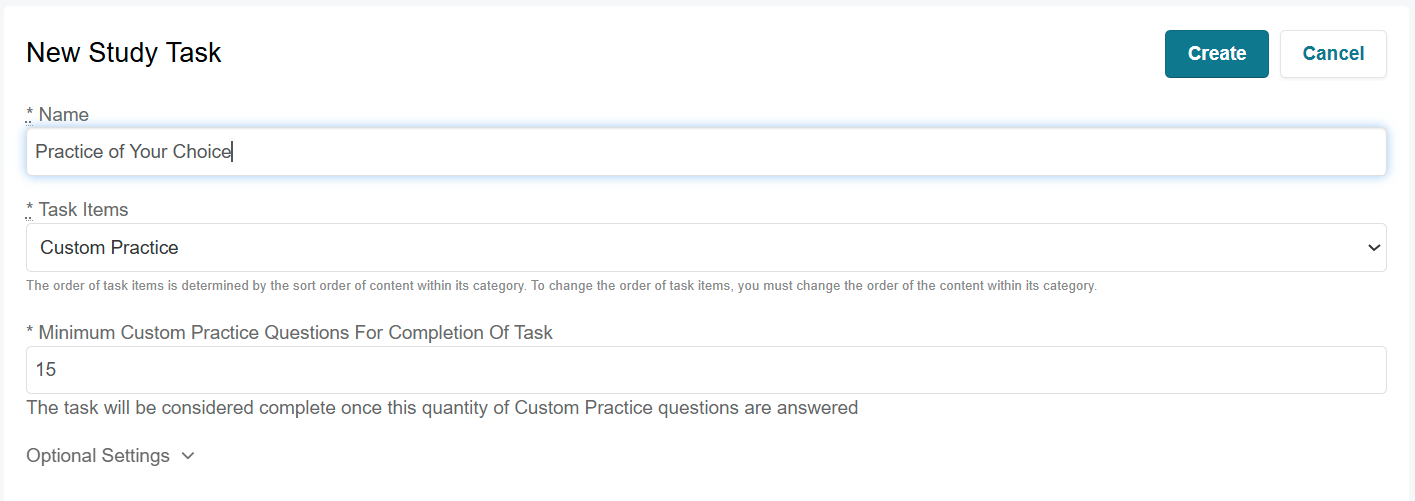
-
For Custom Practice, enter the Minimum Number of Custom Practice questions for completion of task. Users can complete questions from any category to complete the study task, but must finish the number of question entered in this field.
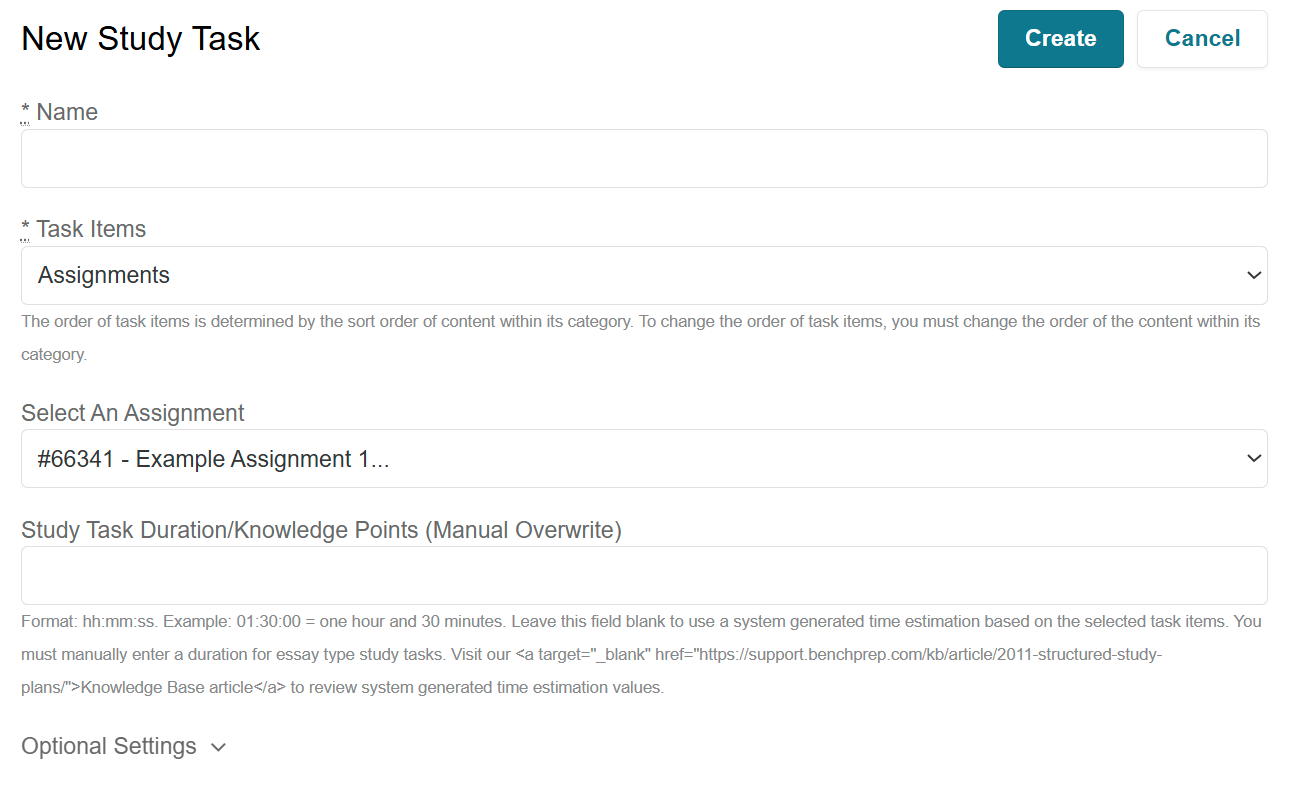
-
For other existing types of content (Tests, Assignments, PDFs, Videos, etc.) select the content item from the Available Items dropdown.
-
Click on Optional Settings to show additional fields you can edit (i.e. Study Task Duration/Knowledge Points, Prerequisite Type, etc.).
-
Click on Save.
Method 2 - Batch Edit Content
If you have a lot of content in your course and want to quickly add them to study tasks:
-
Navigate to the BluePrint tab that you'd like to add from for your Study Task (e.g. Lessons, Practice Questions).
-
Select the items you wish to add.
-
Click on Batch Edit near the top of the page.
-
With your items selected, select the appropriate Study Task from the "Select a Study Task" dropdown.
-
Click on Save to complete adding all of your those items to your Study Task.

Method 3 - Create New Content
If you’d like to create new content directly from the study plan for your study tasks:
- Click on the + icon to add content for the Study Task.
- Change the "Task Items" to the content type you want to add for that Study Task.

NOTE: If exams, essay topics, or external assets are selected, you won’t be able to create new content from here and can only add pre-existing content. To create new content for these items, navigate to the appropriate tab in the left-hand navigation, create your content, and then add them to the Study Task.
- Click on Optional Settings to show additional fields you can edit (i.e. Study Task Duration/Knowledge Points, Prerequisite Type, etc.).
- Click on Save and Create New Content.

This will save your Study Task and take you to a new window where you’ll be able to create content based on the task item that was chosen (i.e. Lessons, Flashcards, etc.).

The left navigation will also automatically collapse. To uncollapse it, click on the arrow icon at the bottom.

- Fill out the page with your new content.
- Click on Save and Add More Content to continue creating new items. If you’re done, click on Save and Finish.

- Once you’re finished, you’ll be directed back to the Study Plan page. To confirm all of the correct content has been added, check the task items under your study task, or click on the eye icon next to your study task to view its items.
Method 4 - Linking Content (URL Study Task)
When creating a new Study Task using the URL task type, you can link to both external and internal content.
- External URLs (content outside the BenchPrep platform) will open in a new browser tab when launched from the WebApp.
- Internal URLs can be used to direct learners to in-course pages in the left-hand navigation (such as Assignments, Practice Questions, Labs, Exams, and Discussions). These internal links open in the same browser tab.
How to Link to Internal Content
- Enter the name of the Study Task
- Select the URL(Embed New URL) task type
- You can either:
Enter the full internal URL(Example: https://<your-domain>.benchprep.com/app/<course-slug>#exams)
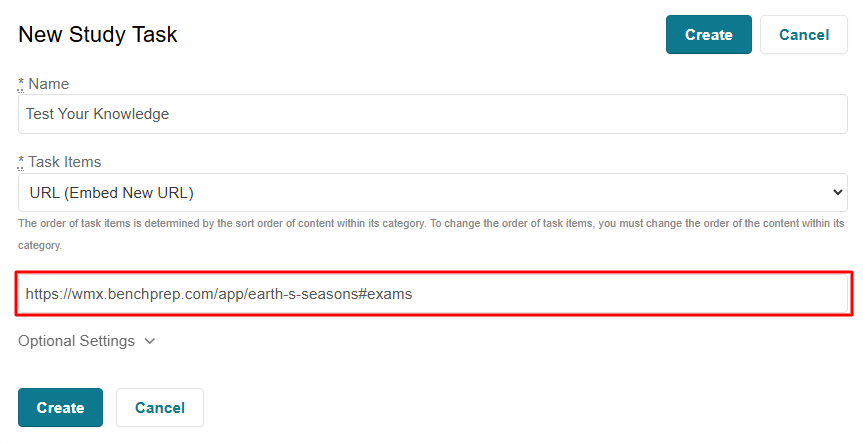
OR
Enter the page anchor directly (the # and text following it in the url, i.e. #exams)
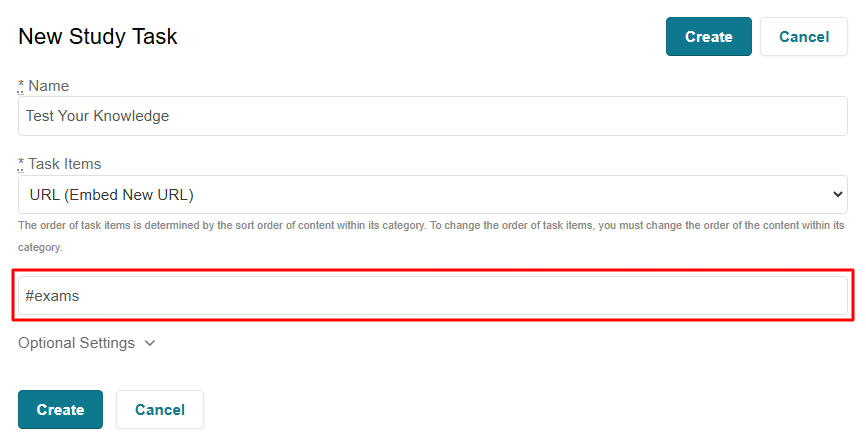
- Click Create to Save.
Note: When you create the study task, the URL will automatically be updated to the anchor.
After you've finished creating your study task groups and study tasks, remember to Publish Changes to your course to push through these changes.
Editing a Structured Study Plan
To edit the order of your Structured Study Plan, click on the Study Plan tab. From here, you can rearrange your Study Tasks and Study Task Groups by clicking and dragging them to your desired order. You can move them within their own groups, to a new group, or outside of a group. The + icon will not be visible while you’re rearranging the study tasks. Just remember to Save your changes when you're done. Once you save your new layout, you’ll be able to add new content.

To edit the content of your Structured Study Plan, follow same the instructions in Step 3 of creating a plan.
When planning to edit a study plan in a live course with learners, remember that adding or removing study tasks will affect the study plan progress for all learners.
If the learner has previously completed the study plan and new content is added, the learner’s progress will now display as incomplete. All previously unchanged and finished content within the study plan will remain complete. The learner will only need to complete the new or updated task to progress the study plan to 100%. If a learner has already completed the course to 100% and a study task is deleted from an active study plan the user's progress will remain at 100%.
If a learner is actively using the study plan, the learner’s progress will recalculate once the new or deleted study task has been added or removed. The percentage of progress that is changed will be based on the knowledge points for each study task that is either added or deleted.
Adding Prerequisites
You can lock Study Tasks and/or Study Task Groups by establishing prerequisites within BluePrint and locking content until a specific prerequisite within learner's Study Plan has been met.
We recommend setting up Study Task Groups and Individual Study tasks first to set up your Study Plan, then specifying your desired prerequisites to ensure a smooth set-up process.
NOTE: Prerequisites ensure content is locked only when accessed from the Structured Study Plan itself, it does not lock content if accessed from the module directly. For example, you can require completion of certain lessons' study tasks before allowing the user to take a Test. The test will be locked within a Study Plan until prerequisite requirements have been met, however the test remains available and can can still be accessed from the Test module directly; from the left-hand navigation. Alternatively, using Milestones allows you to lock content completely from any modality until a certain requirement is met. Learn more about Milestones here.
Study Tasks and Study Task Groups can be prerequisites themselves or have prerequisites:
- Completing a Study Task Group can unlock another Study Task Group
- Completing a Study Task Group can unlock a specific Study Task
- Completing a Study Task can unlock a Study Task Group
- completing a Study Task can unlock another Study Task
To set up prerequisites follow these steps:
- Navigate to the desired Study Task or Study Task group you would like to lock.
- Click on the Pencil icon to edit it OR click on the + icon.
- In the Prerequisite Type field, select a desirable option (default value is none - no prerequisite is needed, choose Study Task or Study Task Group.)
- Select appropriate Prerequisite ID from the drop-down to indicate the content that needs to be completed to unlock desired Study Task or Study Task Group.

- Click Save. Complete previous steps for every Study Task/Study Task Group you would like to set up prerequisites for.
- Publish Changes for your course.
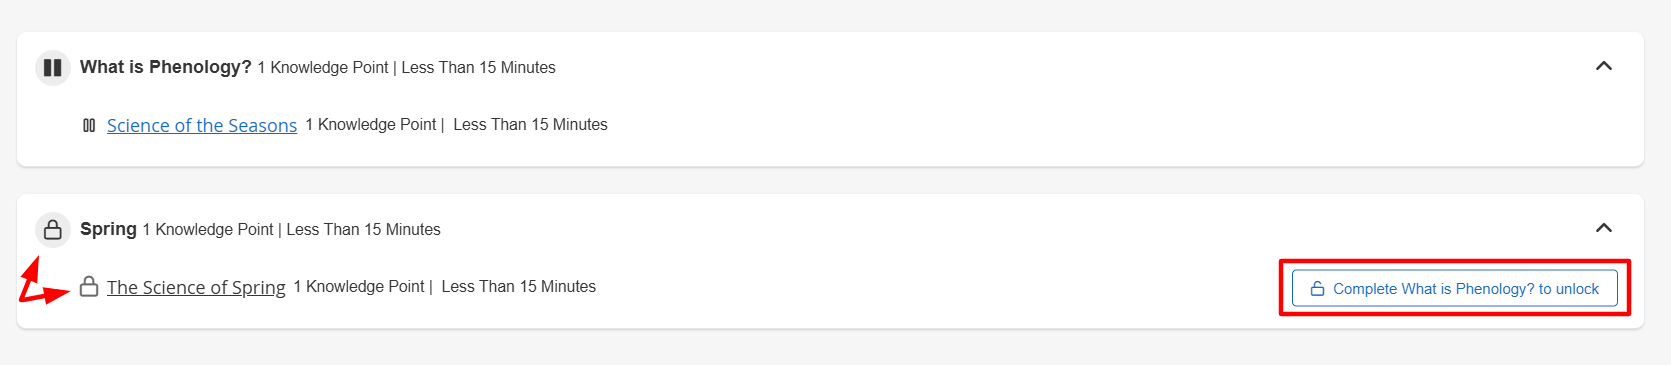
In webapp, the locked content with the prerequisite will display a lock icon to the left of the locked task. Additionally, the locked study task will show the specific required prerequisite on the right-hand side.