
 10
10
The functionality described in this article will be available following the May 21, 2026 deployment.
Visibility and locking can be combined in different ways to control how and when learners interact with content. Depending on your goals, you may want content to be visible but not accessible, hidden until a specific time, or available only to certain learners.
The scenarios below highlight common ways to configure these settings using assignment tasks, helping you manage content access, guide learner progression, and support different delivery models within a single course. For simplicity, the examples below use exams as the content type, but the same configurations can be applied to other types of content.
Console Admins or users with a custom role including: create:assignments, read:assignments, update:assignments, delete:assignments and create:assignment_tasks can manage assignment Tasks in BluePrint. Additionally, the course has to have assignments feature access enabled.
Scenario 1
Hiding Content Until a Specific Time
In this scenario, an exam is completely hidden from learners until a specific date and time, at which point it becomes visible and available for access to a subset of learners or all learners.
How it works:
- Hiding the Exam
- Navigate to the desired course in BluePrint.
- Click on Tests, and choose the test you would like to hide.
- Click Edit, select the Hidden by Default checkbox.
- Click Update.
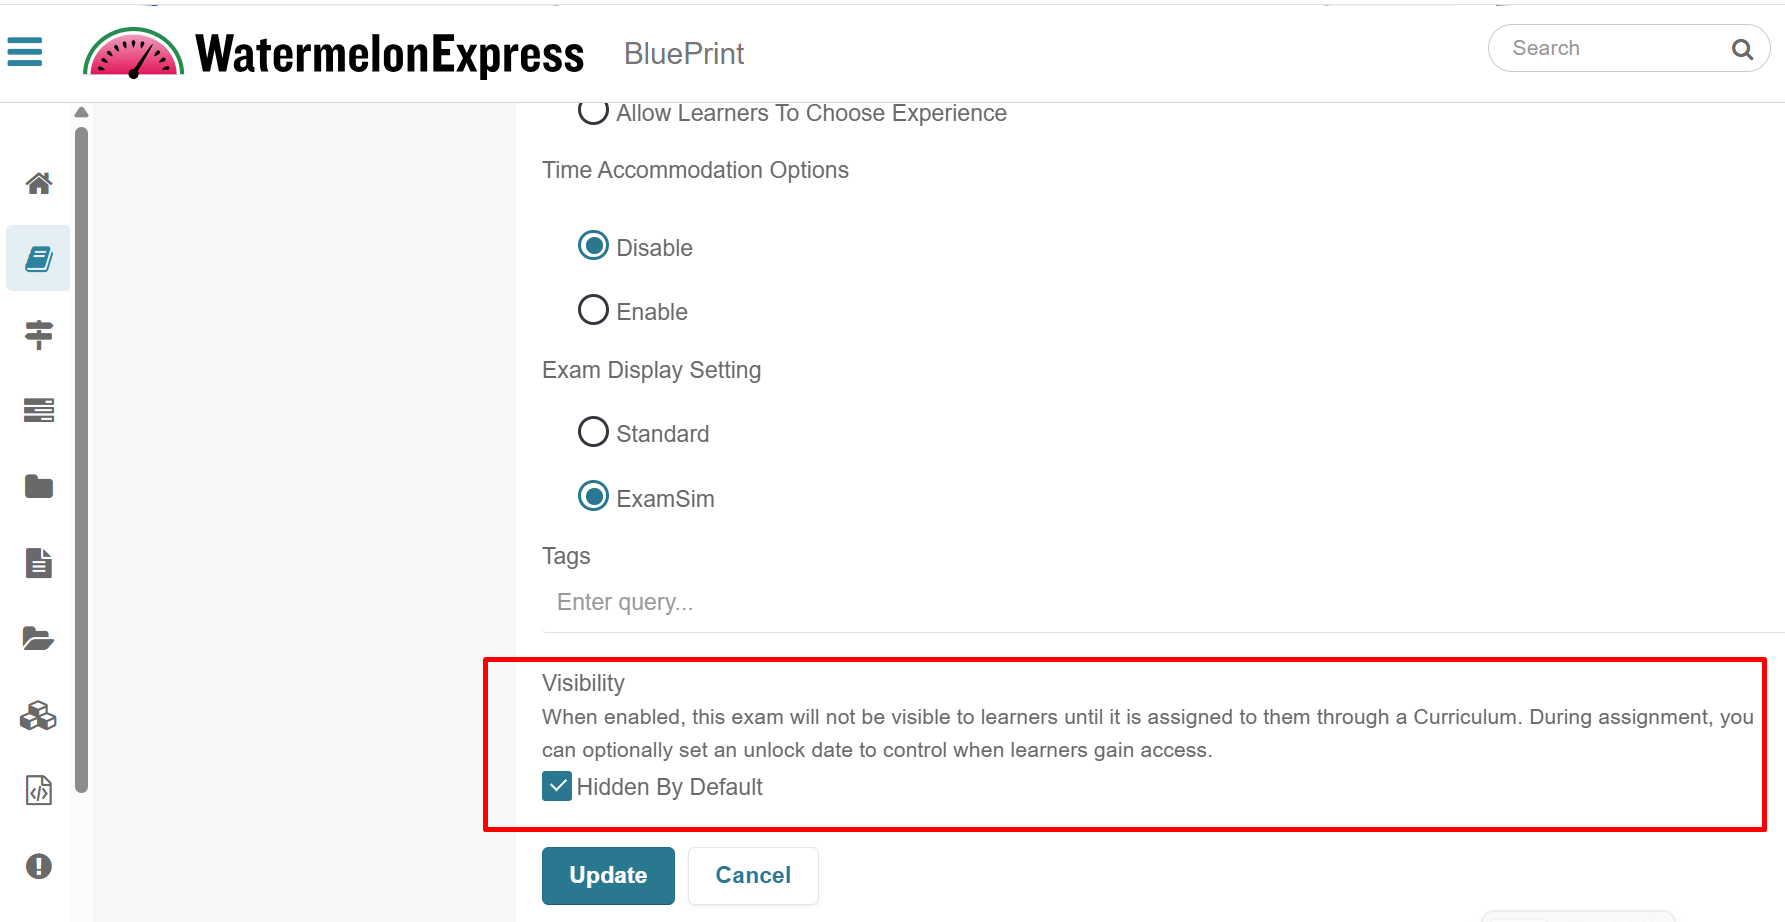
- Click Publish Changes to build the Course.
- Once the course is built, the exam will not appear in the Exam tab on the left-hand side for anyone enrolled in the course.
- Creating an Assignment Task
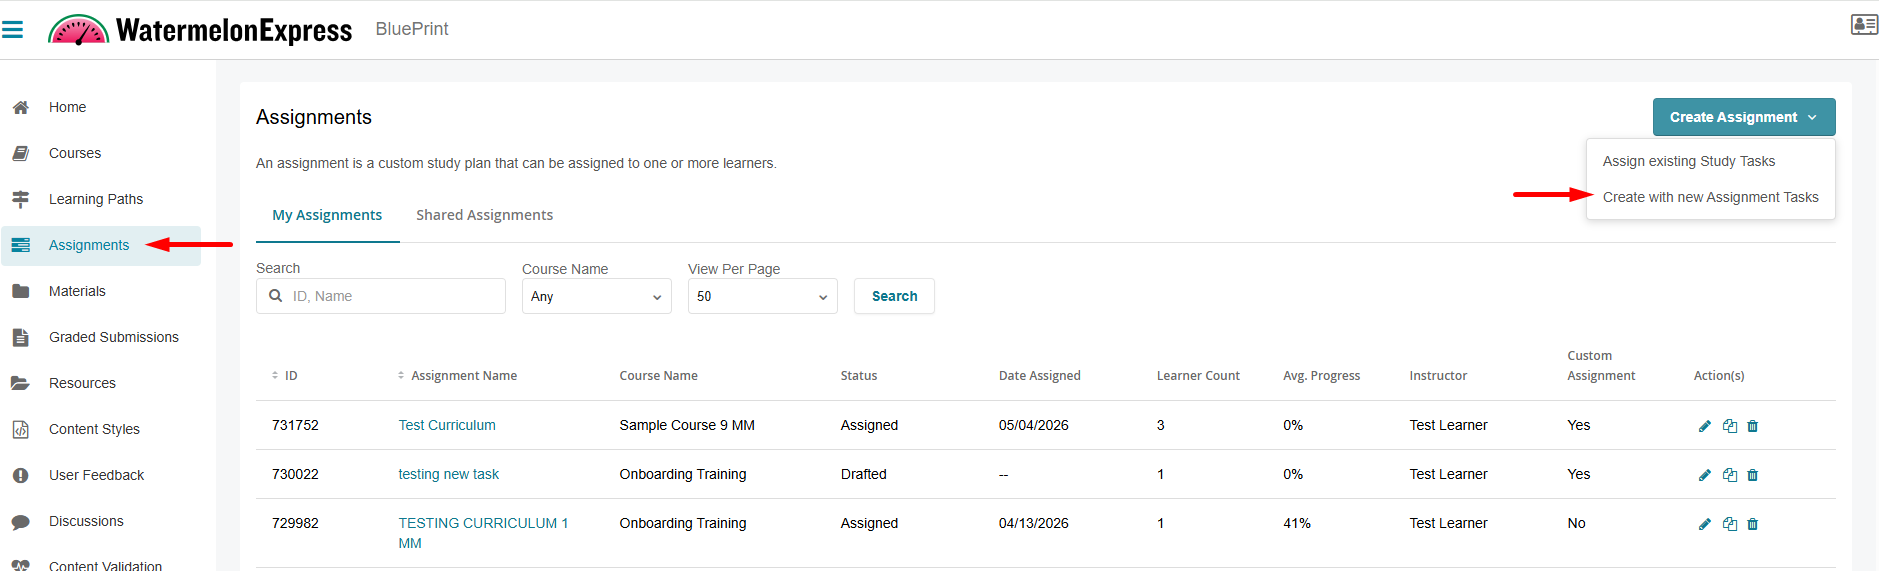
- Navigate to Assignments in BluePrint.
- Click on Assignments on the left hand side.
- Click on the Create Assignments button and choose Create with New Assignment Tasks.
- On the New Assignment page, fill out the following information:
- Select the Course you would like to create the assignment for from the dropdown. Only courses with the assignment feature access enabled will be displayed. The dropdown excludes courses with milestones. Additionally, you will need to have access to the course.
- Assignment Name (required) - name of the assignment displayed to learners within the Learning Application in the assignment tab (if displayed).
- Assignment Description (optional) - description of the assignment displayed to learners within the Learning Application.
- Role Scope Context - The scope of the custom role containing the assignment creation permissions determine the options shown in this dropdown menu. Select the appropriate context to pick desired learners you would like to assign this assignment to.
- Learners can be assigned to a assignment task either individually through the Learners tab or dynamically through the Group tab:
- Select an appropriate Role Scope Context - The scope of the custom role containing the assignment creation permissions determine the options shown in this dropdown menu. Select the appropriate context to pick desired learners you would like to assign this assignment to.
- The Learners tab lists learners of the selected context, such as a branch, as well as any child branches, who have an active enrollment. Select the checkbox next to each learner you would like to assign this assignment task. You can also narrow your search by selecting an appropriate branch or group, if applicable, to display desired learners and make your selection from the provided list. Learners in Active and Inactive states can be added.
- The Group tab lists assignable groups. You can search for a group and click the group name to expand a list of users within that group. Selecting a group will automatically assign all existing users in the group to the assignment task. Any users added to the selected group after the assignment task is assigned will also be automatically enrolled in the assignment task.
- Assignment Access - You can list additional instructors that have access to this assignment task. Instructors in your context will be listed. Search for instructor(s) you would like to add. You can multi-select instructors by checking the box next to their name. Once appropriate instructors are selected, you can:
- Check Can Edit Assignment if you would like them to be able to edit this assignment task.
- Check Can Duplicate Assignment if you would like them to be able to duplicate this assignment task.
- Click the Add Instructor button. The instructors will be listed below, you can still check/uncheck Can Edit Assignment and Can Duplicate Assignment options if you need to make any modifications.
- If you are not ready to assign users yet or provide assignment access, you can skip the steps above. You can return back to this assignment to assign users or provide assignment access to instructors later by editing the assignment.
- Click Next. Select Add Tests to proceed.

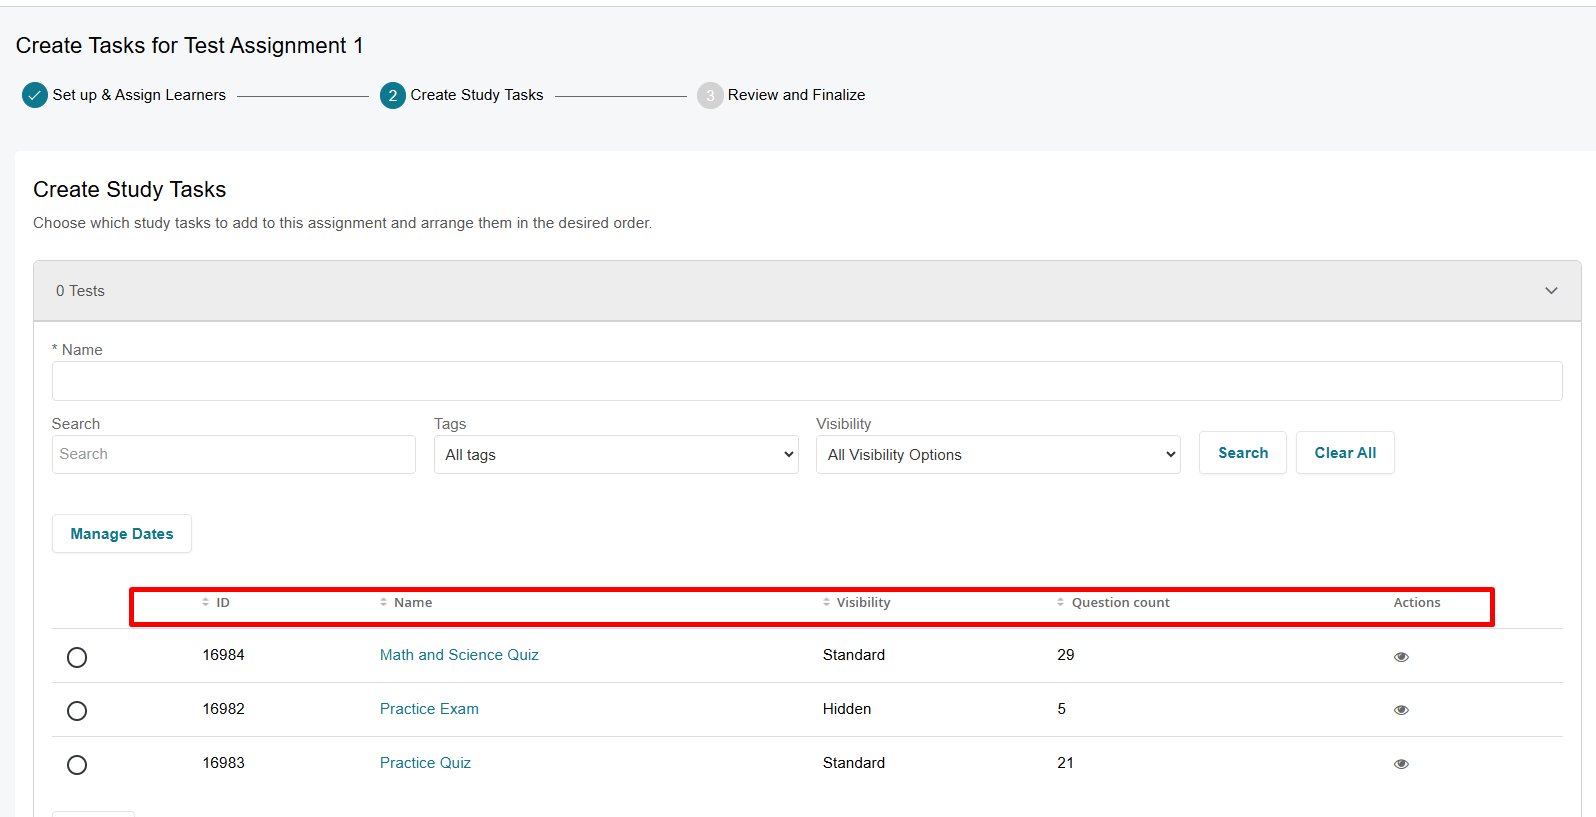
- On the Create Study Tasks page, input the name of the Study Task. This will be visible to learners. Use the search options to filter/narrow your search to locate the exam you are looking for.
- All exams available in the course will be listed, displaying:
- Exam ID
- Exam Name
- Visibility (hidden or standard - the column will be shown if at least 1 exam is hidden)
- Question Count
- Actions - Click on the eye icon to see the details of the exam; the introduction, question count and test settings.
- All exams available in the course will be listed, displaying:
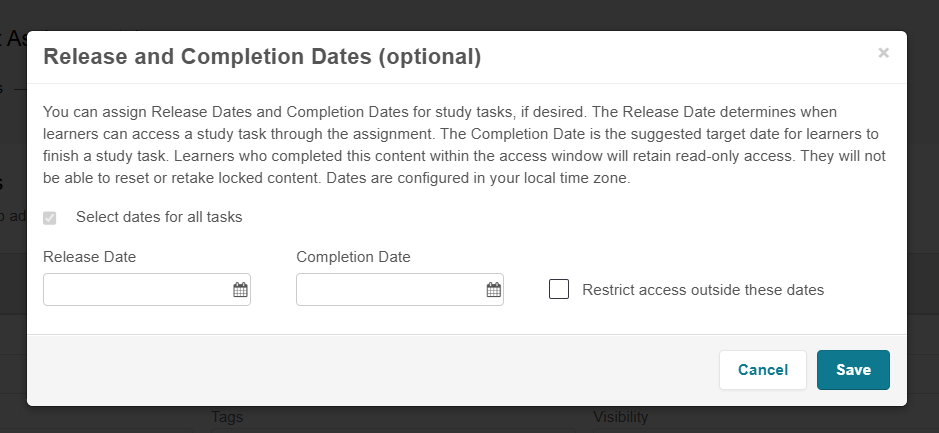
- Click Manage Dates to set the release and completion dates - the timeframe in which you want the exam to be available for the selected learners. Select Restrict access outside these dates to lock the assignment task.
- Select Next to continue. Review the next page and click Assign to assign the assignment.
Learners assigned to this Assignment Task will see different behavior depending on the assignment’s access dates and locking settings. The sections below describe how the exam appears and behaves for learners before, during, and after the assigned access window.
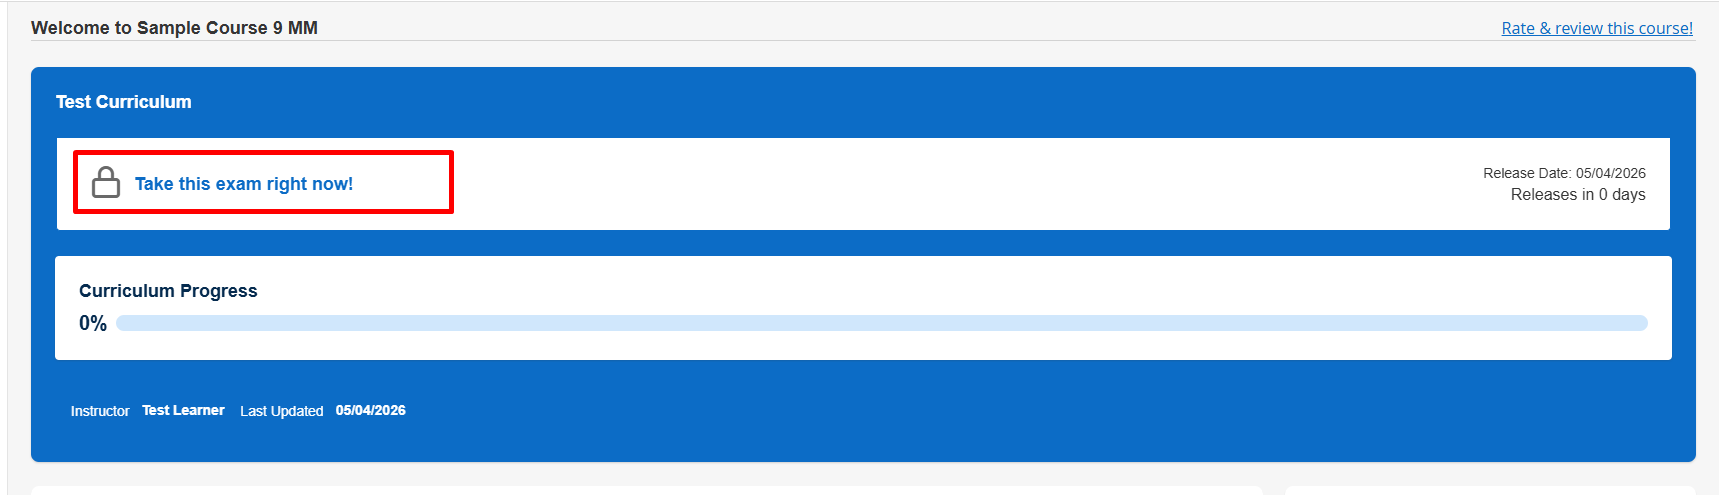
Before the Release Date
- The exam will be visible but locked
- It will appear as a locked task in the assignment tab and on the Exam page
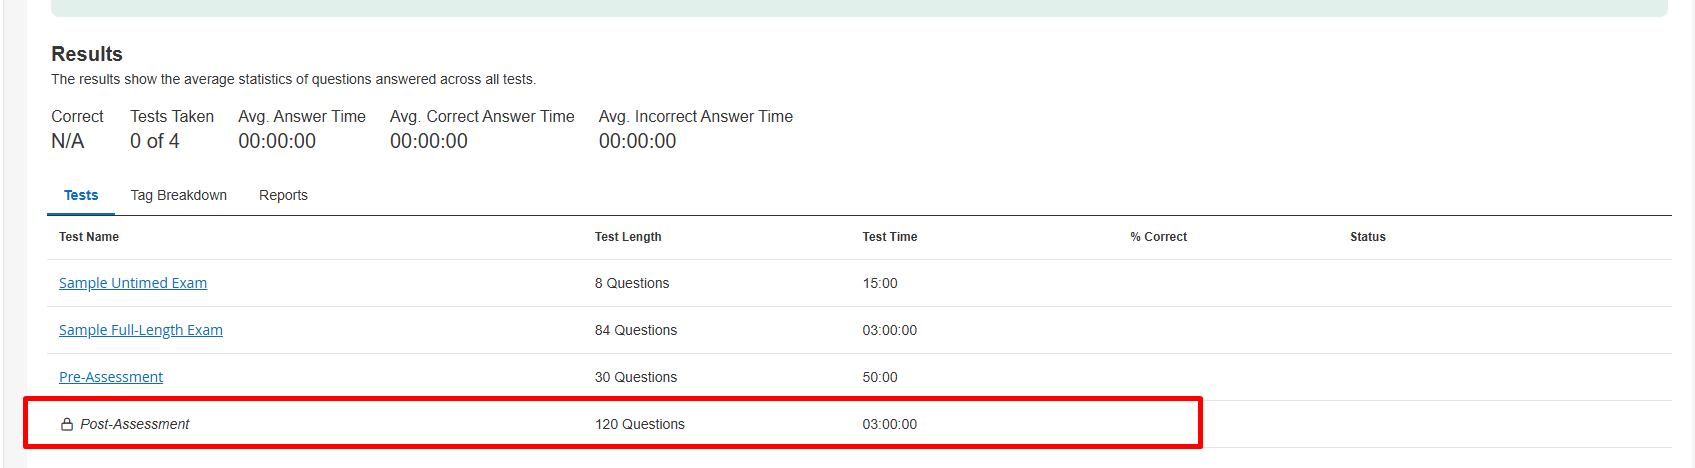
Optionally, administrators can hide the assignment tab from learners by turning off the Assignment Tab Visibility feature access. When disabled, the assignment tab will not appear in the learner experience.
Between the Release and Completion Dates
- The exam will be available to take
- Learners can access, complete, and (if applicable) reset the exam within this window
After the Completion Date
Learner experience depends on whether the exam was completed:
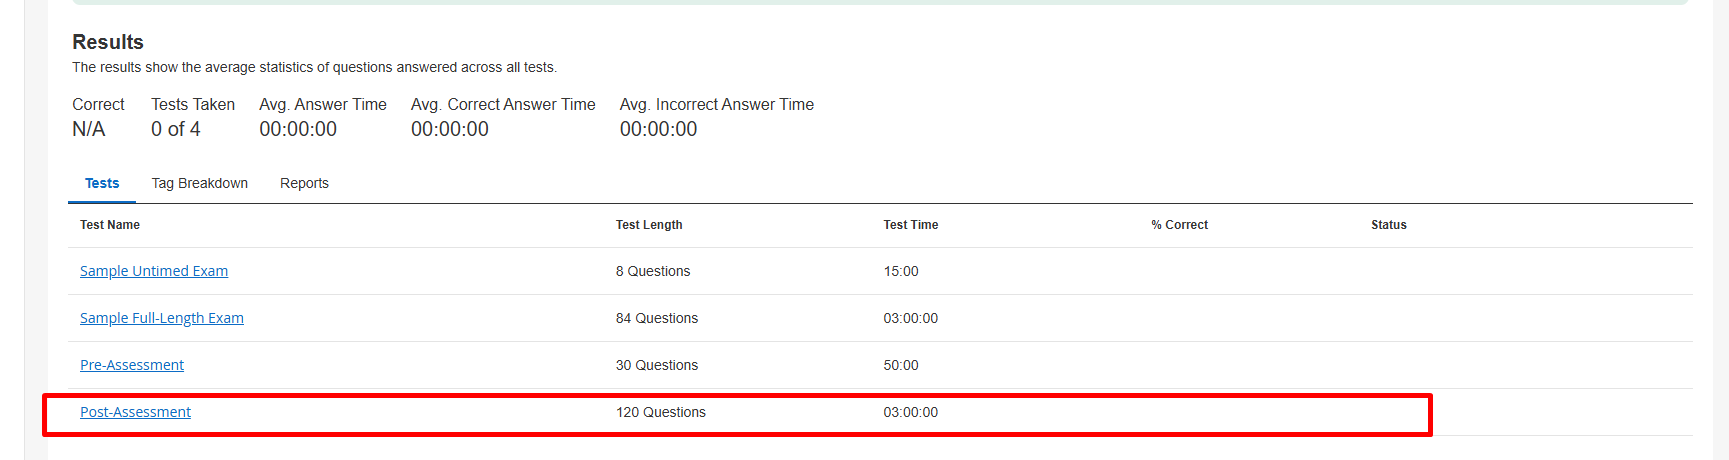
If the learner did not complete the exam:
- The exam will appear locked
- The learner cannot access or attempt the exam
If the learner completed the exam during the access window:
- The exam will remain available in read-only mode
- The learner can review their results
- The learner cannot reset or retake the exam
Scenario 2
Releasing Content at a Specific Time
In this scenario, an exam is visible to learners in the course but locked until a specific date and time. While learners can see the exam in advance, they are unable to access or begin it until it is unlocked.
This approach is useful when you want learners to be aware of upcoming assessments while still controlling when they can interact with them. It supports structured learning schedules without removing visibility of the content.
How it works:
- Follow Step 2: Creating a assignment Task from Scenario 1 above
- Set Release and Completion Dates
- Enable Lock outside these dates
- You do not have to mark the exam as hidden
The key difference from Scenario 1 is that the exam remains visible to learners prior to the release date
Additional Ways to Use assignment Tasks and Hidden Content
While the scenarios above focus on common exam configurations, the same functionality can be applied more broadly across your course content.
assignment Tasks allow you to assign lessons, practice questions, flashcards, and exams to specific learners or groups, enabling more flexible and targeted learning experiences. When combined with hidden content and scheduled access, this opens up additional use cases beyond standard course delivery.
For example, you can:
- Assign supplemental or remedial content to specific learners without affecting others
- Deliver instructor-led assignments alongside self-paced study within the same course
- Pre-load content into a course and release it gradually over time
- Provide make-up or advanced exams to select learners or cohorts
Editing an Assignment Task
To edit a assignment follow these steps:
- In BluePrint, click on Assignments on the left-hand side.
- Locate the assignment task you would like to edit under My Assignments or Shared Assignments tab.
- Select the pencil icon next to the assignment you’d like to work with or click on the assignment name and click on the Edit button. NOTE: If you don't see the pencil icon under the Action(s) column under Shared assignments the assignment creator did not grant you the ability to edit this assignment.
- The editing process will take you through all three original assignment task creation steps - navigate to the page you would like to edit by selecting the appropriate step in the creation process.
- On the Set Up & Assign Learners page, edit the assignment’s name or description, add/remove learners from the assignment task and modify assignment access. You will not be able to change the course the assignment is part of or update the Role Scope Context.
- On the Create Study Tasks page, add new content items if desired, click on the existing task to edit its components. Click Next. On the Review & Finalize step, review your changes and select Update to update the assignment task.

