
 1649
1649
Tags must first be set up in Console before they can be assigned to your content. To manage tags, you will need to be an admin or have a custom role assigned with the permissions Create:Tags, Read:Tags, Update:Tags, and Delete:Tags.
Before You Get Started
Before creating your tags in Console, you’ll need to determine what kind of tags you want to create and how you want to set up their hierarchy. Tags will consist of three different levels as shown below:
- Categories - These are top-level groupings used to organize your content at a broad thematic level. These are not tags and cannot be assigned to content.
- Parent Tags - Tags that sit under categories and represent a more specific topic, theme, or dimension, often with an added attribute like difficulty, topic type, or learner level.
- Child Tags (optional) - Tags that are even more granular labels that nest under parent tags. They often include specific sections within a topic, or content elements, and may also include metadata like difficulty. Child tags will inherit configurations set for their parent tags.
- Parent Tags - Tags that sit under categories and represent a more specific topic, theme, or dimension, often with an added attribute like difficulty, topic type, or learner level.
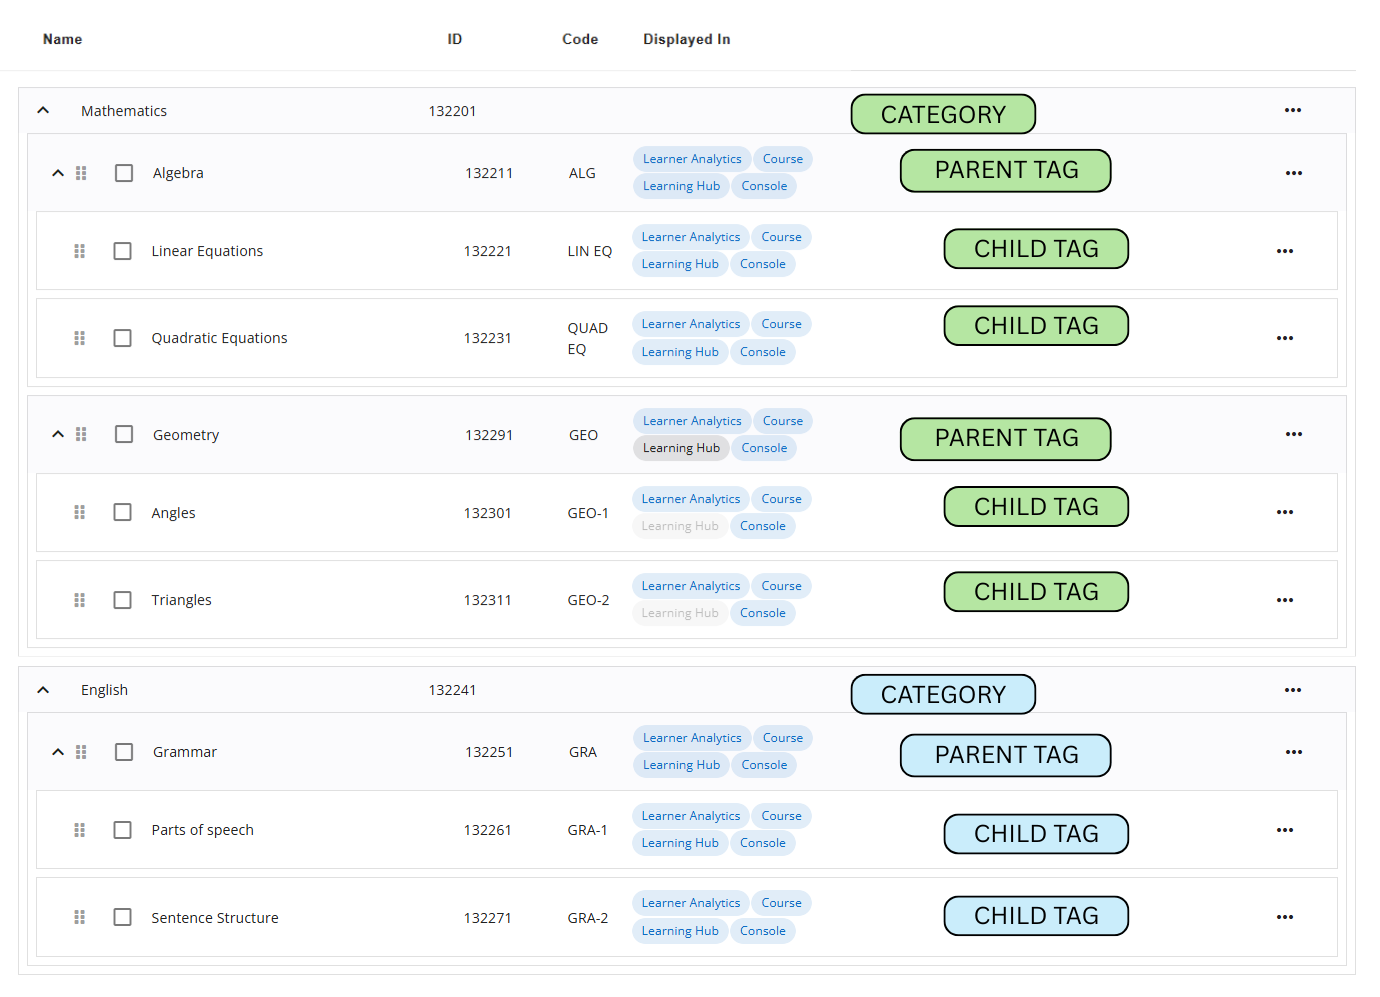
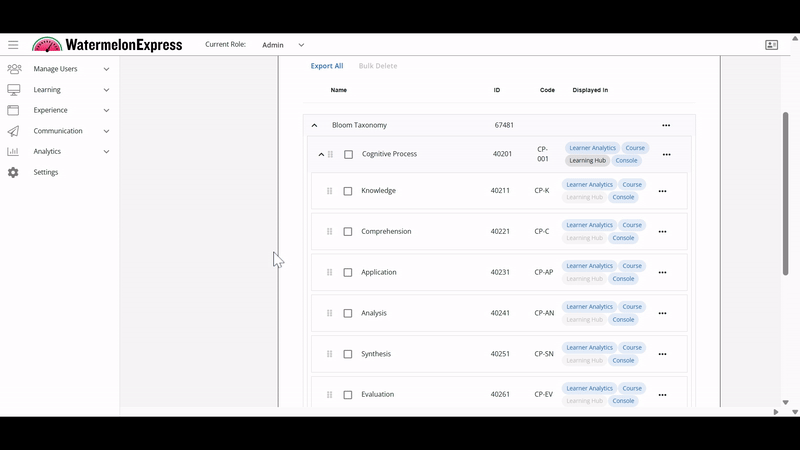
Below is an example of how tags can be set up using categories, parent tags, and child tags:
- Mathematics
- Algebra
- Linear Equations
- Quadratic Equations
- Geometry
- Angles
- Triangles
- Algebra
- English
- Grammar
- Parts of speech
- Sentence structure
- Grammar
You'll also want to think about how your tags will be used or where you want your tags to be displayed. For parent and child tags, they can be configured to display as a filter to learners within Learner Analytics, as a filter in Learning Hub, in WebApp within the course, and/or as tags that can be assigned to users within Console.
Best Practices
- Examine your course content and determine what kind of tags would be most beneficial to you. Would you like to track your content by question or lesson categories? What about skills or competencies?
- Tags can be used across your tenant and not just for a specific course. So if your courses have similar content, you’ll want to use tags that can be used for all of them.
- Will your tags mainly be for admins, learner-facing, or both? For instance, if your tags will be learner-facing and you intend to use them as filters within Learner Analytics, you'll want to create tags that will help your learners understand how they’re doing in different areas of your courses.
Once you know what kind of tags you’d like to create, you can add them individually in Console or bulk import them with a CSV file. If you already have tags created, you can still make updates to them, or assign them to your course content in BluePrint. To assign tags in BluePrint, the Tags feature access will need to be enabled at the tenant and course-level. Use the table below to find the scenario that best applies to you and see what next steps to take.
| Scenarios | Next Steps |
|---|---|
| Scenario 1: You already have tags, and all of your content is tagged. | You’re all set! You’ll still be able to manage your tags from Console and what content is tagged from BluePrint. |
| Scenario 2: You already have tags, but your content is not yet tagged. |
Option 1: You can bulk assign tags to your content. See our article here for more info.
If you’d like assistance with tagging content, please contact Support. |
|
Option 2: BenchPrep will leverage our AI engine to analyze your existing content and recommend the most relevant tags. Then, these tags can be bulk assigned to your content. Currently, only lesson and question content can be analyzed by the AI engine.
If you’re interested, please contact Support for assistance. |
|
| Scenario 3: You don’t have tags, but you know which specific tags you want. |
You can create your tags individually or bulk import them in Console. The sections below will cover how to create your tags.
Then once your tags are set up, you can assign them to your content. See our article here for more info on assigning tags.
If you’d like assistance with tagging content, please contact Support. |
| Scenario 4: You don’t have tags, and you don’t know which tags you want. |
BenchPrep can convert your question categories and lesson categories into tags and then automatically tag your content.
If you’re interested, please contact Support for assistance. |
Recap:
- The tags hierarchy consists of categories, parent tags, and child tags.
- Tags can be configured to display as a filter in Learner Analytics, as a filter in Learning Hub, within a course in WebApp, and/or for users in Console.
- Tags can be added individually or bulk imported in Console.
- Once your tags are created, assign them to your content in BluePrint or to users in Console. If assigning to content, make sure the Tags feature access is enabled.
Adding a Tag
To add a tag, follow these steps:
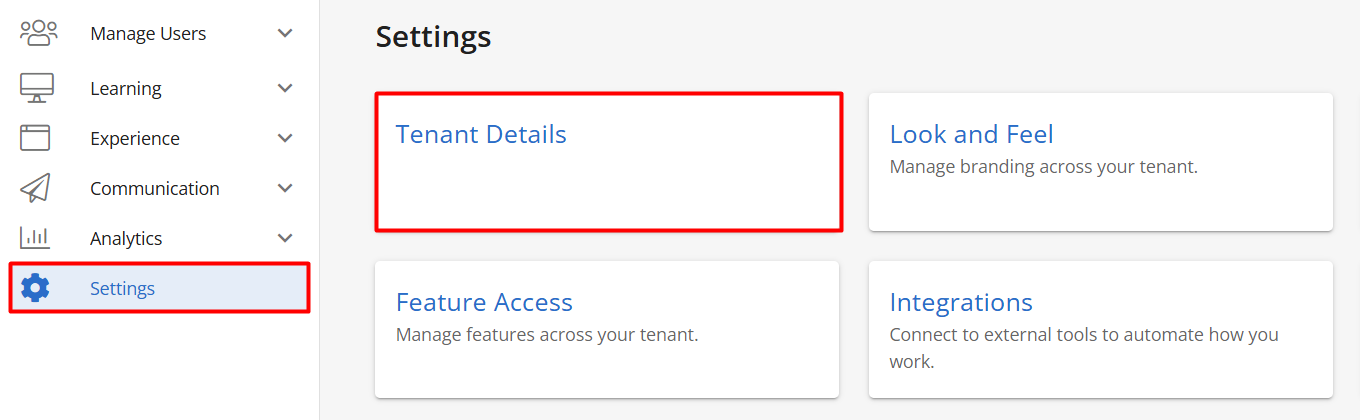
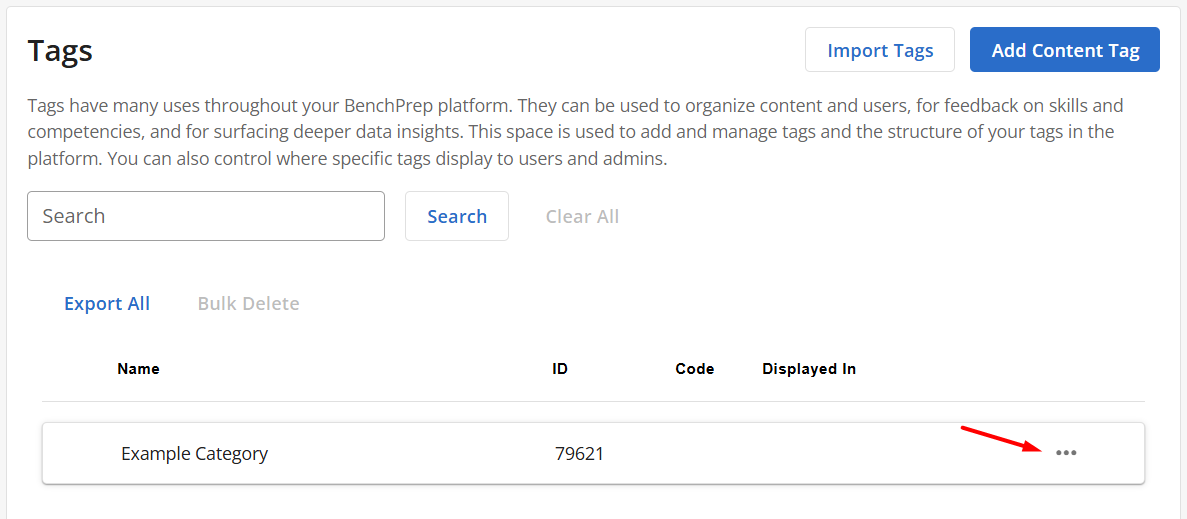
- Navigate to Console, click on Settings, and then Tenant Details.
- Click on the Content Tags tab.
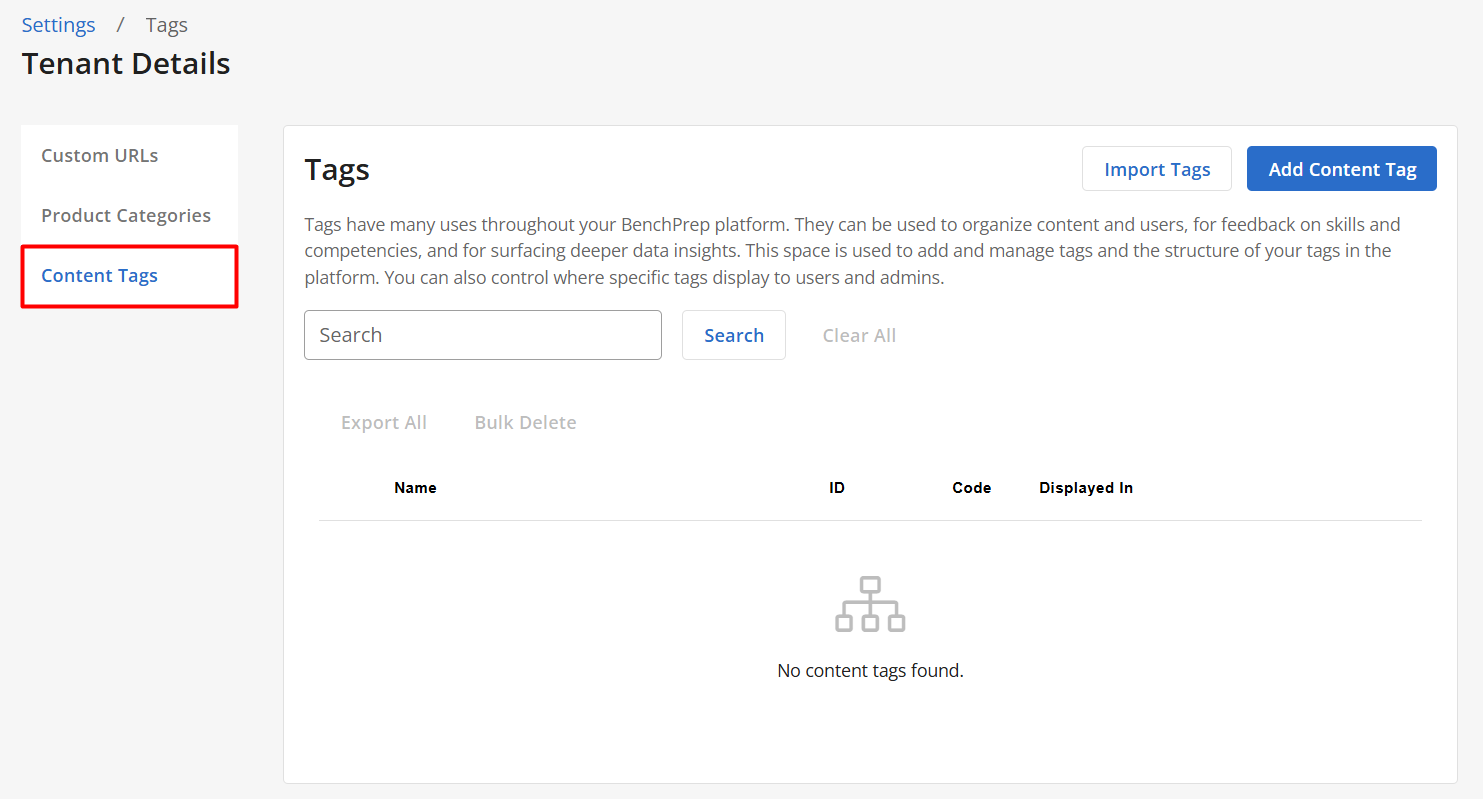
- Click on Add Content Tag.

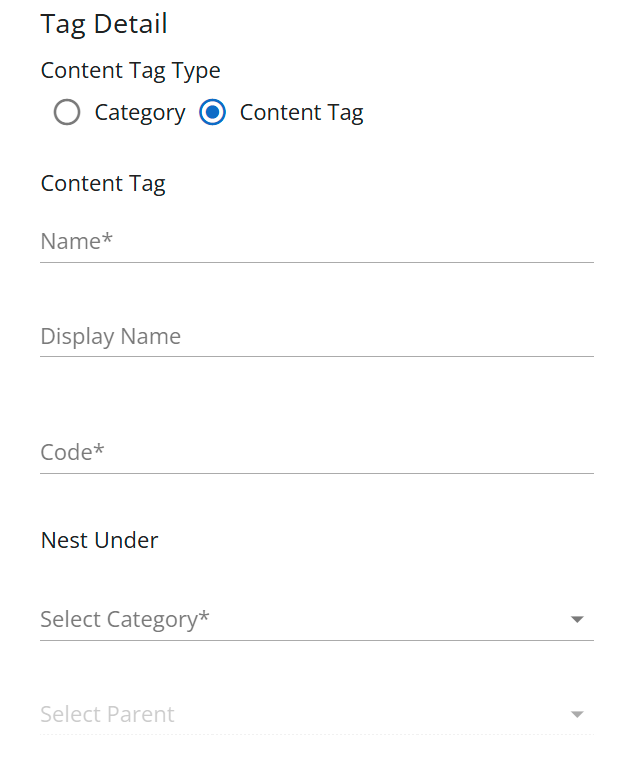
- Select a Content Tag type.
NOTE: If you do not have any categories yet, they will need to be created first before you can create content tags. - To create a Category, input a Category Name and click Save.
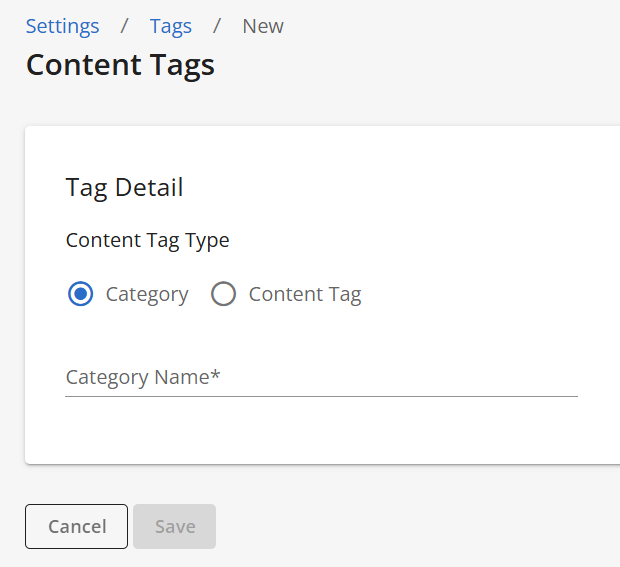
-
To create a Content Tag
- Click the Content Tag radio button.
- Input a Name for your Tag.
- (Optional) Enter a Display Name for your tag. This name will appear to users in Learner Analytics and Content Tag Filters within the Learning Hub. If no Display Name is provided, the system will default to using the text from the Name field. Providing a Display Name is recommended when the Name field contains longer text.
- Input a code for your content tag. The code can be used as an abbreviation of your tag or a way for you to easily identify your tag (e.g. Code for Algebra can be ALG).
- Select a category to nest the tag under.
- Select a parent (optional).
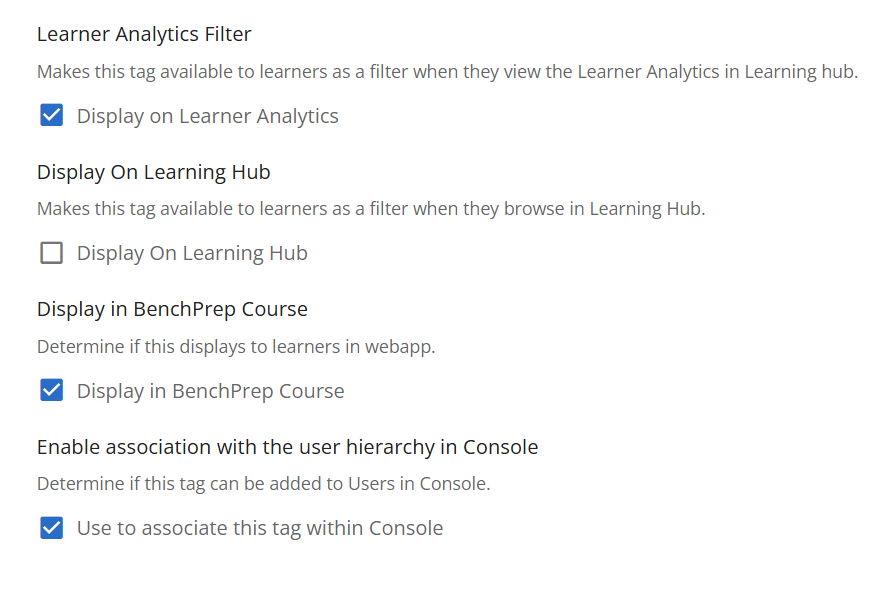
- Select the following option(s) based on where the tag should be displayed:
- Display on Learner Analytics - Makes this tag available to learners as a filter when they view the Learner Analytics in Learning Hub and displays in Percentage Correct by Tag and Areas to Focus charts.
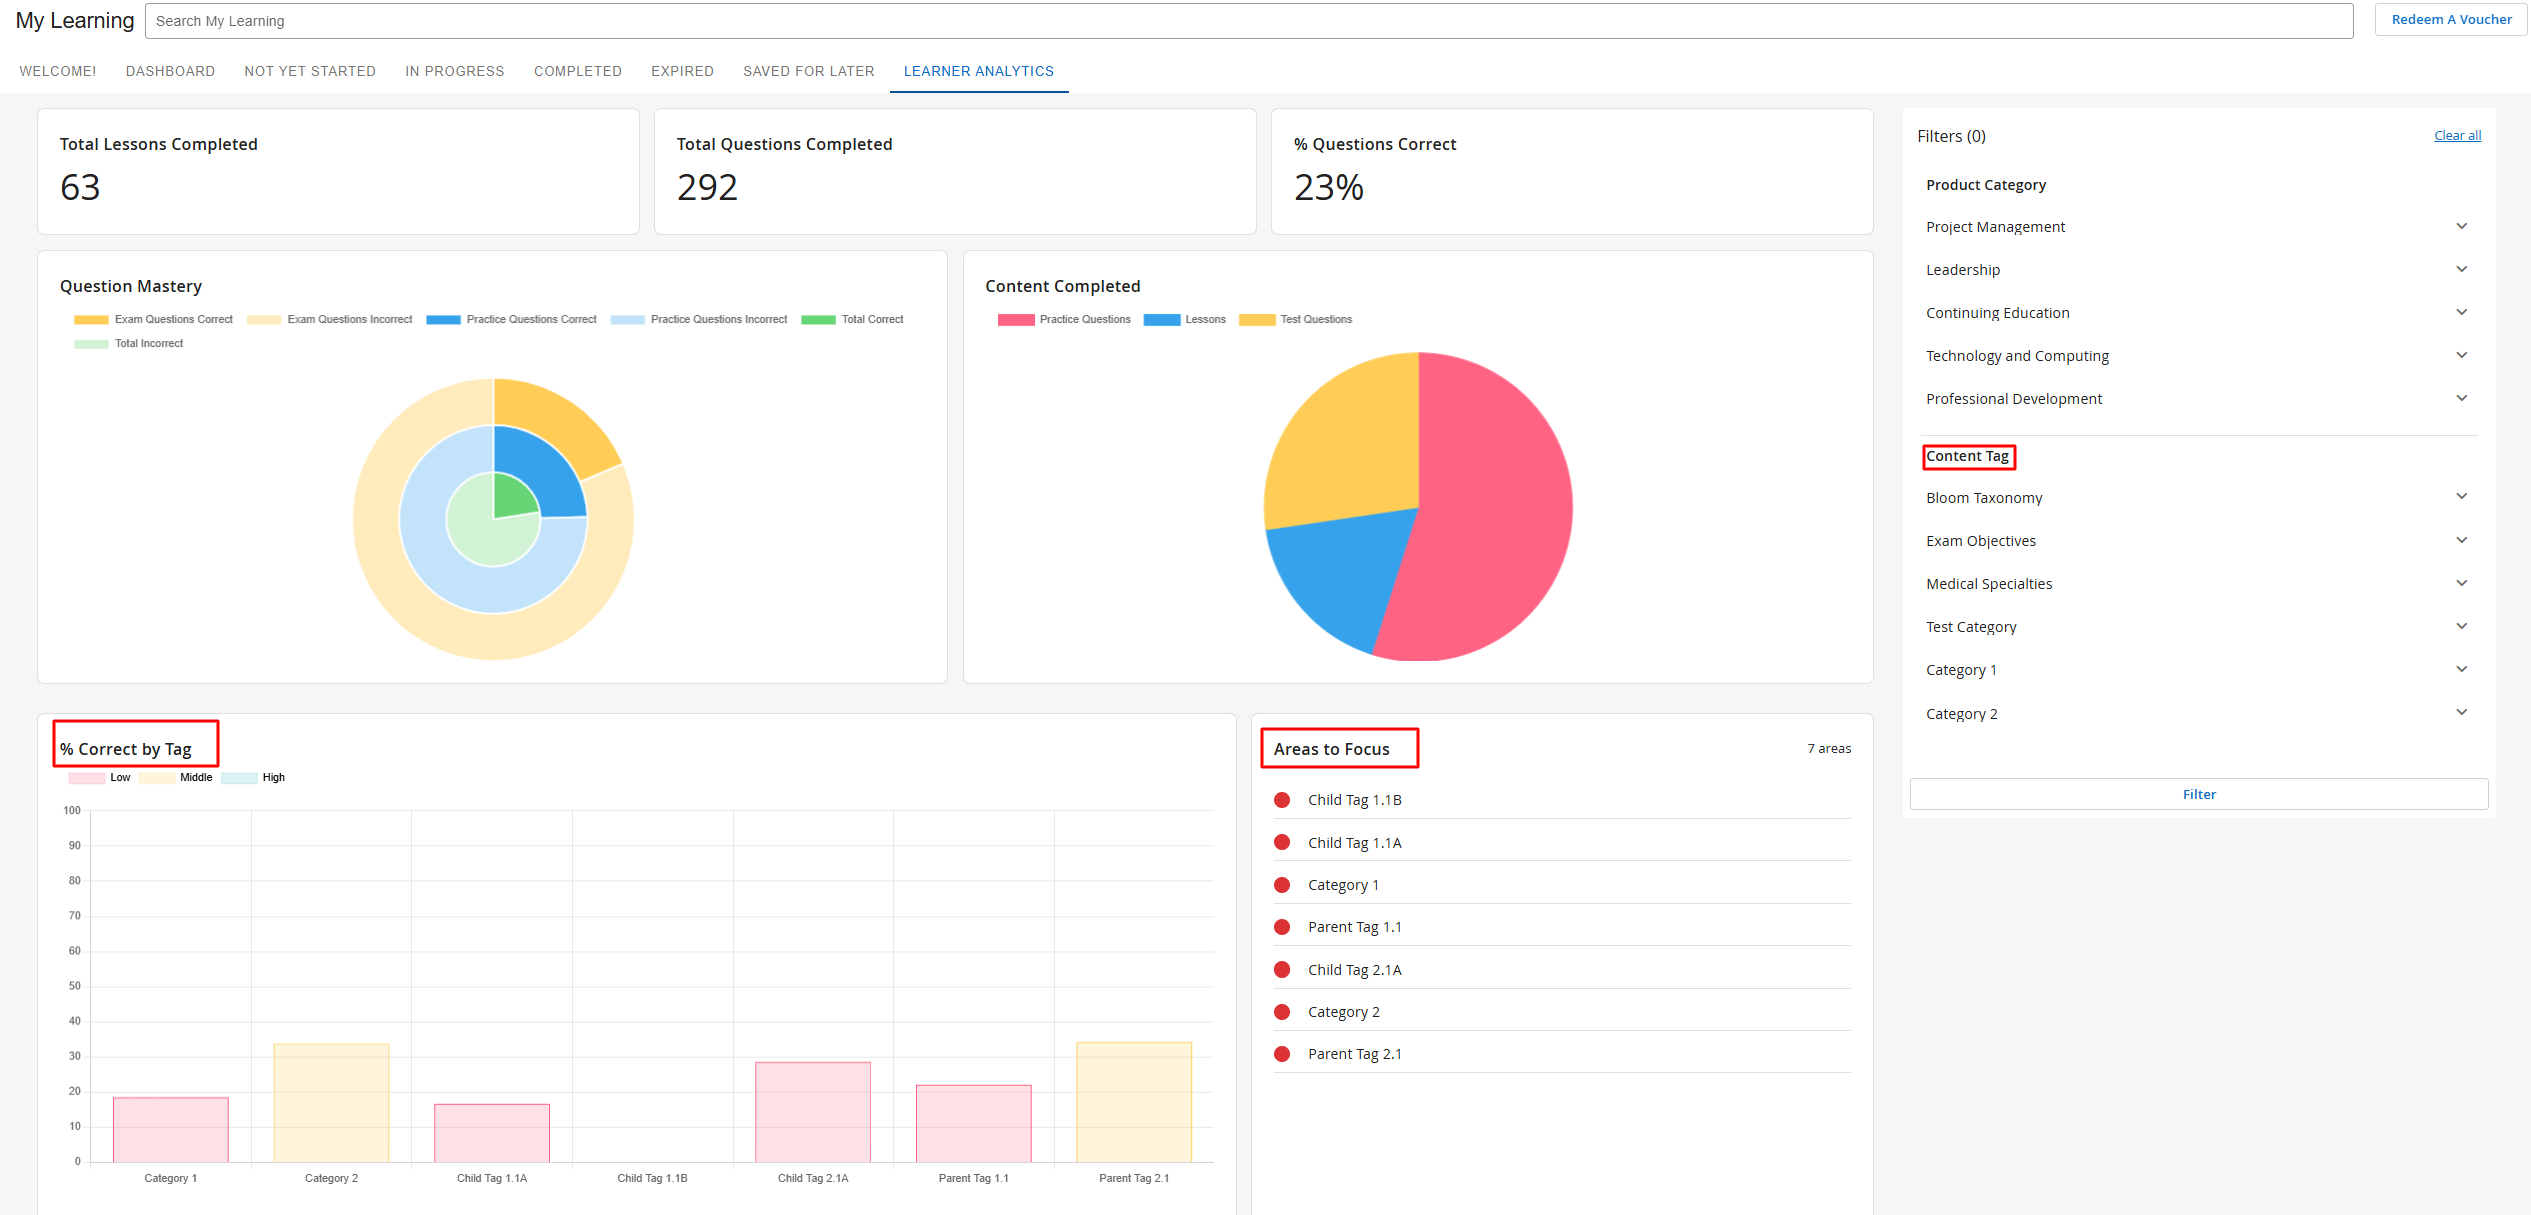
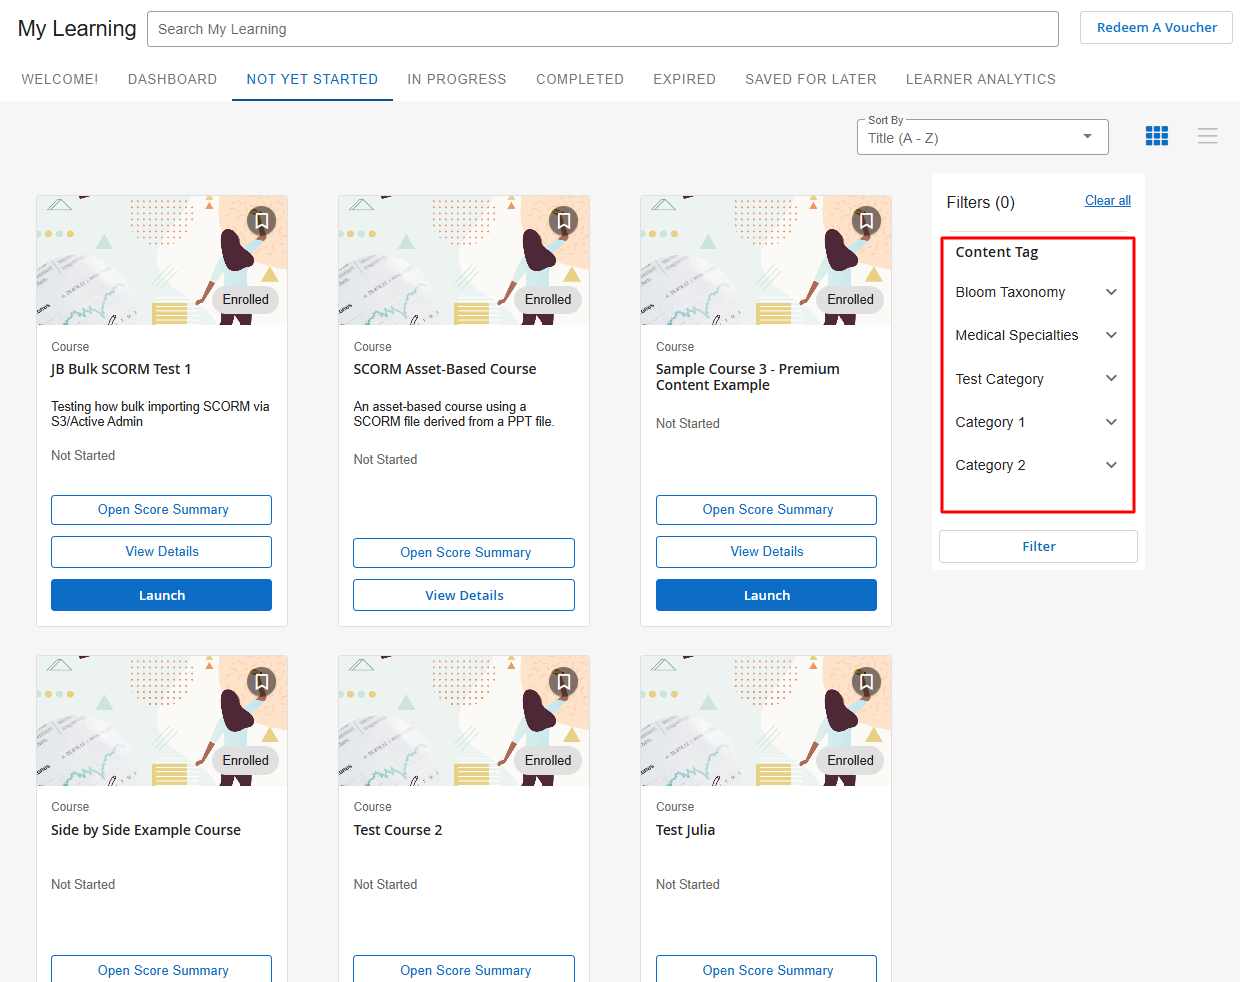
- Display On Learning Hub - Makes this tag available to learners as a filter when they browse in the Learning Hub. Filtering by this tag will show all courses that have content with this tag.
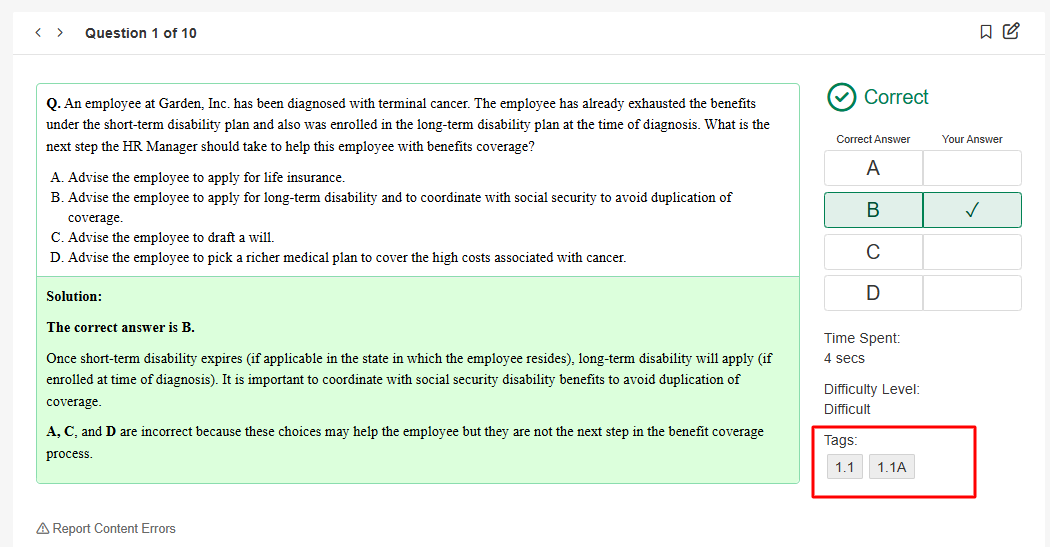
- Display in BenchPrep Course - Displays this tag to learners in WebApp on content that has the tag assigned.
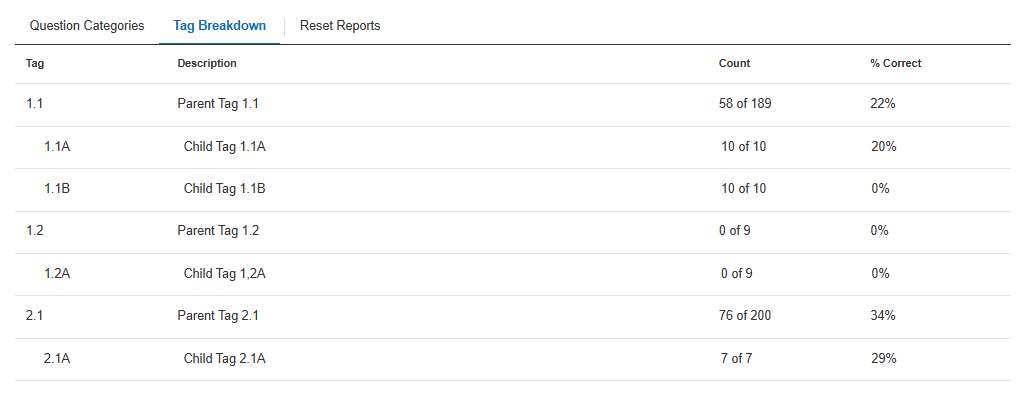
NOTE: This is currently only applicable to questions. When reviewing questions or viewing the Tags Breakdown section, any tags that are assigned will display here.
- Use to associate this tag within Console - Enables this tag to be added to users in Console.
NOTE: If you selected a parent, the display options cannot be edited directly for child tags. The parent tag’s display options will need to be updated.
- Display on Learner Analytics - Makes this tag available to learners as a filter when they view the Learner Analytics in Learning Hub and displays in Percentage Correct by Tag and Areas to Focus charts.
- Click on Save.
Adding a Parent Tag
To quickly add a parent tag under a category, follow the steps below. You can also create a parent tag by following the steps in the section above.
- Click on the ellipsis next to the category you’d like to add a parent tag under.
- Click on Add a Tag Below.
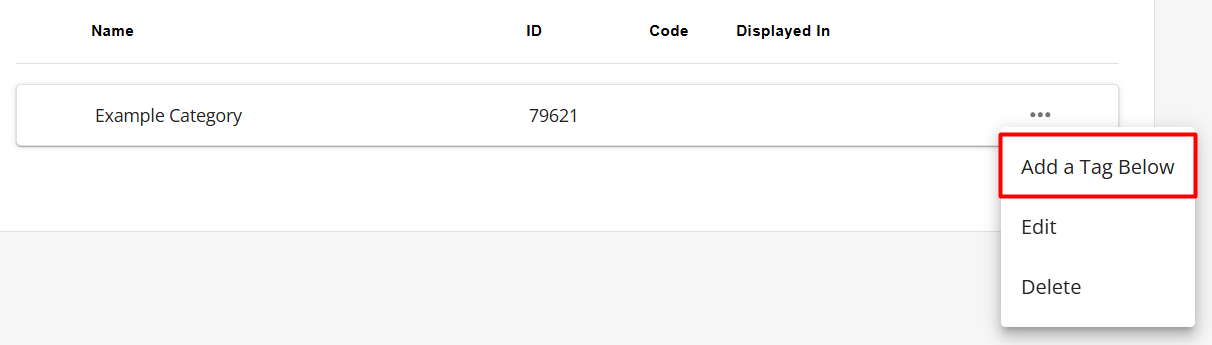
- Input a name and code. Code can be used as an abbreviation of your tag or a way for you to easily identify your tag (e.g. Code for Algebra can be ALG).

- Click on Save.
Bulk Importing Tags
If you’d like to bulk import your tags versus creating them individually, follow these steps:
- Navigate to Console, click on Settings, and then Tenant Details.
- Click on the Content Tags tab.
- Click on Import Tags.

- Upload your CSV file. Click on See upload instructions to see what columns need to be included and download a template.
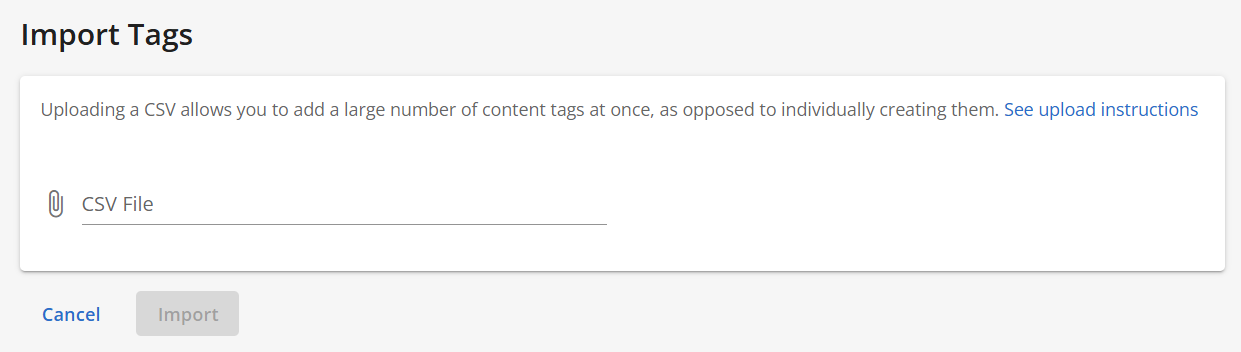
- Click on Import.
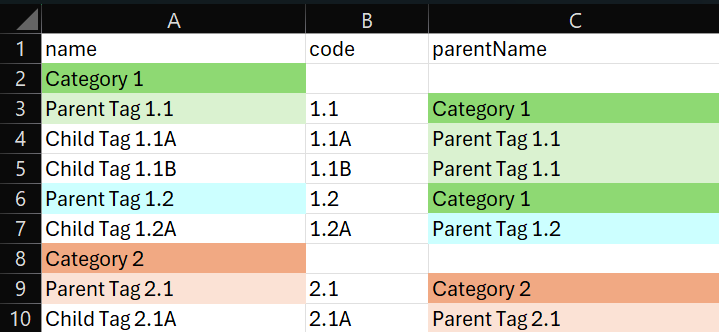
Formatting Your Tag Import CSV
- To add a new Category (not yet created in Console):
- Enter the Category name in the name column
- Leave all other cells in that row blank
- To add a Parent Tag:
- Enter the new Parent Tag name in the name column
- In the same row, in the parentName column, enter the Category this Parent Tag should belong to
- To add a Child Tag:
- Enter the Child Tag name in the name column
- In the same row, in the parentName column, enter the Parent Tag it should belong to
- If the Category or Parent tag you are nesting a tag within already exists in Console, you don't need to include the Category or Parent tag in the name column. The name column should only include new categories or tags being created.
Below is an example of the name, code, and parentName columns in the tag import spreadsheet, color-coded to illustrate the relationships and hierarchy between tags.
Note: If the Display in BenchPrep Course option is enabled for a tag, the text in the code and name columns are displayed to users in the Tag Breakdown and Question Review. Likewise, the text in the code and name columns will display to users in Learning Hub in Filters and Learner Analytics if the Display On Learning Hub option is enabled for a tag. If a Display Name is included in the displayName column, users will see this on the Learner Dashboard instead of the text in the name column.
Editing a Tag
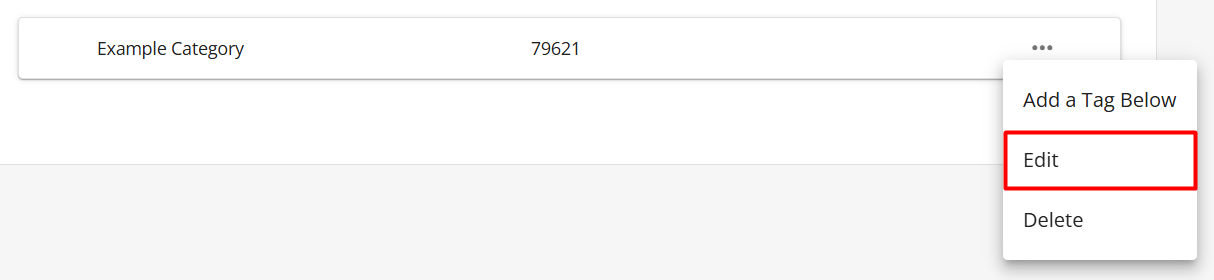
To edit a tag, follow these steps:
- Navigate to Console, click on Settings, and then Tenant Details.
- Click on the Content Tags tab.
- Click on the ellipsis next to the tag you’d like to edit.
- Click on Edit.
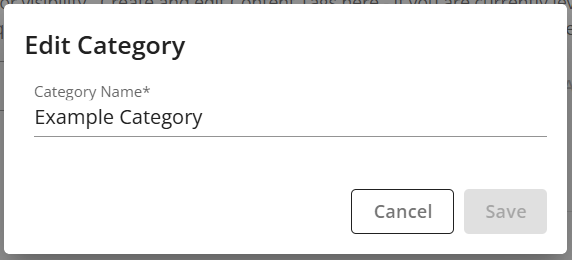
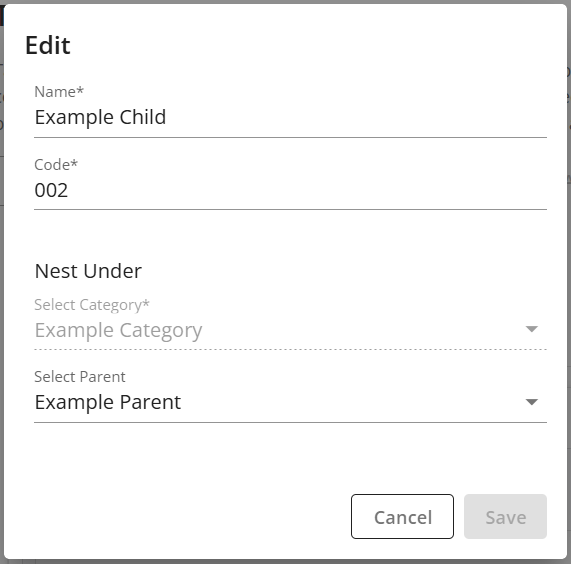
- Depending on the type of tag, you’ll be able to edit the following:
- Category - Edit the category’s name, and click on Save.
- Parent Tag - Edit the tag’s name, code, and/or category. Click on Save.
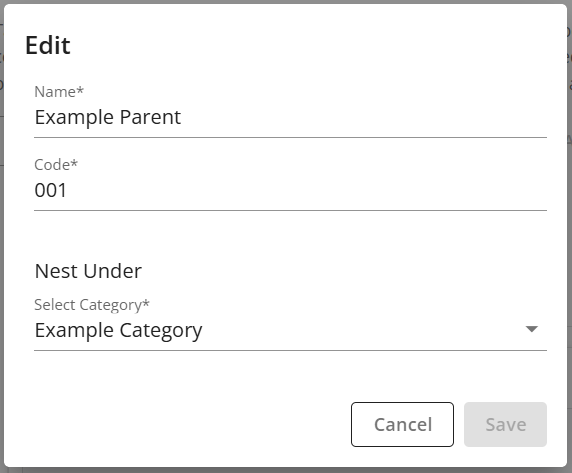
- Child Tag - Edit the tag’s name, code, and/or parent. Click on Save.
- For parent and child tags, the display options Learner Analytics, Course, Learning Hub, and Console will appear next to each tag. To enable or disable where a tag should display, click on the appropriate option(s).
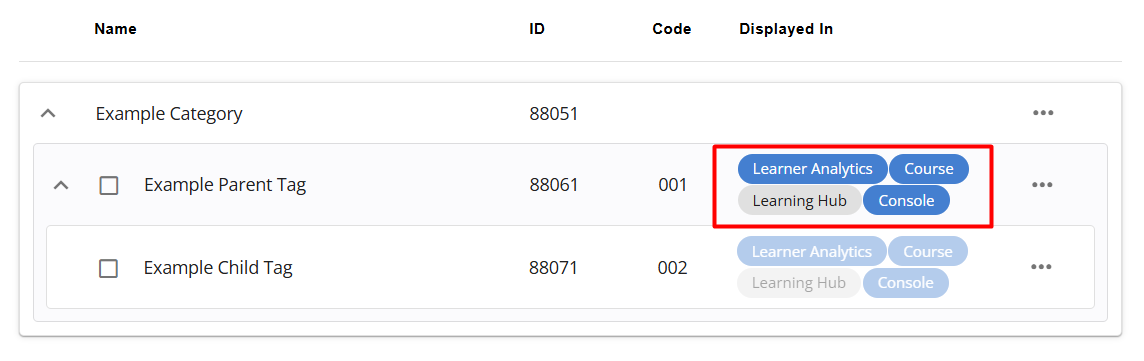
NOTE: The display options cannot be edited directly for child tags. The parent tag must be updated to change the display of its child tag.
- Category - Edit the category’s name, and click on Save.
Reordering Tags
You can rearrange tags by dragging and dropping them. The order of the tags will be reflected in Learning Hub. When rearranging tags keep in mind:
- You can:
- Drag and drop a child tag to a different parent
- Drag and drop a parent tag under a different category
- Drag and drop a child tag directly onto a parent tag
- You can’t:
- Drag and drop a category
- Drag and drop a parent tag under a child tag
- Drag and drop a child tag under a category without its parent
Deleting a Tag
To delete a tag, follow these steps:
- Navigate to Console, click on Settings, and then Tenant Details.
- Click on the Content Tags tab.
- Click on the ellipsis next to the tag you’d like to delete.
- Click on Delete.
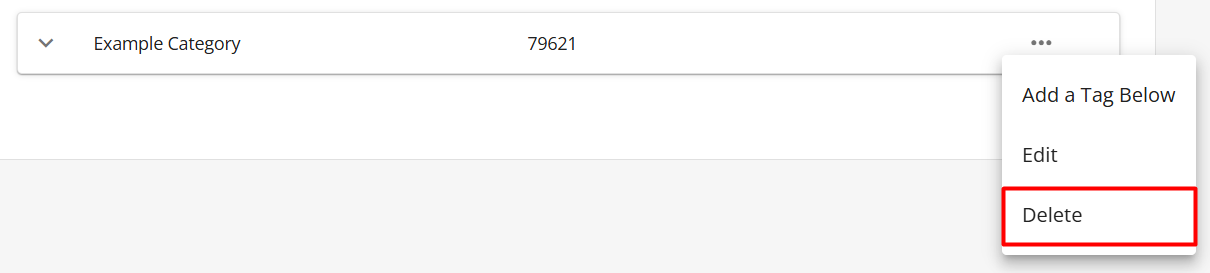
- Click on Delete to confirm.
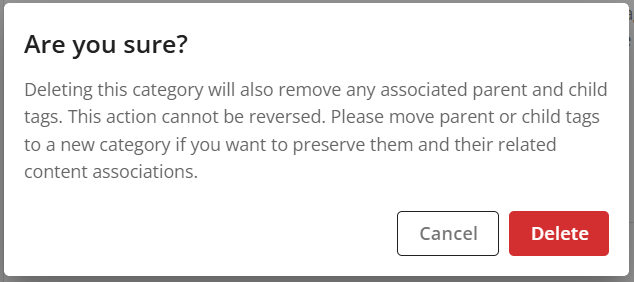
NOTE: Deleting a category will remove any associated parent and child tags. Deleting a parent tag will also remove any associated child tags. This action cannot be reversed. Please move any parent and/or child tags if you want to preserve them and their related content associations.
Bulk Deleting Tags
To bulk delete tags, follow these steps:
- Navigate to Console, click on Settings, and then Tenant Details.
- Click on the Content Tags tab.
- Next to the tags you’d like to delete, select the checkbox. If a parent tag is selected, all of its child tags will automatically be selected. Click on Bulk Delete.
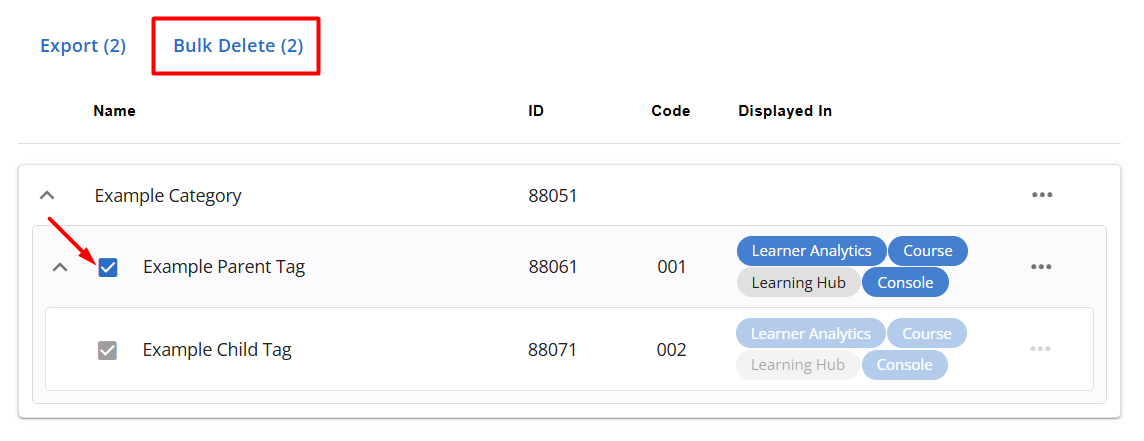
- Click on Delete to confirm.
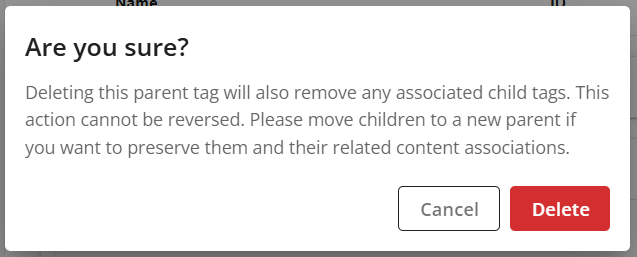
NOTE: Deleting a parent tag will also remove any associated child tags. This action cannot be reversed. Please move any child tags if you want to preserve them and their related content associations.

