


Understanding Test Types
BluePrint supports two types of tests: Full Length Tests (timed) and Standard Tests (untimed). Standard Tests, sometimes referred to as Mini Tests, are the default test type. To create a Full Length Test, enable the Full Length checkbox when configuring the test.

|
Full Length Test |
|
|
Standard Test |
|
Creating a Tests
To create a new test in BluePrint, follow these steps:
- In BluePrint, navigate to the course where you want to create a test.
- From the left navigation menu, select Tests.
- Click New Test in the upper-right corner.
- Enter a Name for the test.
- Optionally, enter an Introduction to provide instructions or other information learners should review before beginning the test.
- Determine whether you want to create a Full Length Test (timed) or a Standard Test (untimed).
For more information about the available test settings and how they affect the learner experience, refer to the Test Configuration Options section below.
Creating a Standard Test
To create a new test in BluePrint, follow these steps:
- Leave the Full Length checkbox unchecked.
- Select the Testing Tools you want to make available to learners during the test.
- Configure the Answer Explanation setting.
- Select the appropriate Exam Reset Limit.
- Optionally, add any additional Tags to the test.
- Click Create to save the test.
Adding Questions to a Standard Test
After creating a Standard Test, you can create new questions, import questions, or add existing course questions to the test.
Creating or Importing Questions
- On the Test Details page, locate the Questions section.
- Click 0 Questions to access the test's questions.
- From here, you can create new questions or import questions into the test.
Adding Existing Questions
To add questions that already exist in the course, follow these steps:
- From the left navigation menu in BluePrint, select Questions.
- Select the questions you want to add to the test.
- Click Batch Edit.
- From the Test dropdown, select the test you want to assign the questions to.
- Click Save to apply the changes.
Creating a Full Length Test
To configure a Full Length Test, continue with the following steps:
- Select the Full Length checkbox to designate the test as a timed, full-length test.
- Configure the available test settings, including testing tools, answer explanations, exam reset limits, and additional tags, as applicable.
- Add at least one Test Section and assign at least one question to each section.
- Configure the time allotted for each section and optionally add timed breaks between sections.
- Save the test once all required sections and questions have been configured.
- Note: Full Length Tests must contain at least one test section, and each section must contain at least one question. You can configure multiple sections with individual time limits and optional timed breaks.

Adding Questions to a Full Length Test
Full Length Tests use a Question Picker to assign existing course questions to individual test sections. Each test section must contain at least one question.
To add questions to a Full Length Test, follow these steps:
- In the Test Sections area, add a new section.
- Enter the section name and configure the time allotted.
- Locate the Question Picker, which displays available questions on the left and Chosen Items on the right.
- Select the questions you want to include from the available questions list.
- Click the right arrow to move the selected questions to Chosen Items.
- To add all available questions at once, click the double right arrow. You can then use the left arrow to remove any questions you do not want to include.
- Repeat these steps for any additional test sections.
- Optionally, add timed breaks between sections.
- Save the test once at least one question has been assigned to each section.
- Note: When adding a large number of questions, it may be quicker to move all available questions to Chosen Items using the double arrow, then remove any unnecessary questions using the left arrow.
- You must assign at least one question to each test section before the test can be saved.
Test Configuration Options
|
Section |
Description |
Considerations |
|||
|
Name and Introduction |
Type in the test name. Include test instructions under Introduction. |
This is the first page a learner will see in the test so make sure it’s descriptive and clear to the learner.
NOTE: If the introduction is left blank for an untimed test, learners will not see this page. If the introduction is left blank for a timed test, this page will still appear. |
|||
|
Full Length Checkbox |
Remember to check this box if you are creating a timed test. |
N/A |
|||
|
Testing Tools |
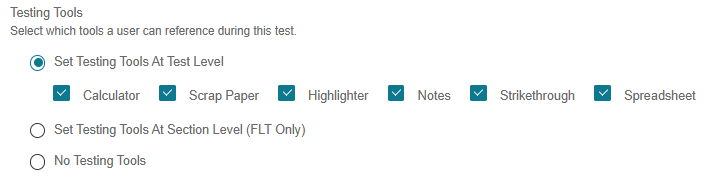
Select which tools a user can reference during this test and in review modal. Note: Notes are always available in review modal.
|
Selecting Add Testing Tools allows you to indicate specific test tools (calculator, scrap paper, highlighter, notes, strikethrough, spreadsheet) you would like to make available to learners during a test.
You can set these at the Test Level or the Section Level. This comes in handy If your test contains, say, one section that needs a calculator and another that does not allow calculators. |
|||
 |
|||||
|
Test Sections |
Within test sections you can add a name, introductions, time allotted, and questions. You can also add multiple sections to the test as well as breaks. |
The name of the section is visible to learners, so treat it as the official name of the test section.
This field does not accept HTML, so any special characters will need to be pasted in. |
|||
|
Breaks |
Breaks are a period of time allotted between test sections. They are not necessary for test creation, and completely optional for a user. |
You can add breaks between sections as they see fit.
A learner can decide to skip the break if they want during the testing experience. Specify the maximum time a learner should have to take a break (in minutes).
Do not add a break at the beginning or end of a Full-Length Test. |
|||
|
Adding Questions |
Use the arrows to add questions to your test. |
You must create questions first before you can add them to a test.
Depending on the number of questions you want to add, it may be quicker to send all of them over to Chosen Items using the double arrow and then using the single back arrow to remove the ones that do not belong in the section.
After the first section is created, you should save your work.
Best practice is to save frequently, but you will not be able to save this test until at least one question is assigned to each test section. |
|||
|
Time Accommodation Options |
Time Accommodation Options gives you the power to allow additional time multipliers you would like to make available for learners. This allows learners who have extended time accommodations to practice under the same conditions they will experience on test day. |
Once enabled, you can select any additional time multipliers you would like to make available to learners, specify custom time or choose an unlimited time option.
NOTE: Multiple options can be selected, to allow learners to choose from more options. |
|||
 |
|||||
|
Exam Reset Limit |
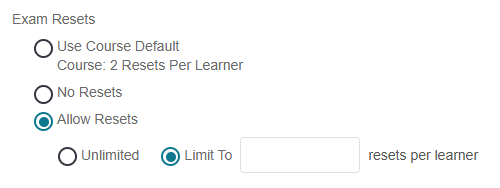
Set individual exam reset limits in BluePrint, allowing different exams to have varying numbers of permitted resets.
|
Exam-level reset limits override both course-level and branch-level reset limits. The Allow Exam Resets feature access does not need to be enabled to set a exam-level reset limit. See more about course and branch-level exam reset limits here.
Selecting Use Course Default applies the course-level or branch-level reset limit. If a branch-level limit is configured, it overrides the course-level limit.
Admins can grant individual learners additional resets through Console. These are added to the learner's remaining available resets.
The Reset All Tests button is hidden when an exam-level, course-level, or branch-level reset limit is configured. Learners can still reset individual exams, subject to their available resets. |
|||
 |
|||||
Additional Resources:
- Review Feature Access: Practice Questions and Exams article to learn about Exam/Test feature accesses to help you configure a desired test experience for your learners!
- Check out ExamSim resources to learn how you can leverage realistic exam simulations to boost learner confidence, engagement, and performance.
- Explore Dynamic Exams section to configure a differentiated exam experience.

