
 7646
7646
Our Side By Side question display offers you more opportunities to engage with your learners by designing practice questions with a layout better suited for long passages. Additionally, Side by Side questions lets you customize the answer content for every possible answer.
Let's discuss how the Side by Side display is different from the traditional display, and then walk you through setting it up on your own courses.
Introduction to Side By Side Display
With BenchPrep's traditional question display, a multiple-choice question is created by putting the question and all possible answers into the "question content." The learner inputs their answer by choosing the corresponding letter button on the right. This can cause some issues in cases where there's a large passage, and it's placed directly over the question content. This causes content to be pushed farther down the page and creates an undesirable learning experience.
With the Side by Side question display, only the question itself is displayed on the left, while the individual answers are displayed on the right. See the images below to compare the two different experiences (passages have been excluded for clarity):
Additionally, with the traditional display, there is only one possible answer rationale. But what if you wanted different answer rationales, custom-written for each possible answer option? Side by Side display allows you to do this. Below is an example of a customized answer rationale:

Side by Side Question Types
Side by Side question display currently only supports the following question types:
- Multiple-Choice - One answer allowed
- Multiple-Choice - Multiple answers allowed
- Table Entry
More information about each question type can be found in our articles here.
For multiple-choice type questions, our examples above showcase what the question experience will look like for learners. However, for table entry type questions, this will vary based on whether or not a passage is included. If a table entry type question does not have a passage, the question content will be displayed on the left-hand side while the answer rationale will be displayed on the right.

If a table entry type question does include a passage, the passage will be displayed on the left-hand side while the question content and answer rationale will be displayed on the right.

Considerations
Before setting up a Side by Side course, review the following considerations:
- Not all question types are supported in Side by Side courses (i.e. numeric entry, drag and drop, etc.).
- A course's question display cannot be changed once it's created. So Side by Side courses cannot be changed to the traditional display.
- Question-Lesson Connections are not supported in Side by Side courses.
- We recommend replicating questions only between courses of the same type in order to preserve all question and answer content. Do not replicate questions between different course types, as this can result in the loss of rationale data. For example, if you need to replicate questions from another course into your Side by Side course (or vice versa), the source course should also be Side by Side. This is because Side by Side courses use answer rationales by answer choice, while standard courses only use a single, basic rationale.
Creating a Course with Side by Side Display
- Create a new course in BluePrint. See this article for more details.
- Select the Yes checkbox under the heading "Utilize Side by Side Question Display?"
NOTE: Once a course has been created using Side by Side display, it cannot be switched to traditional display and vice-versa. - Once your course has been created, you'll see that it's question display has been set to "Side-by-Side" on the Course Details page.

Creating a Side by Side Question
- Create a new question in your course by clicking on New Question in the top-right corner of the Questions page.

- Enter your question content into the section titled "Question Content."
- Enter your answer content into the section titled "Answer Explanation Content."
- If you'd like to create custom answer rationales for each of your answers vs. having one rationale for all answers, select Rationale By Answer Choice.

- If you'd like to create custom answer rationales for each of your answers vs. having one rationale for all answers, select Rationale By Answer Choice.
- Select the question type.

- Enter your answer options under the section titled "Answers." Make sure to also select the correct answer.

NOTE: If you selected Multiple Choice - Multiple answers allowed as your question type, make sure to select all correct answers. - Select a question category and distribution.

- Click on Create to finish creating your question.
If you'd like to import your questions instead of manually creating them, instructions on how to do so can be found here. Side by Side questions can also be replicated from one Side by Side course to another, or the full course can be replicated. More on content replication can be found in our section here.
Taking Side by Side Practice Questions
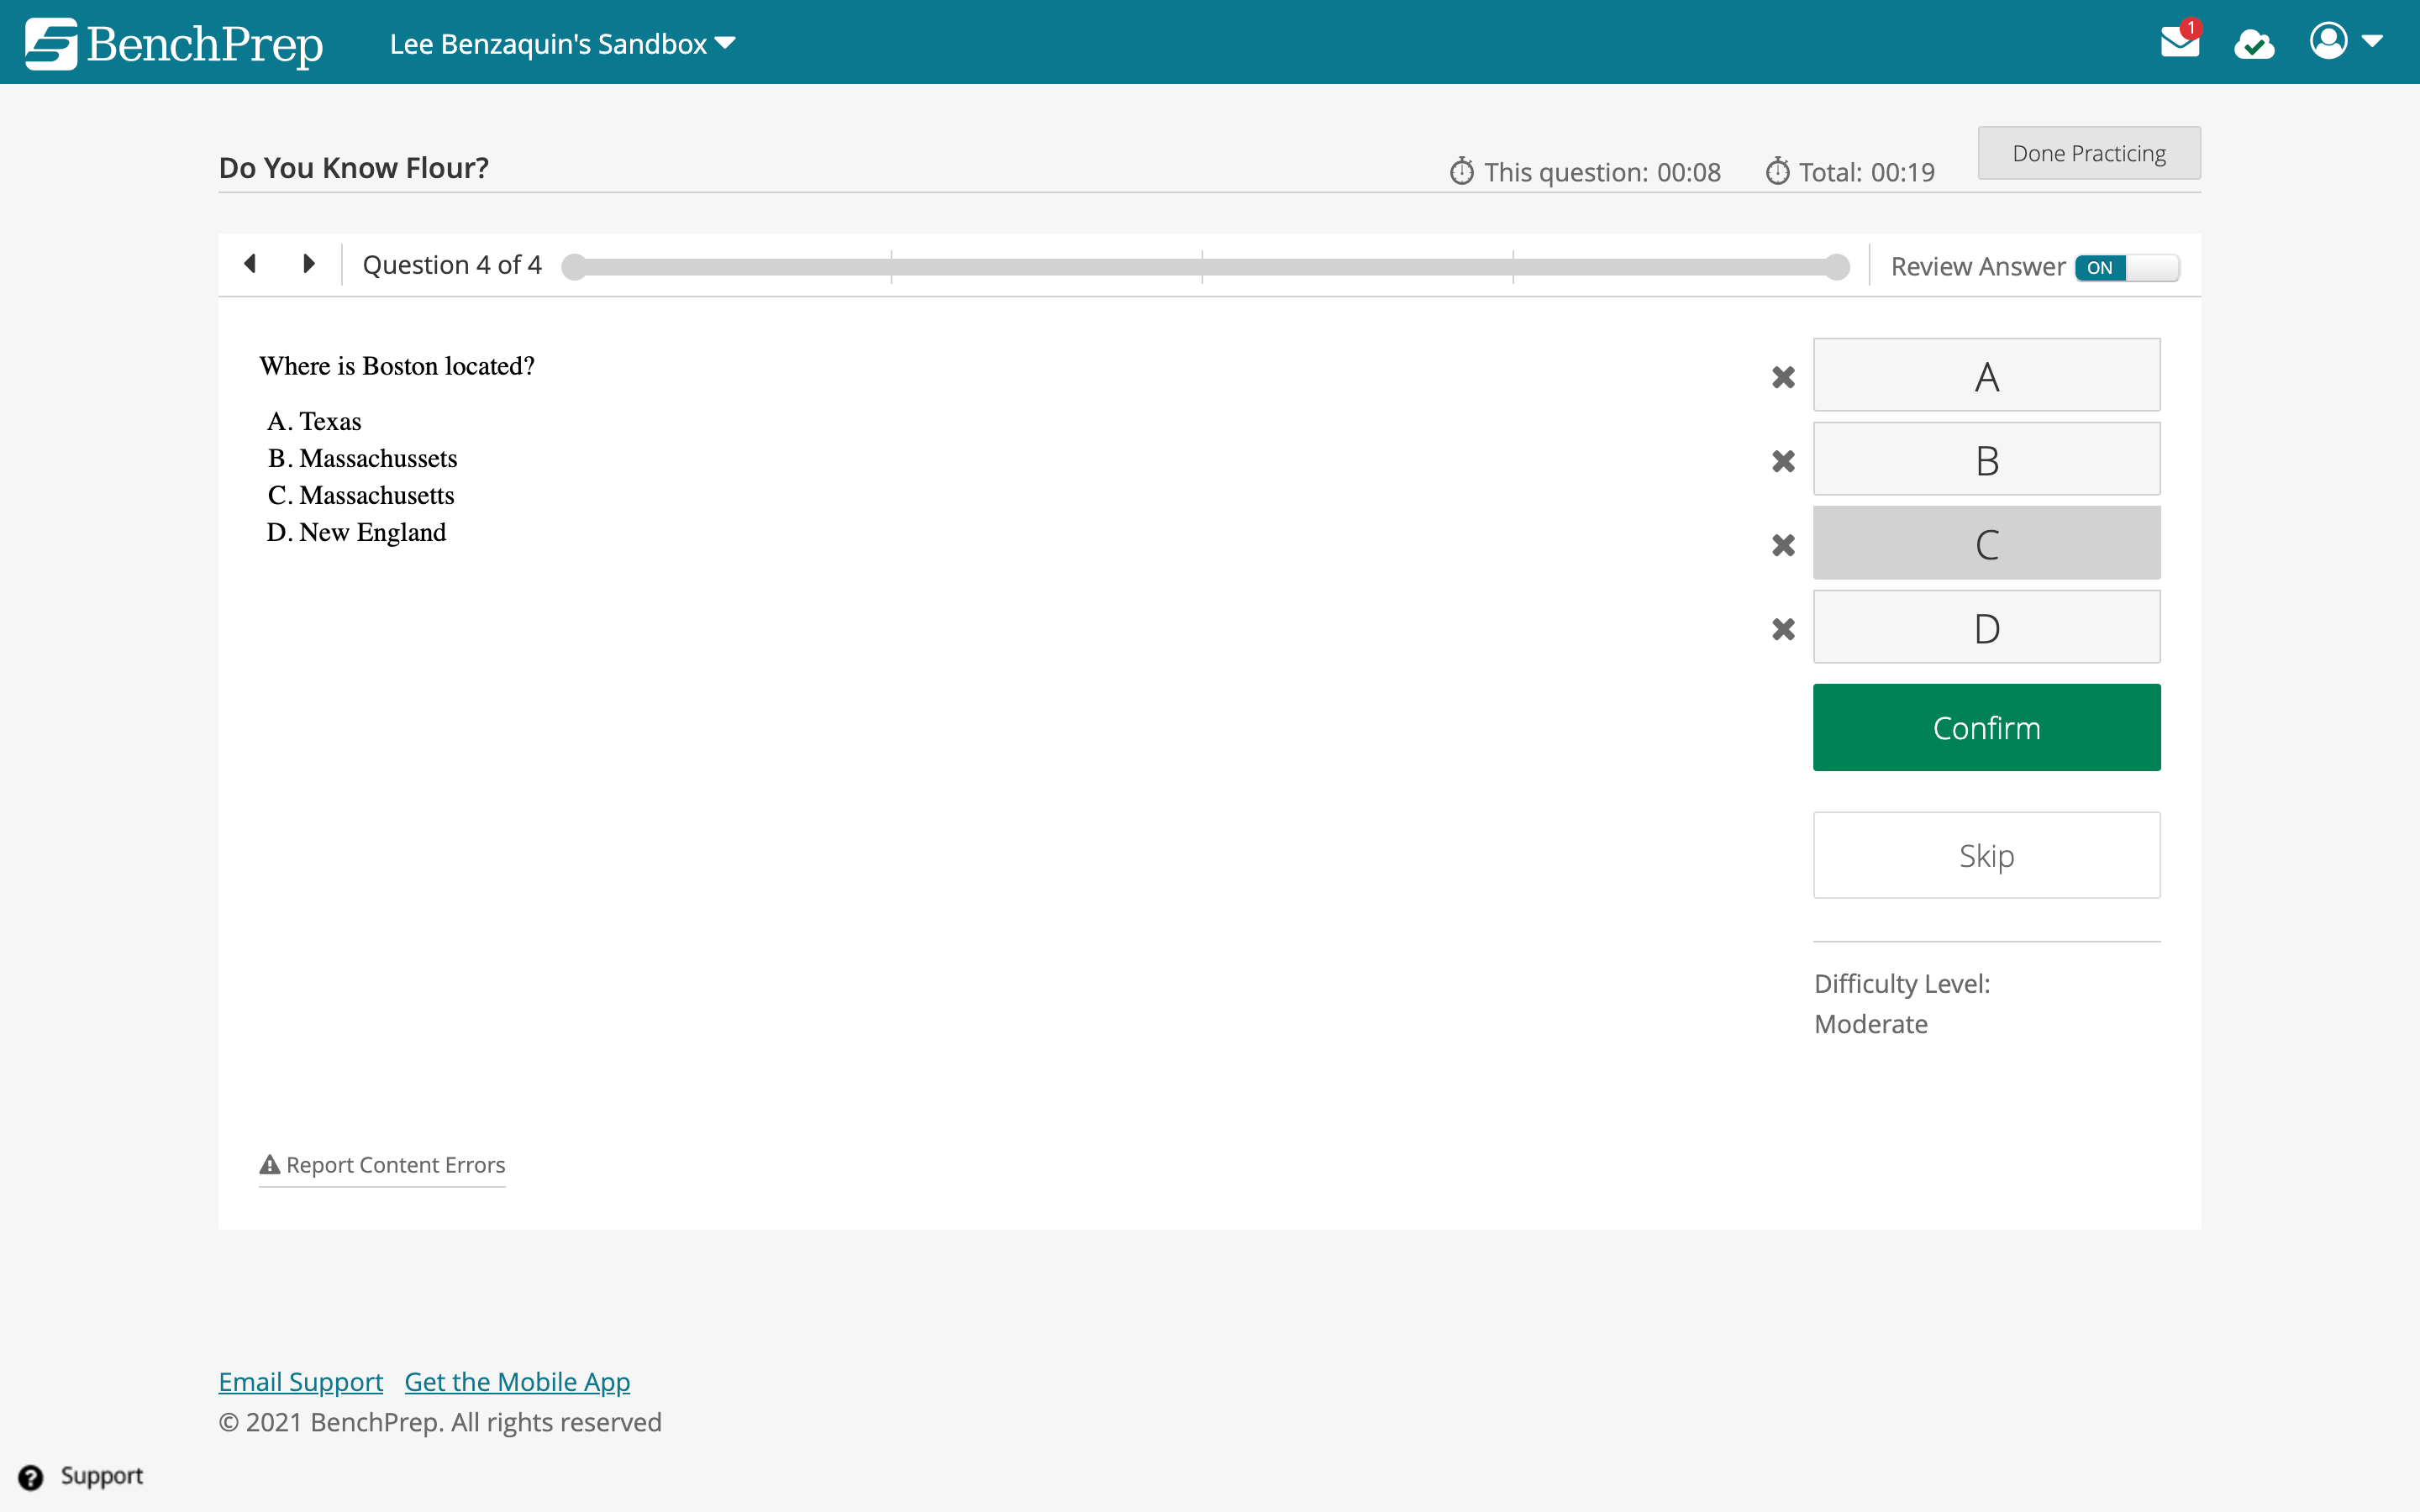
After creating and publishing your questions to your course, you’ll be able to take your Side by Side questions within the Learning Platform. To start a new practice question session, navigate to your course’s Practice tab, click on a question category, and then on the Practice Category button.

From here, you’ll see the following:

- Left and right navigation arrows
- Completion bar showing the number of questions you’ve taken
- Question content
- Answer choices and confirm buttons
- NOTE: Table entry type questions will appear differently here.
- If you’d like to eliminate an answer, click on the X next to an answer choice. Eliminated answer choices will have an "X" crossed through the letter circle.

- Time taken on current question and total time taken in your session
NOTE: The timers are controlled by a course-level feature access called Display Timers During Practice. They can be hidden by toggling the feature access OFF.- If you'd like your learners to be able to control the timers, you can enable the feature access Allow users to control timer displays in practice at the course-level.

- If you'd like your learners to be able to control the timers, you can enable the feature access Allow users to control timer displays in practice at the course-level.
- Review Answer toggle
- Toggle ON if you’d like to review your answers after each question.
- Toggle OFF if you’d like to practice questions without reviewing your answers. You will still be able to review them after your session is complete.
- Done Practicing - Click this button if you’d like to end your practice session.
- Practice question tools (e.g. highlighter, bookmark, notes, etc.)
- Learn more about these tools and feature accesses here
- Skip button
NOTE: The Skip Questions in Practice feature access will need to be enabled. - Confidence levels
NOTE: The Confidence Level Marking During Practice Questions is Required or Optional feature access will need to be enabled.
After you’ve completed all of the questions in the category or clicked on Done Practicing to end your session, you’ll be able to see your final score, how many questions you took, your average question times, and review your answers. To navigate back to the Practice Dashboard, click Back near the top-left.

Reviewing Side by Side Practice Questions
To review questions you’ve completed, click on a question category on the Practice Dashboard to see more details. Under the Review Category tab, you’ll see your completed questions and they will be listed in the order that you took them. Each row will show whether you got the question correct/incorrect, your confidence level on the question (if applicable), a preview of the question’s content, the amount of time you spent on the question, its difficulty, and if it’s been bookmarked.

Click on the eye icon to preview a question or Review to review your answer. Click on Review All or Review Category (if the category has been completed) to review all of your answers.

You can also filter questions by:
- Question difficulty - learn more about difficulty levels here
- Question correctness
- Tag breakdown (if applicable)
- Confidence level (if applicable)
- Has a bookmark checkbox

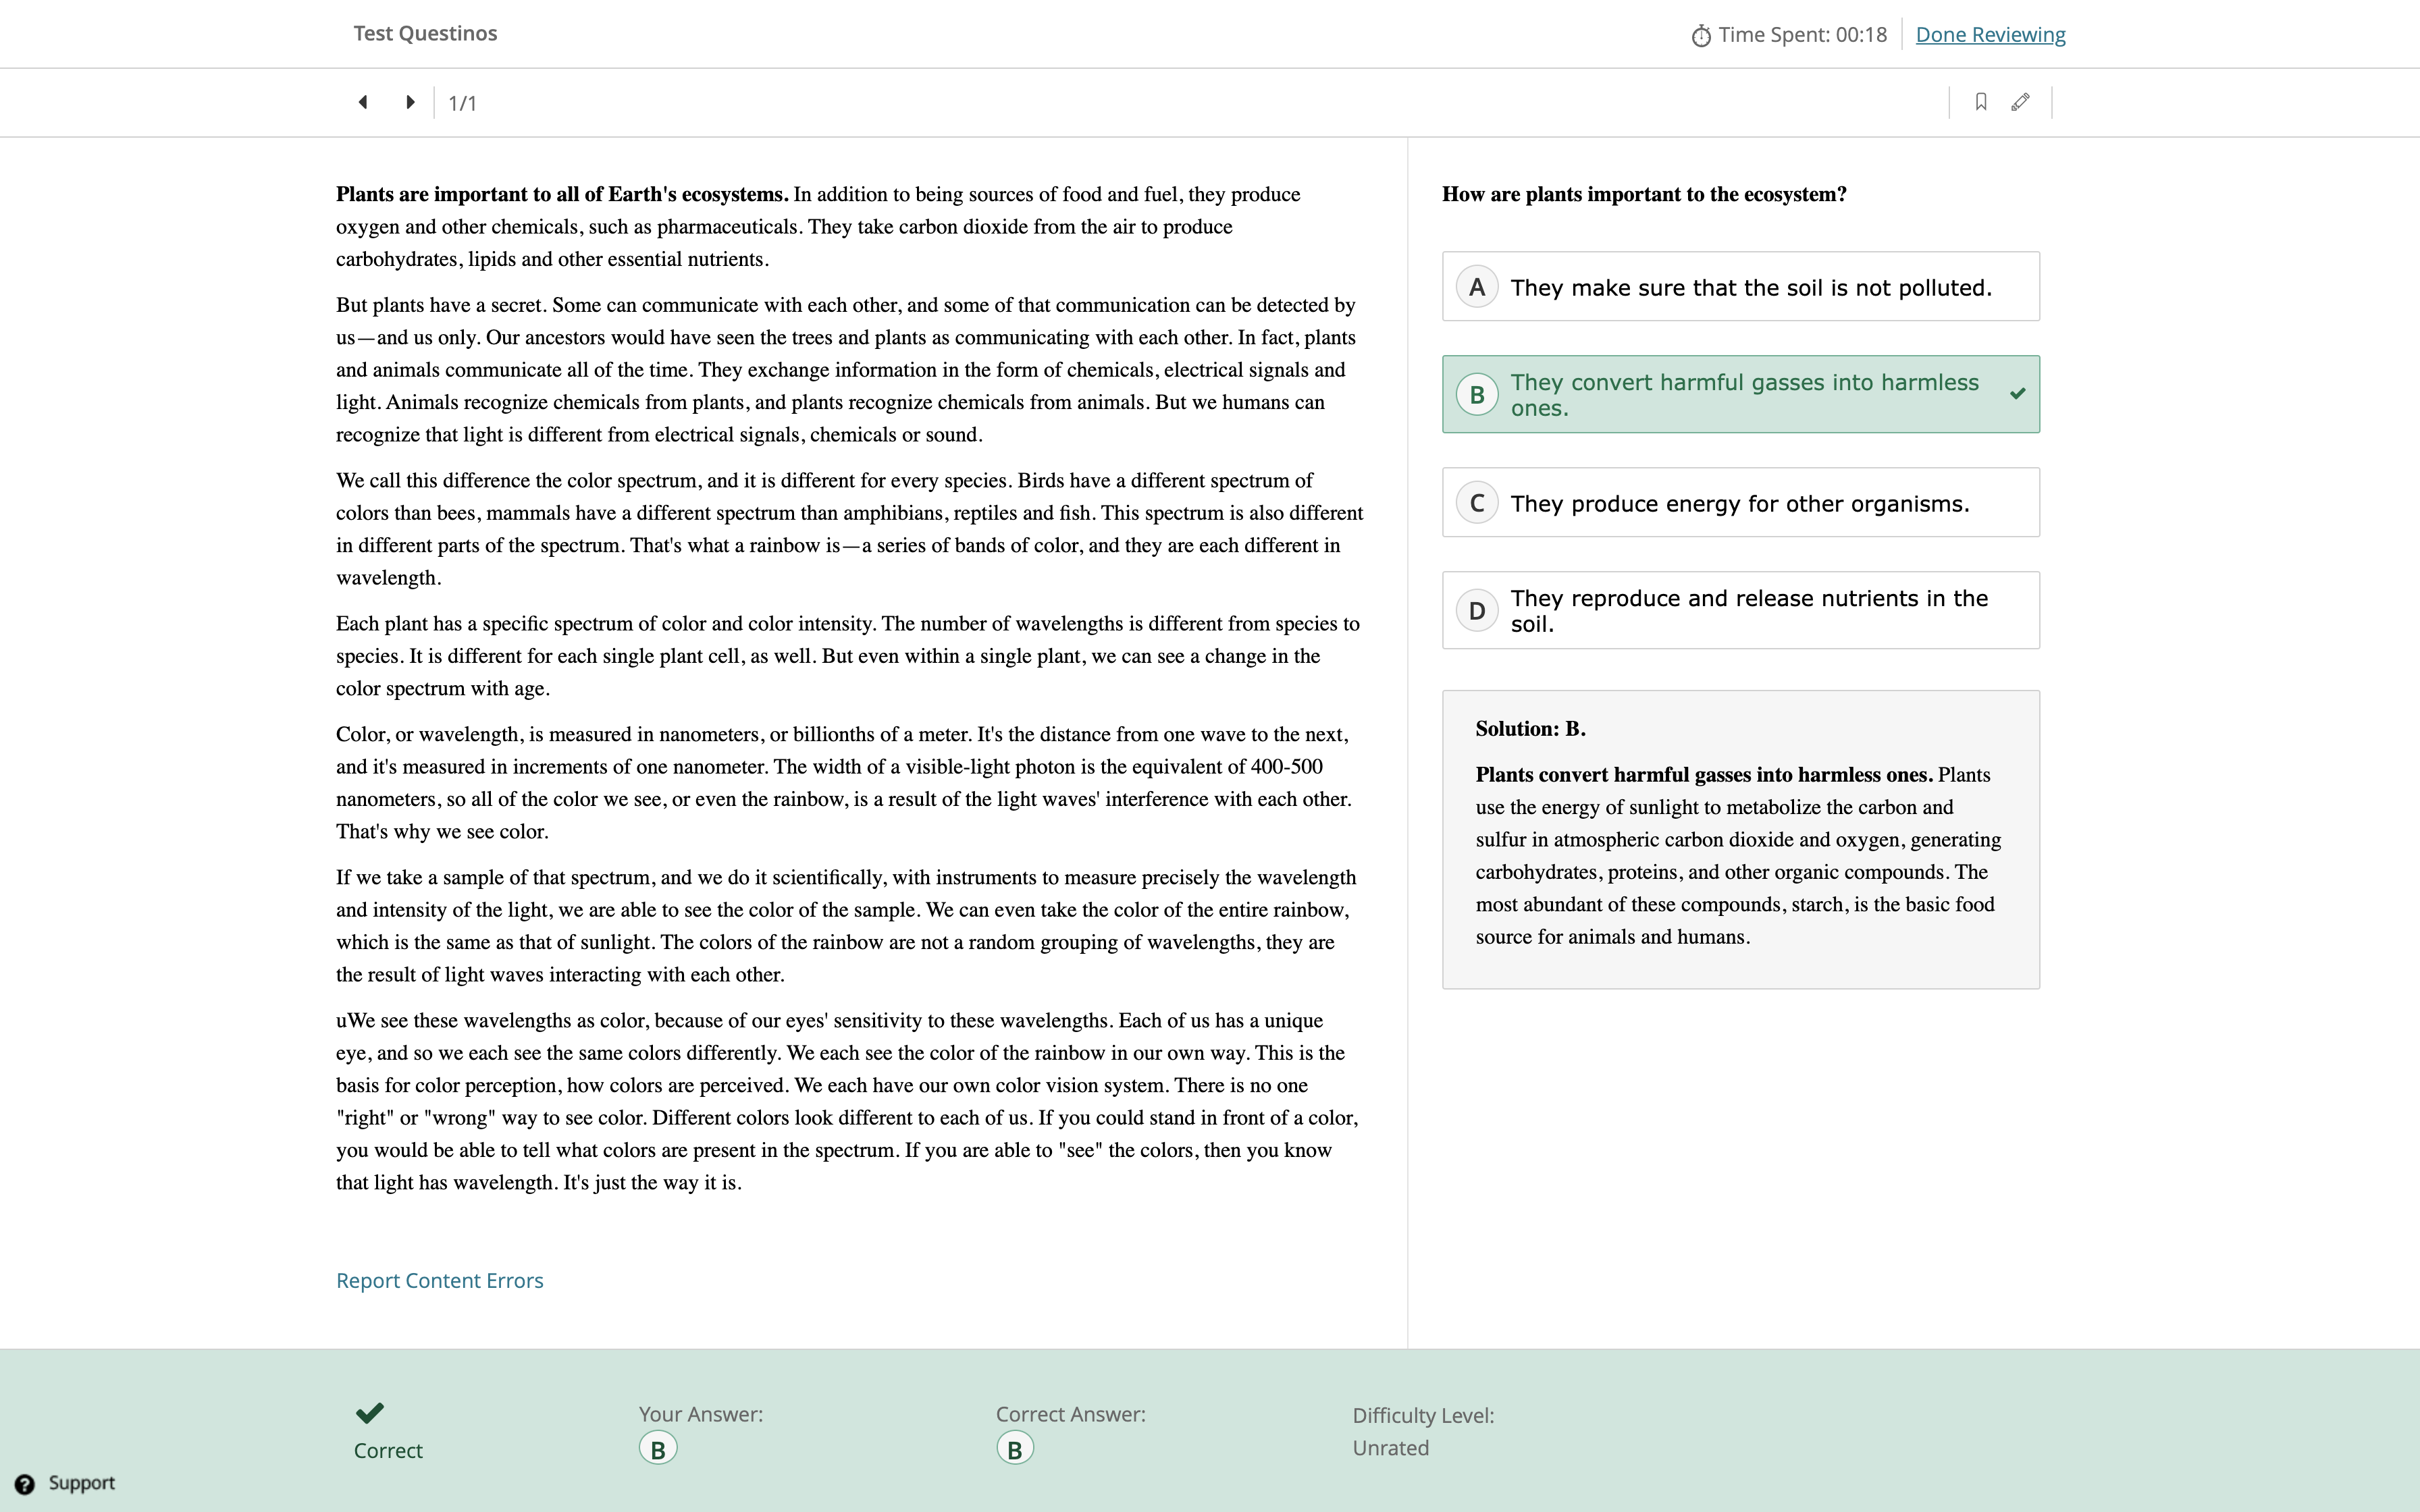
In Review Mode, you'll be able to review your answers, highlight content, bookmark questions, and take notes.

You’ll also be able to see what answers you eliminated if you had eliminated any of them while taking the questions. Eliminated answer choices will have an "X" crossed through the letter circle. In the example below, the learner answered A and eliminated answers B and C. However, the correct answer was actually B.

When hovering over the “X,” a tooltip will also appear indicating that this was an "Eliminated answer."

Taking a Side by Side Test
The test taking experience for Side by Side questions is similar to taking practice questions. If you’d like to create a test for your course, check out our article here for more information. Once your test is created and published to your course, navigate to your course’s Tests tab, click on the test, and then on the Start Test button.

NOTE: If your test has time accommodation options enabled and/or allows you to choose whether or not to review answers during the test, you can select these options before starting your test. Our article here will cover more on Answer Explanation Options. Once you begin your test, you won’t be able to change these options until the test is reset.

When taking your test, you’ll see a similar interface to taking practice questions with some differences outlined below:

- Time taken on current question and total time taken in your session
- If this is a full-length exam, it will instead show how much time you have left in the current section and how much time you have left in total.
- Pause Exam - Click this button to pause your exam.
NOTE: The Disable Pausing During Exams feature access will need to be off. - Testing tools (e.g. highlighter, notes, calculator, etc.)
- Testing tools can be configured by editing the test in BluePrint. More info can be found here.
- Skip button (only applicable to full-length exams)
- Revisit Later and Review & Finalize Section
NOTE: The Disable Exam Question Navigation feature access will need to be off. More details about this feature will be here. - Confidence levels
NOTE: The Confidence Level Marking During Tests is Required or Optional feature access will need to be enabled.
After you’ve completed your test, you’ll be able to see your final score, how many questions you took, your average answer times, and review your answers. To navigate back to the Tests Dashboard, click Back near the top-left.

Reviewing a Side by Side Test
To review a test you’ve completed, click on the test on the Tests Dashboard. If your test is a full-length exam, click on a test section to review answers from that section.

Under the Question Review tab, you’ll see your test questions, and this will be the same interface as what you see for practice questions. Click on the eye icon to preview a question or Review to review your answer. Click on Review All to review all of your answers.


