


Knowledge Base in Progress: We're actively updating this article to reflect the current Zoom integration functionality and configuration process in Console. While the instructions have been updated, some details are still being verified, and additional guidance and screenshots will be added as they become available.
The Zoom integration allows BenchPrep to collect attendance information from Zoom meetings associated with In-Course Events. This information can be used to track learner participation and support attendance-based recognitions and course requirements.
Zoom meetings are created and managed directly in Zoom. The integration is configured in BenchPrep Console, and Zoom meeting links are added to In-Course Events.
Before You Begin
Before setting up the Zoom integration, make sure you have access to:
- A Zoom account with an administrator role or equivalent permissions to create and manage applications in the Zoom App Marketplace and authorize access to the account data required for the integration.
- BenchPrep Console with permission to configure integrations.
- The Zoom integration feature enabled for your BenchPrep tenant.
Setting up the Zoom integration involves three steps:
- Create a Server-to-Server OAuth App in Zoom.
- Configure the Zoom integration in Console.
- Configure the webhook in Zoom.
Important: Complete these steps in order. You must save the integration in Console before validating the webhook endpoint in Zoom.
Step 1: Create a Server-to-Server OAuth App in Zoom
First, create an application in the Zoom App Marketplace. This application provides the credentials BenchPrep needs to connect to your Zoom account.
- Sign in to the Zoom App Marketplace.
- Click Develop and select Build App.
- Select Server-to-Server OAuth App and click Create.
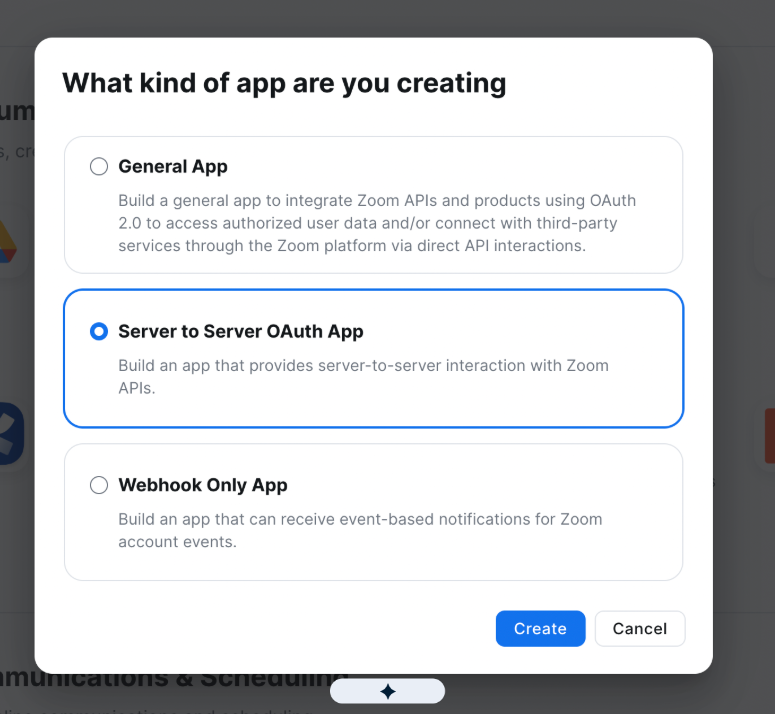
- Enter a name for your application and click Create.
- On the App Credentials page, locate the following values:
- Account ID
- Client ID
- Client Secret
- Copy and securely save these values. You will need them when configuring the Zoom integration in Console.
- Click Continue.
- On the Information page, complete the required application information, including the application description and developer contact information.
- Click Continue.
- On the Feature page, locate the Secret Token.
- Copy and securely save the Secret Token. You will need it when configuring the integration in Console.
- Leave Event Subscriptions disabled for now. You will return to this section in Step 3 after saving the integration in Console.
- Click Continue.
- On the Scopes page, click Add Scopes. Select report:read:list_meeting_participants:admin and parent report:read:admin
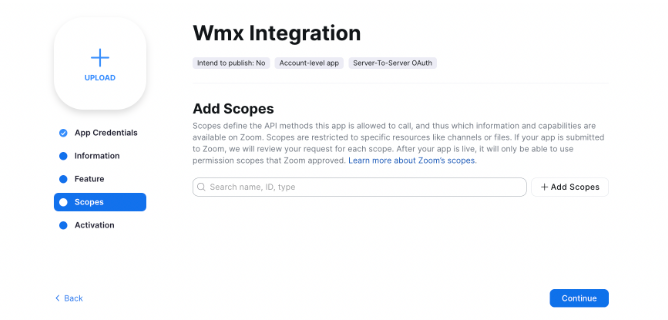
- Add the reporting scope required to retrieve meeting participant information.
- Save the selected scope and click Continue.
- On the Activation page, activate your application.
- Confirm that the application is activated. You do not need to publish the application in the Zoom App Marketplace.
Once the application is activated, you can use its credentials to configure the Zoom integration in BenchPrep Console.
Step 2: Configure the Zoom Integration in Console
Next, create the Zoom integration in Console using the credentials from the Server-to-Server OAuth App.
- Sign in to BenchPrep and open Console.
- In the left-hand navigation, expand Settings.
- Select Integrations.
- Click New to create an integration.
- Under Integration Type, select Zoom.
- Under Properties, complete the following fields:
- Account ID: Enter the Account ID from your Zoom application.
- Webhook Secret Token: Enter the Secret Token from the Feature page of your Zoom application.
- Account Name: Enter a name to identify the Zoom integration.
- Client ID: Enter the Client ID from your Zoom application.
- Client Secret: Enter the Client Secret from your Zoom application.
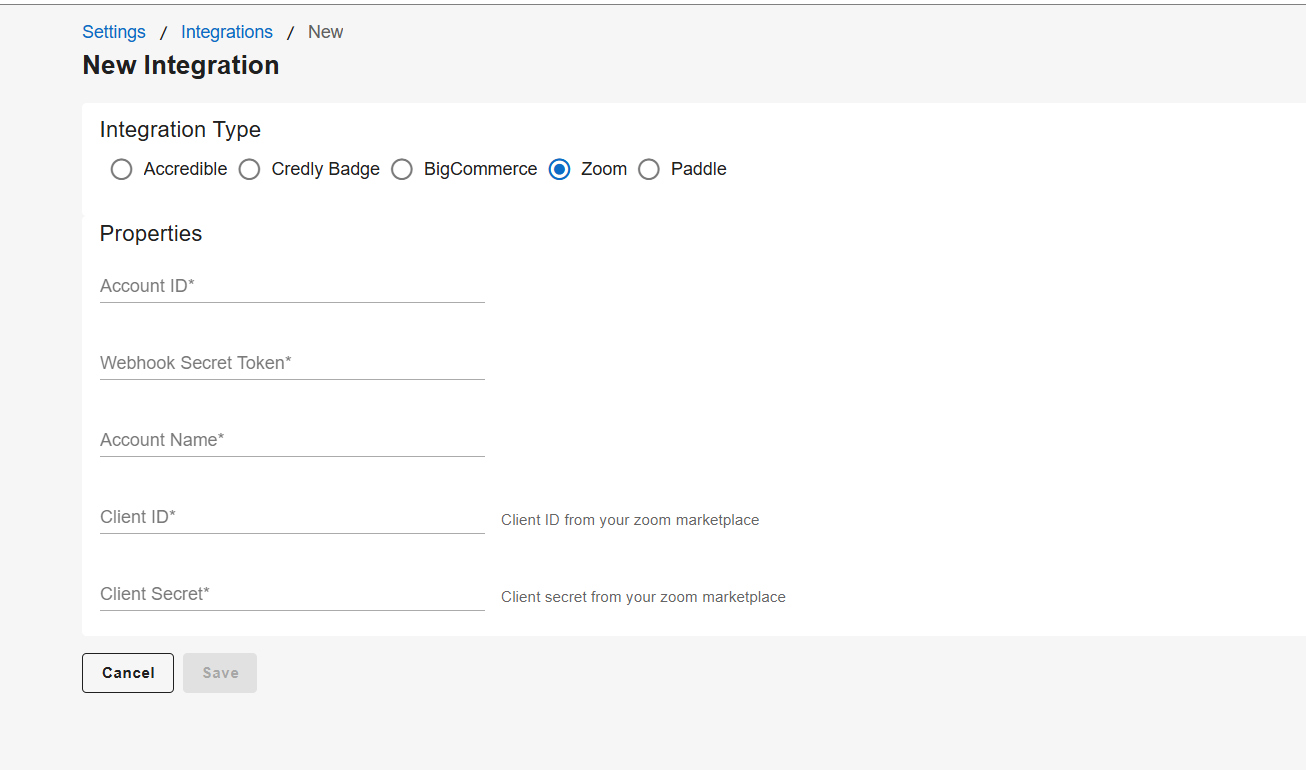
- Review the information to make sure it matches the credentials from your Zoom application.
- Click Save.
BenchPrep validates the credentials with Zoom when the integration is saved. If the credentials cannot be validated, an error message will appear and the integration will not be created.
Note: The Client Secret is not displayed after the integration is saved. Make sure you have securely stored the credentials from your Zoom application.
Once the integration has been saved, return to the Zoom App Marketplace to configure the webhook.
Step 3: Configure the Webhook in Zoom
The webhook notifies BenchPrep when a Zoom meeting ends so that attendance information can be retrieved.
- Return to the Zoom App Marketplace.
- Open the Server-to-Server OAuth App you created in Step 1.
- Navigate to the Feature page.
- Enable Event Subscriptions.
- Add a new event subscription.
- Enter a name for the subscription, such as "Meeting Ended".
- Under Select a method, select Webhook.
- In the Event notification endpoint URL field, enter your BenchPrep tenant URL followed by the Zoom webhook endpoint.
For example:
https://yourtenant.benchprep.com/api/v1/zoom/webhooks/meeting_ended
Replace yourtenant.benchprep.com with your BenchPrep tenant's domain.
- Click Validate to validate the webhook endpoint.
- Confirm that Zoom displays a Validated status.
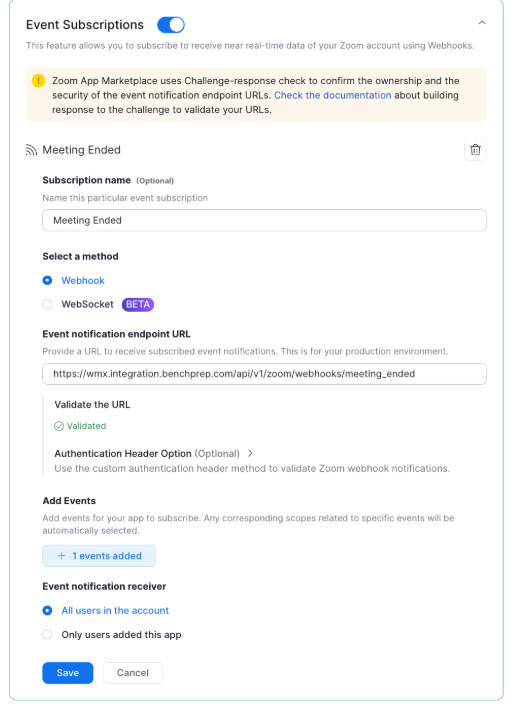
- Click Add Events.
- Select the Meeting Ended event.
- Under Event notification receiver, select All users in the account.
- Save the event selection.
- Click Save to save the event subscription configuration.
Important: The webhook must be successfully validated for Zoom to send meeting notifications to BenchPrep. If validation fails, verify that you saved the Zoom integration in Console and entered the correct endpoint URL.
Next Steps
After completing all three setup steps, the Zoom integration is configured.
To use the integration with an In-Course Event:
- Create a meeting directly in Zoom.
- Copy the Zoom meeting URL.
- Create or edit an In-Course Event in BenchPrep Console.
- Add the meeting URL to the event's Streaming URL field.
- Enable attendance tracking for the event.
BenchPrep identifies the Zoom meeting ID from the URL. After the meeting ends, Zoom attendance information can be collected and associated with learners in BenchPrep.
For more information about creating and configuring events, see the Configuring In-Course Events article.
Additional Information
- Meeting management: Zoom meetings must be created and managed directly in Zoom. They are not created through BenchPrep Console.
- Attendance information: The integration can collect participant names, email addresses, join times, leave times, and attendance duration.
- Meeting types: The integration supports Zoom Meetings, not Zoom Webinars.
- Event configuration: Attendance tracking must be enabled for the applicable In-Course Event.
```

