


Assignment Templates functionality is now live in Beta. We are actively testing the functionality and making updates as we continue to refine the experience. This Knowledge Base article will be updated with the latest guidance as testing progresses.
Using Templates and Groups to Organize Assignment Tasks
Assignment Templates give instructors and administrators a faster way to build assignments by starting from a pre-built structure instead of creating the same assignment from scratch each time. Templates can be reused to create assignments for different learners, groups, or cohorts while maintaining a consistent assignment structure.
Assignment Groups work alongside templates as an organizational layer. Groups allow you to organize related study tasks within a template, for example by exam section, modality, topic, or week, so that both the template itself and the assignment a learner sees are easier to navigate.
Templates also support relative dates. Instead of configuring specific calendar dates while building the template, each group can be configured to begin a specified number of days or weeks from the program start date. When the template is later used to create an assignment, the program start date is selected and BluePrint automatically calculates the corresponding dates for the assignment.
Together, templates and groups make it possible to:
- Standardize how assignments are structured across classes, instructors, or branches
- Reduce the time it takes to build a new assignment from scratch
- Organize larger assignments into clear, logical sections for learners
- Reuse the same assignment structure for different learners or cohorts
- Automatically calculate assignment dates based on a program start date
- Maintain consistency while still allowing instructors to customize assignments where needed
Note: Groups can also be used when creating regular Assignment Tasks. In regular assignments, study tasks use specific release and completion dates. Within templates, groups can use relative Starting Dates so that the same assignment structure can be reused for different program start dates.
To manage Assignment Templates in BluePrint, Console Admins or users with a custom role need the appropriate Assignment Template permissions:
- read:assignment_templates: View the Templates tab, open templates and use templates to create an assignment.
- create:assignment_templates: Create a new template.
- update:assignment_templates: Edit an existing template, including its groups and study tasks.
- delete:assignment_templates: Delete a template.
To use a template to build an assignment, the role must also include create:assignments, read:assignments, create:assignment_tasks, and manage:content.
Additionally, the course must have Assignments feature access enabled.
Note: Assignment Template permissions can be granted to roles scoped to the tenant, a branch, or a group. The templates a user can access depend on the scope of their role. See Who Can Manage Assignment Templates below.
Creating an Assignment Template
Templates are created in BluePrint and can contain the same supported content types as Assignment Tasks, including lessons, practice questions, question categories, tests and flashcards.
- Navigate to Assignments in BluePrint.
- Click on Assignments on the left-hand side.
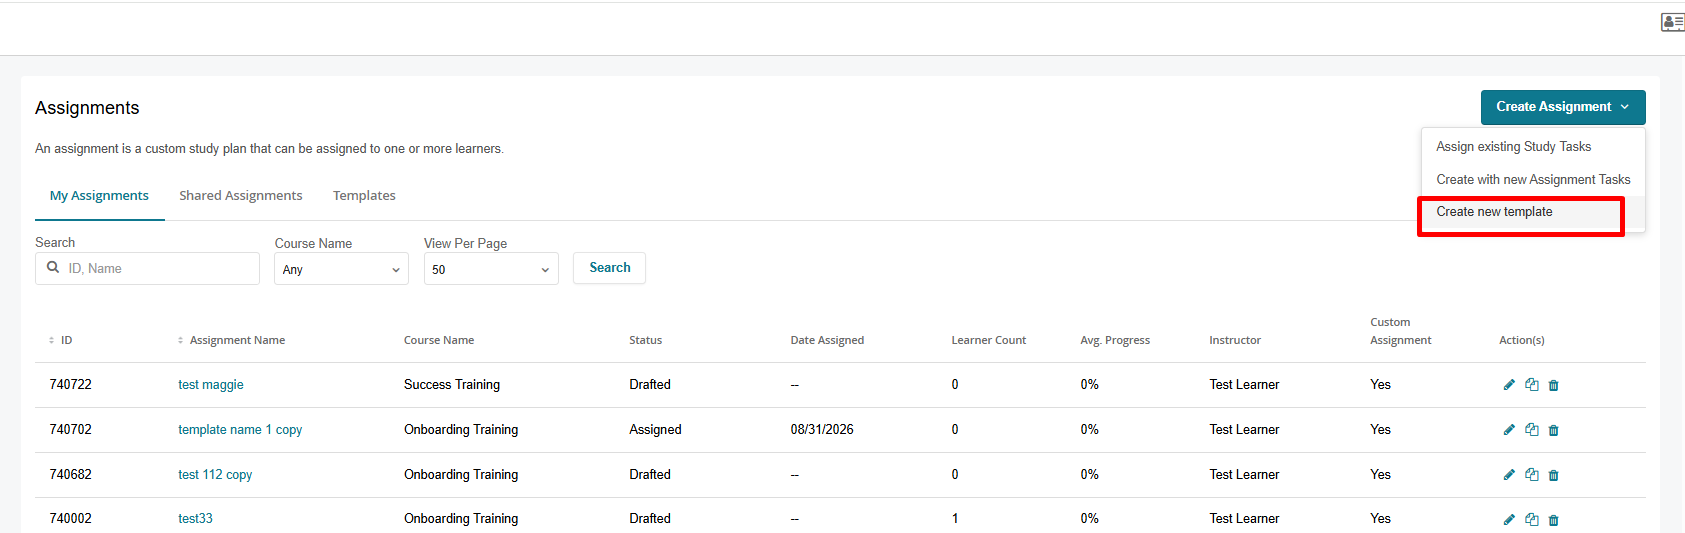
- Click on the Create Assignments button and choose Create new template.
- On the Template Properties page, fill out the following information:
- Select the Course you would like to create the template for from the dropdown.
- Template Name - enter a name that will help instructors identify the template. When the template is used to create an assignment, the Template Name will automatically carry over as the Assignment Name with "copy" appended to it (for example, Onboarding Training copy).
- Template Description - enter a description of the template, if desired. The Template Description will automatically carry over as the Assignment Description when the template is used.
- Click Next to continue to the Create Study Tasks page.
Creating Study Tasks and Groups within a Template
Groups allow related study tasks to be organized together within the template. For example, a template can contain separate groups for Week 1, Week 2 and Week 3, with the appropriate lessons, practice questions, tests or other content organized within each group.
- On the Create Study Tasks page, click New Group in the top-right corner to create a group for organizing related study tasks.
- A new group will appear. In the Group Name field, enter the name for the group. This name will be visible to learners when an assignment is created from the template.
- Configure the group's Starting Date:
- Enter the desired number.
- Select either Days from start or Weeks from start.
The Starting Date determines when the group begins relative to the program start date that will be selected when the template is later used to create an assignment.
For example, if a group is configured to begin 2 days from start, the content within that group will begin two days after the program start date selected when the template is used.
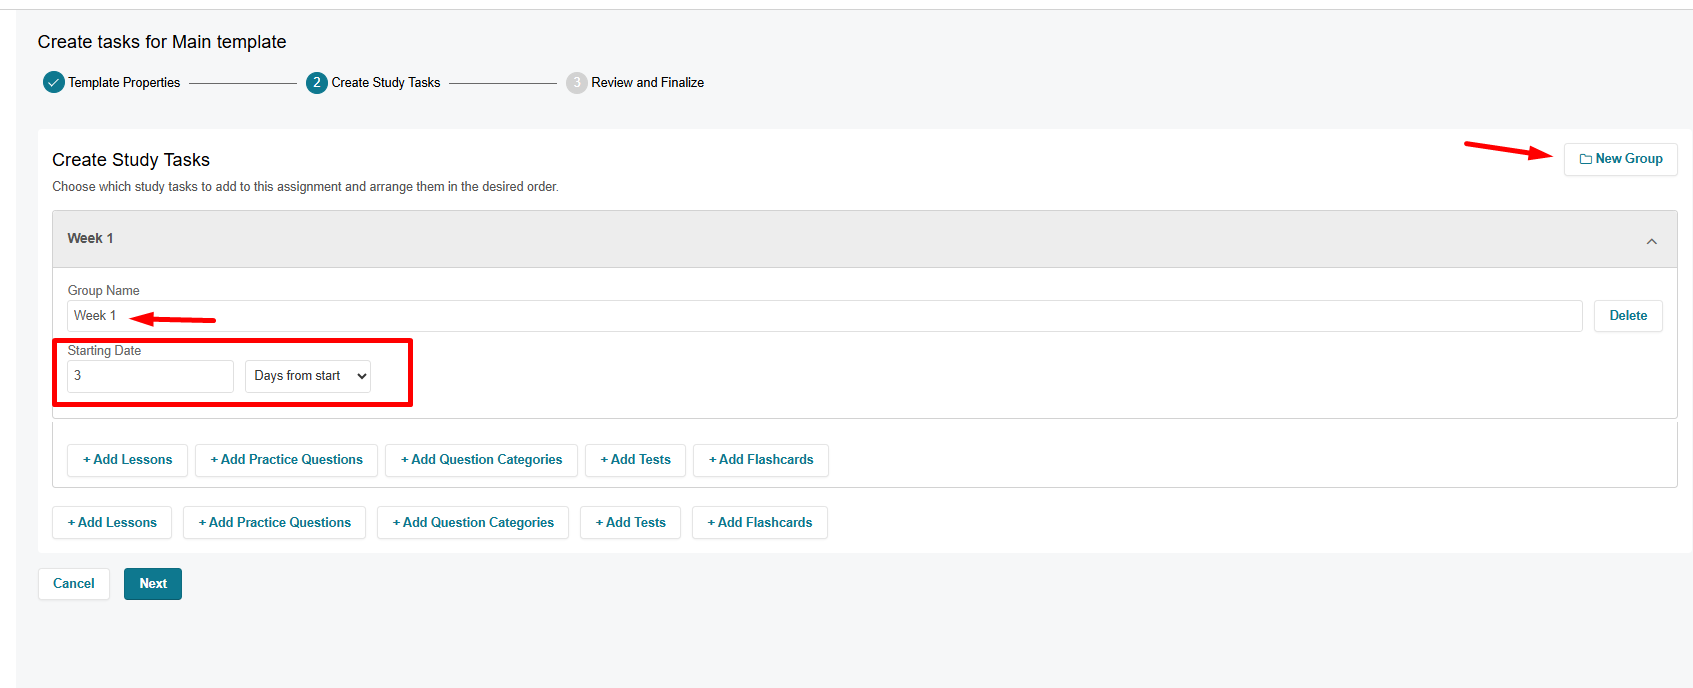
- Click one of the content buttons within the group (Add Lessons, Add Practice Questions, Add Question Categories, Add Tests, or Add Flashcards) to select the content type you would like to add:
- Lessons: Click the + icon next to the desired lesson to move the task from Available to Selected Tasks. You can also drag and drop the lesson into the Selected Tasks section. To remove a lesson from the template, either drag and drop it into the left column, or select the - icon next to the name. You can drag and drop individual lessons within the Selected Tasks section to rearrange their order.
- Practice Questions: Click the + icon next to the desired practice question to move the task from Available to Selected Tasks. You can also drag and drop the practice question into the Selected Tasks section. To remove a practice question from the template, either drag and drop it into the left column, or select the - icon next to the name. You can drag and drop individual questions within the Selected Tasks section to rearrange their order.
Instead of selecting questions individually, use Set Question Count to enter the number of questions you want. The system will randomly select that number of questions from the available questions and add them to Selected Questions.
You can further configure the practice experience by configuring the Duration and Mode options if using Custom Practice. The questions will display in a custom practice question-taking experience if Custom Practice is enabled. If Custom Practice is not used, the questions will be presented in Category Practice experience.
- Question Categories: Select the desired question categories to add to the group.
- Tests: All content of the selected type available in the course will be listed, displaying:
- ID
- Name
- Visibility (hidden or standard - the column will be shown if at least 1 item is hidden)
- Actions - Click on the eye icon to see the details of the item.
- Flashcards: Click the + icon next to the desired flashcard to move the task from Available to Selected Tasks. You can also drag and drop the flashcard into the Selected Tasks section. To remove a flashcard from the template, either drag and drop it into the left column, or select the - icon next to the name. You can drag and drop individual flashcards within the Selected Tasks section to rearrange their order.
- Select the desired items you would like to add to the group.
- Repeat the steps above to add additional content to the same group.
- To create an additional group, click New Group again. Enter a name for the new group, configure its Starting Date, and repeat the steps above to add content to it.
- Repeat these steps until all desired groups and study tasks have been added to the template.
- Groups and study tasks can be rearranged as needed. Tasks can be reordered within a group, moved between groups, or moved outside of a group. Groups themselves can also be reordered.
- Select Next to continue.
Review and Finalize the Template
- On the Review and Finalize page, review the template details before creating it. To make changes, navigate back to the appropriate step in the creation process.
- Review the template's configuration, including:
- Template Name
- Template Description
- Associated Course
- Groups
- Study Tasks
- Click Create Template to finalize the template.
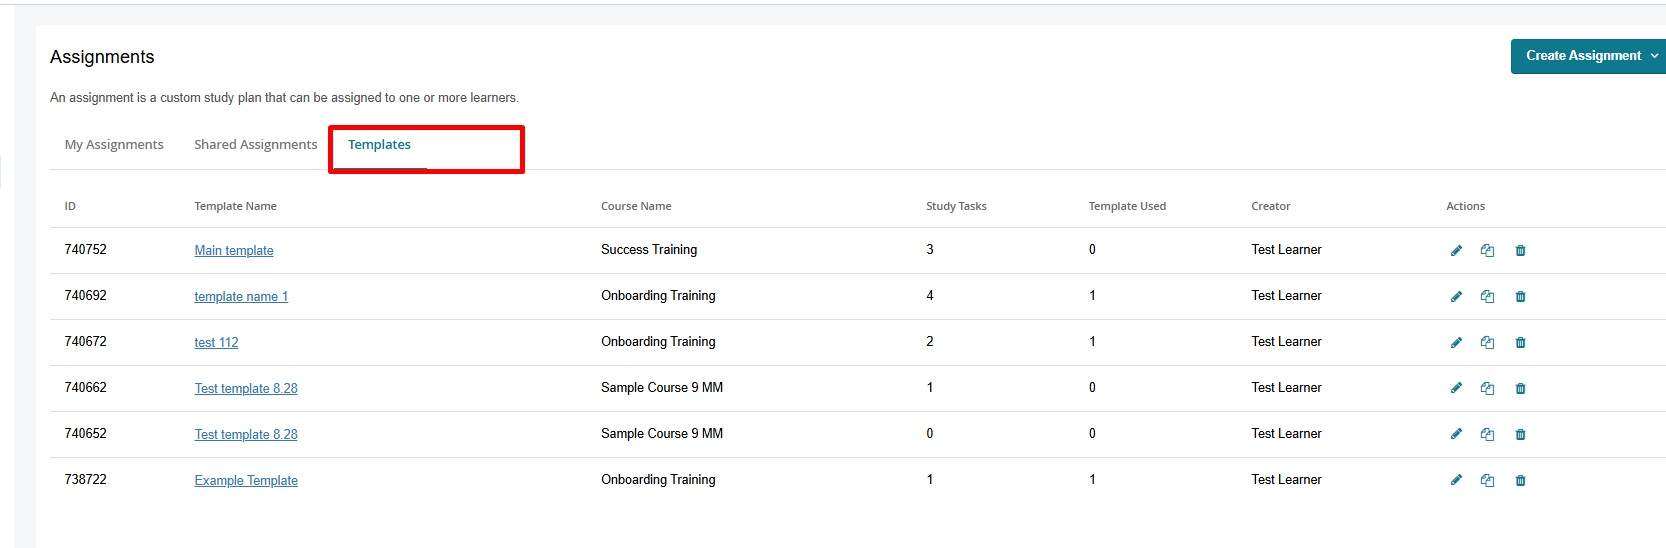
Once created, the template will be available under the Templates tab in BluePrint.
Using an Assignment Template
Templates themselves are not assigned directly to learners. When you use a template, BluePrint creates a separate assignment based on the template's structure. The new assignment can then be customized and assigned to the appropriate learners.
Using a template does not modify the original template. Changes made to an assignment created from a template will not affect the template, and changes made to the template later will not affect assignments that have already been created from it.
Note: The Templates tab does not currently display the scope a template was created for. If you manage multiple branches or groups, confirm that you are using the intended template. The assignment created from the template will use the Role Scope Context selected when you create the assignment.
To use a template, follow these steps:
- In BluePrint, navigate to Assignments.
- Select the Templates tab.
- Locate the template you would like to use and click on the Template Name to open it.
- Review the template details, including the groups and study tasks included in the template.
- Click Use Template.
- BluePrint will create a new assignment based on the selected template. On the Set Up & Assign Learners page, fill out the assignment information:
- Assignment Name - the Template Name will automatically populate as the Assignment Name with "copy" appended to it. Update the name as desired.
- Assignment Description - the Template Description will automatically populate as the Assignment Description. Update the description as desired.
- Program Start Date - select the date the program or cohort will begin. Once the Program Start Date is selected, the system automatically calculates the dates for each group based on the relative Starting Date configured in the template (for example, 2 days from start or 1 week from start) and populates the applicable dates for the assignment.
- Role Scope Context - select the appropriate context to determine the learners available for assignment.
- Assign Learners or Groups - select the learners who should receive the assignment. You can assign learners individually through the Learners tab or dynamically through the Group tab. When a group is selected, all existing users in that group are assigned to the Assignment Task, and users added to the group later will also be automatically enrolled.
- Assignment Access - add additional instructors who should have access to the assignment, if desired. You can also determine whether each instructor can edit or duplicate the assignment.
If you are not ready to assign learners or provide Assignment Access, you can skip these steps and return to the assignment later. For additional details on assigning individual learners, groups and instructors, see Configuring Content Visibility and Access using Assignment Tasks.
- Click Next to continue to the Create Study Tasks page.
- Review the groups and study tasks copied from the template.
- Make any desired changes to the assignment's groups, study tasks, dates, or other settings.
- Select Next to continue.
- On the Review and Finalize page, review the assignment details, learners, groups, tasks and Assignment Access.
- Click Assign to finalize and create the assignment.
How Relative Dates Are Applied
If the template contains groups with relative Starting Dates, the Program Start Date selected when using the template determines the actual dates applied to the new assignment.
For example, if the Program Start Date is September 2:
- A group configured for 2 days from start will begin on September 4.
- A group configured for 1 week from start will begin on September 9.
BluePrint automatically calculates these dates based on the Program Start Date, eliminating the need to manually enter the dates for each group every time the template is reused.
Once the template has been used to create an assignment, the relative dates are resolved into the applicable dates for that assignment. The assignment can then be managed and updated like any other Assignment Task.
Learner Experience
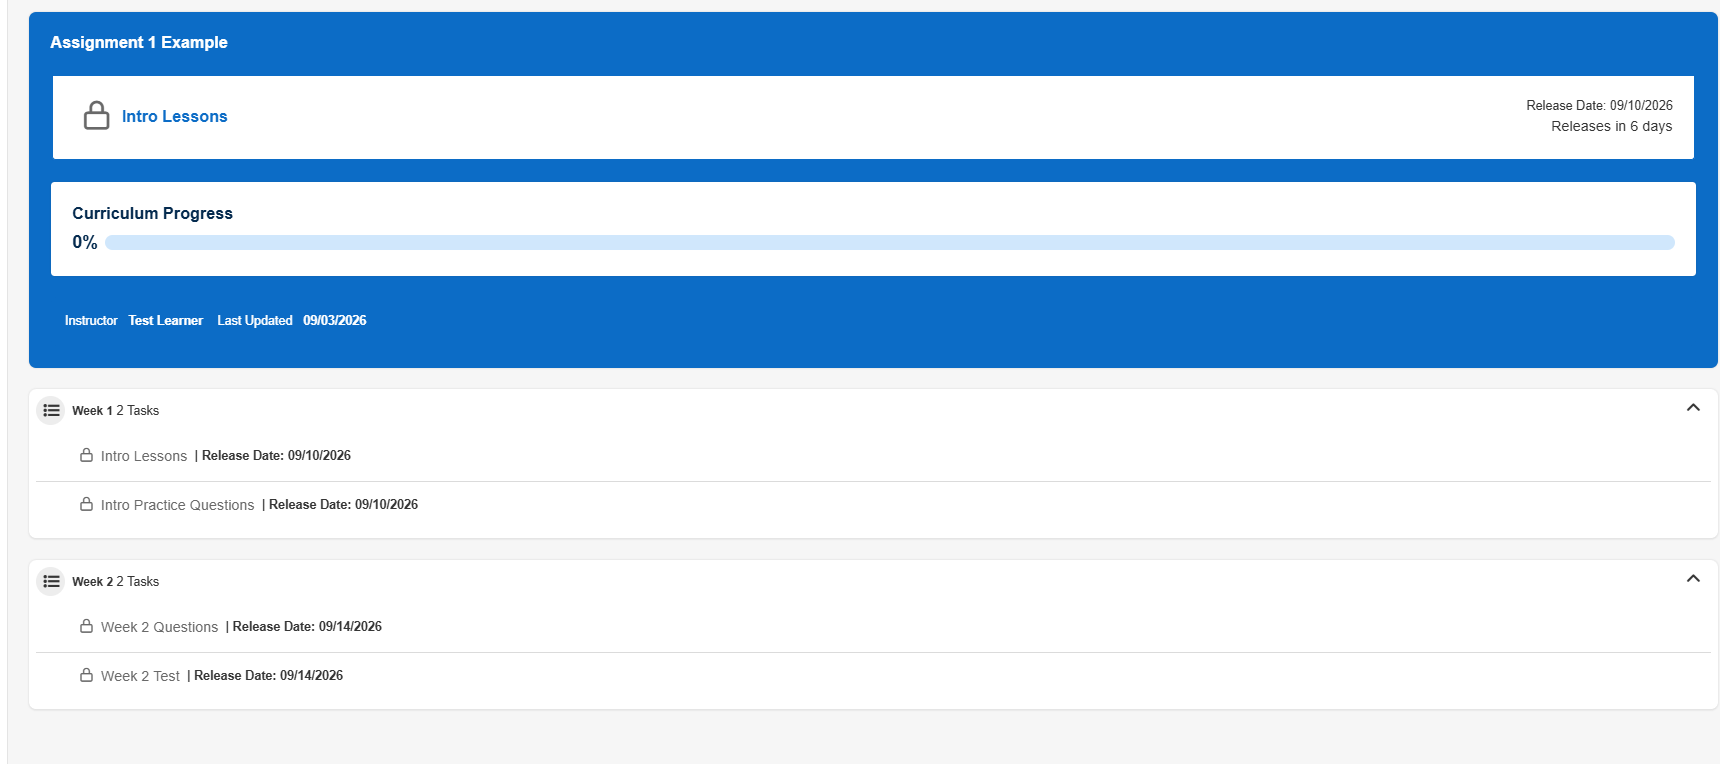
Groups created within a template are carried over to the assignment created from that template. Learners will see the group names and their associated study tasks organized into sections within the assignment.
For example, an assignment can be organized into groups such as Week 1, Week 2 and Week 3, with the appropriate lessons, practice questions, tests or other content contained within each section.
Groups are displayed as collapsible sections, allowing learners to more easily navigate larger assignments and understand how the assigned content is organized.
Learners will be able to access the study tasks according to the dates and access restrictions configured for the resulting assignment.
Who Can Manage Assignment Templates
What a user can do with Assignment Templates depends on both the Assignment Template permissions included in their role and the scope of that role.
Each template action is controlled by its own permission:
| Permission | What it allows |
|---|---|
| read:assignment_templates | View the Templates tab and open a template to review its groups and study tasks. |
| create:assignment_templates | Create a template and use a template to create an assignment. |
| update:assignment_templates | Edit a template, including the groups and study tasks within it. |
| delete:assignment_templates | Delete a template. |
A template belongs to the scope it was created for. What a user can access depends on the scope of the role holding these permissions:
| Role Scope | View and Use | Create | Edit and Delete |
|---|---|---|---|
| Tenant | All templates in the tenant, including branch-level and group-level templates | Tenant-level templates | Tenant-level templates only |
| Branch | Tenant-level templates and templates for the branches they manage | Templates for the branches they manage | Templates for the branches they manage |
| Group | Tenant-level templates, templates for their branch, and group-level templates associated with groups they manage | Templates for the groups they manage | Templates for the groups they manage |
Note: Template visibility can be broader than template management. For example, a branch- or group-scoped user can use a tenant-level template to create an assignment but cannot edit or delete that template. A tenant-scoped role can view and use templates created at the branch or group level, but can only edit or delete tenant-level templates.
Note: Templates are not visible downward. For example, a branch-scoped user does not see templates created for groups within that branch.
Note: If the Templates tab is not visible, confirm the role includes read:assignment_templates. If actions such as Edit, Use Template, or Delete are unavailable, confirm the role has the required permission and that the template is within the user's role scope.
Managing Assignment Templates
Assignment Templates can be accessed from the Templates tab in BluePrint. Templates can be reviewed and managed separately from active assignments.
Remember that templates serve as reusable starting points. Once a template has been used to create an assignment, the resulting assignment is independent of the original template. Updating the template will not update assignments that were previously created from it.

