
 705
705
Setting up the AI Assistant requires collaboration with the BenchPrep team. Your Customer Success Manager (CSM) will work closely with you to ensure your configuration and branding align with your goals.
After AI Assistant functionality has been enabled, you can manage configuring and branding the Assistant to fit your needs. Console Admins or users with read:ai_tutor_configurations and update:ai_tutor_configurations along with read:content_package permissions (for course-level referential sources management) can manage AI Assistant configuration. Review the terms before proceeding, as they outline important considerations for selecting which courses the AI Assistant may use as reference sources.
- Tenant-level Referential Sources
Tenant-level referential sources are the courses that have been imported into your tenant and are available for AI Assistant to reference. Importing a course at the tenant level makes its content available to AI Assistant, but does not automatically enable the AI Assistant within that course. This serves as a shared content library from which individual courses can select reference material. Once a course has been imported, any updates made in BluePrint will be synced automatically. -
Course-level Referential Sources
Course-level referential sources control which tenant-level courses the AI Assistant will use when responding within a specific course.
By default, a course references only its own content. You can add additional tenant-imported courses at the course level to allow the AI Assistant to reference multiple courses when answering learner questions.
Follow the steps below to configure your AI assistant.
- Decide what you want your AI Assistant to reference
- Course-only (AI Assistant in Course A only references content from Course A)
- Multi-Course (AI Assistant in Course A can reference Course A + Course B (and more)
- Ingest the courses at the Tenant Level
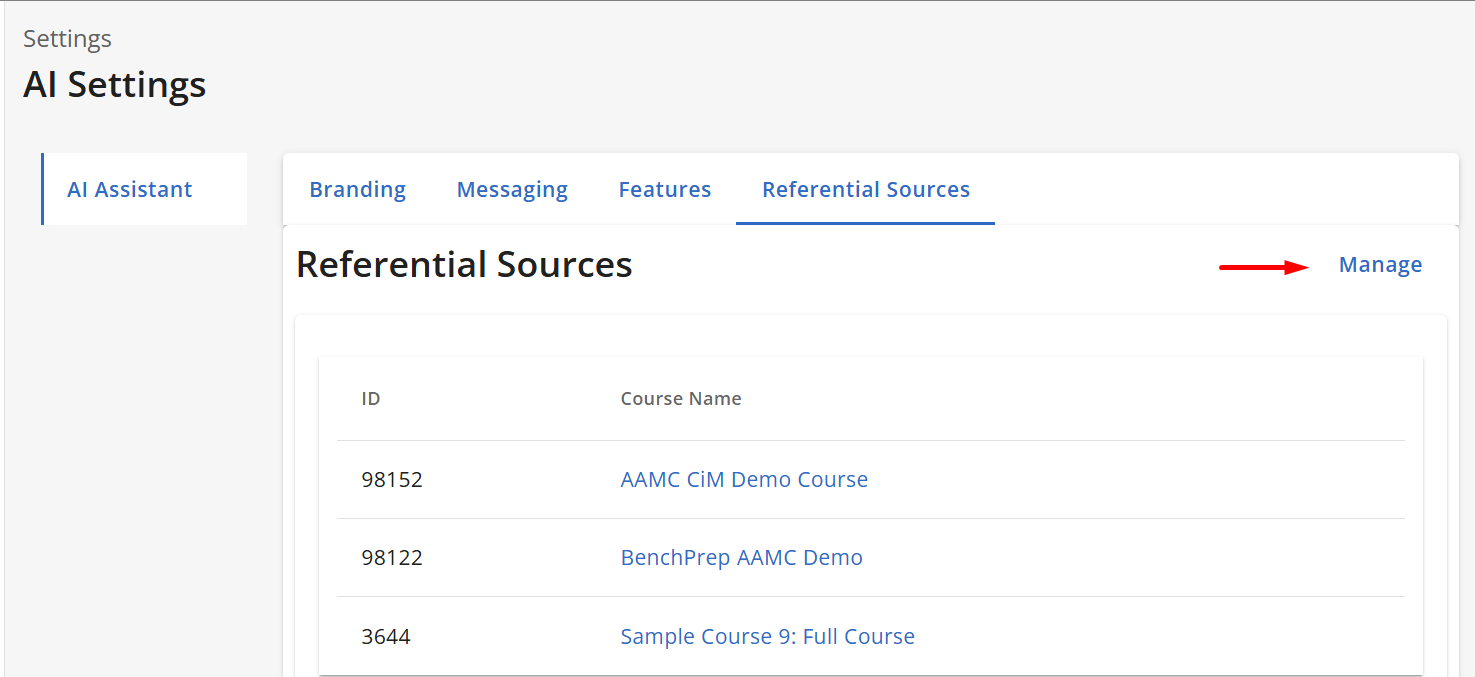
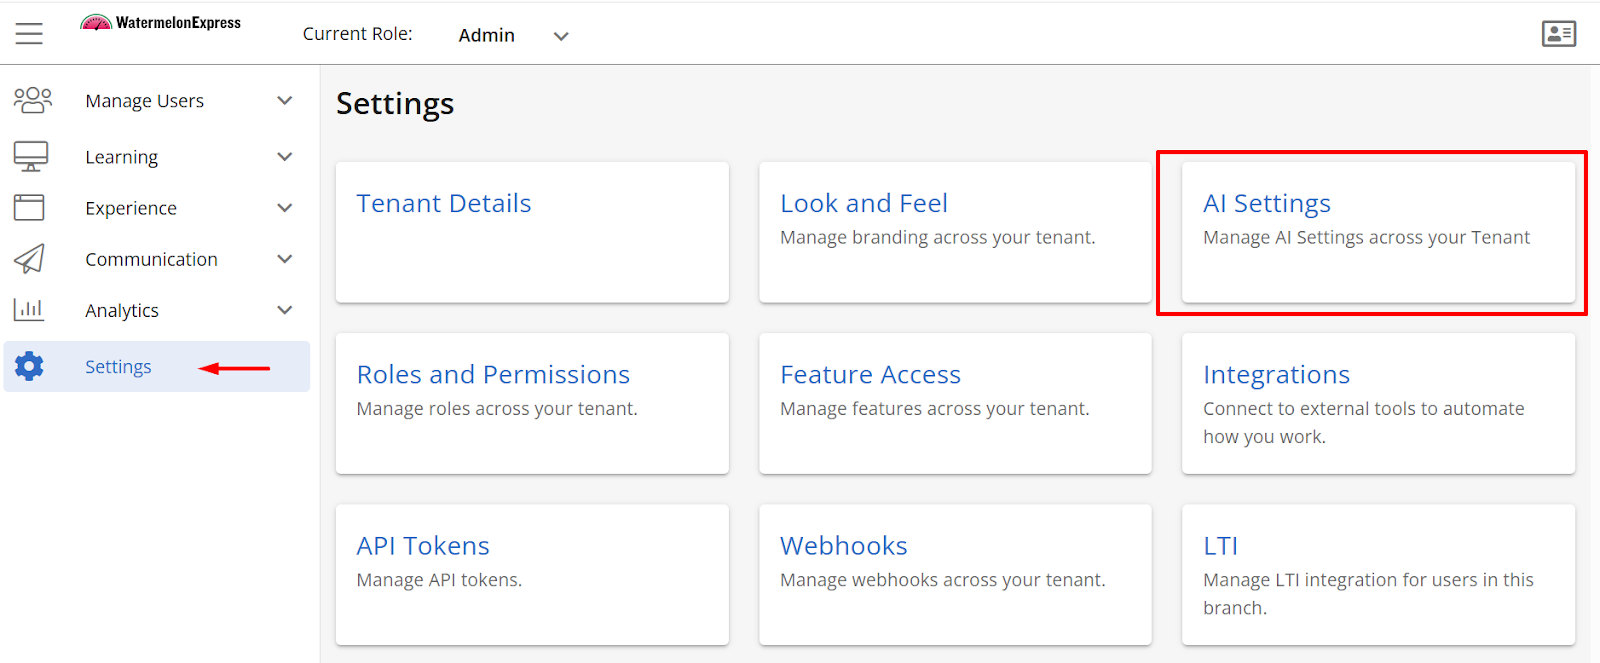
Import every course you want AI to be able to reference, this will be your content library- Navigate to Console, click on Settings and then AI Settings.
- Click on the Referential Sources tab. The page will list all courses that have already been imported. Click on Manage on the top right.
- Move courses from the Available Courses to the Selected Courses section by clicking on the + icon next to a course.
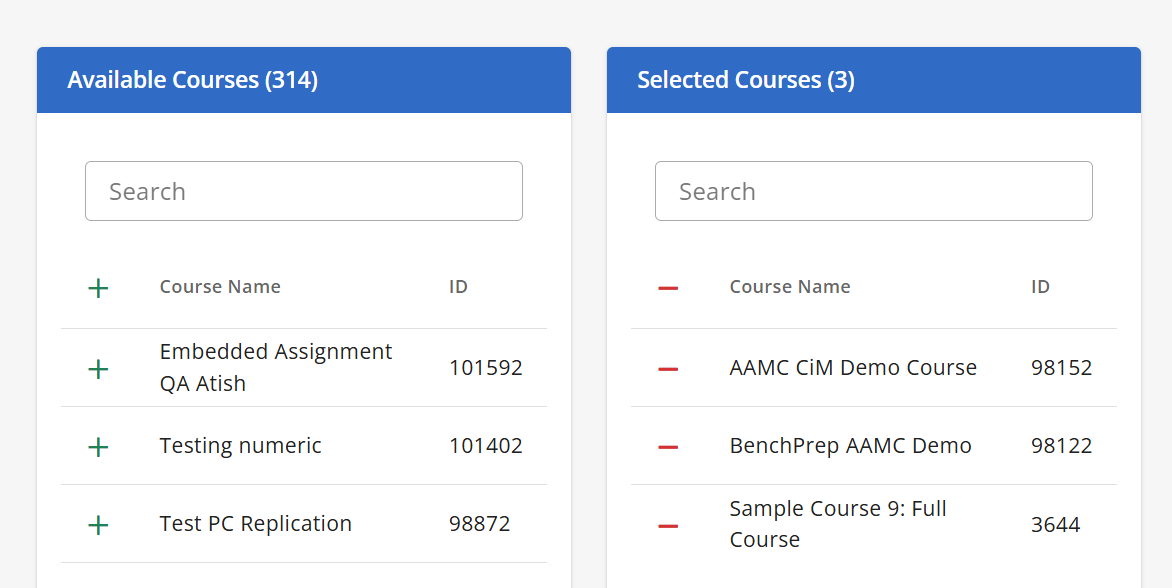
- Click Save. Note: Ingestion can take up to 1 hour.
- Optional. Configure Referential Sources for multi-course referencing.
By default, a course references itself. You only need this step if you want Course A to reference other imported courses.
If you want AI Assistant in Course A to pull from Course A plus other courses, follow these steps:- Navigate to Console, click on Content Packages, locate the course you are enabling AI assistant for and click on the name.
- Click on the Referential Sources tab. The page will list all courses that have already been imported. Click on Manage on the top right.
- Move courses from the Available Courses to the Selected Courses section by clicking on the + icon next to a course.
- Click Save.
- Request AI Branding Activation
Contact your BenchPrep CSM to enable AI branding in the Console. - Configure Branding in Console
Use Console to configure your desired branding settings. Check out Configuring AI Assistant Tenant Branding and Configuring AI Assistant Branch Branding sections below for step-by-step instructions. - Turn "Enable AI Assistant" feature access ON.
The feature can be enabled at tenant, course and branch levels.
Configuring AI Assistant Tenant Branding
Once AI branding has been enabled by BenchPrep (step 4 above), users with a Console Admin or a custom role with create:ai_tutor_configurations, read:ai_tutor_configurations, update:ai_tutor_configurations and delete:ai_tutor_configurations permissions can manage the branding for the tenant.
You can also update branding at the branch level for greater customization. By default, branding settings are inherited from the tenant, but it can be overridden and customized as needed.
To update branding follow these steps:
- Navigate to Console, click on Settings and then AI Settings.
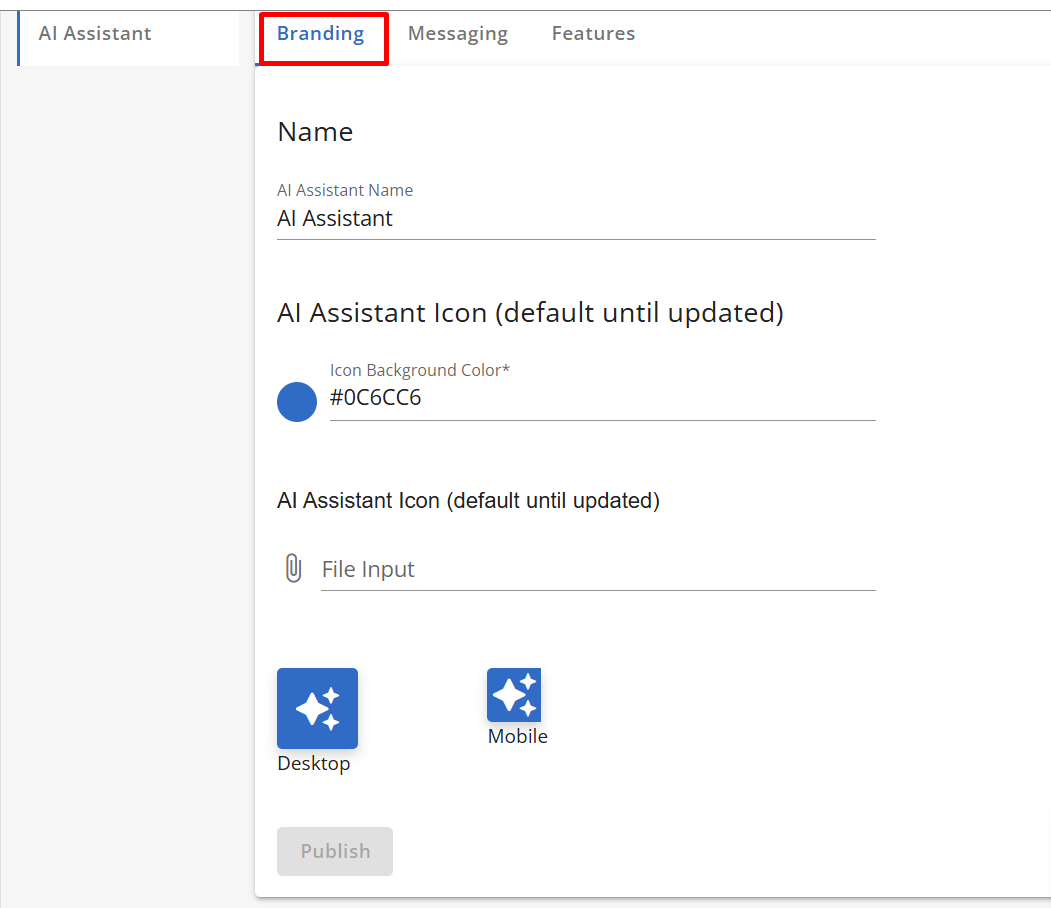
- The AI assistant has 3 sections to configure; Branding, Messaging and Features.
- Branding
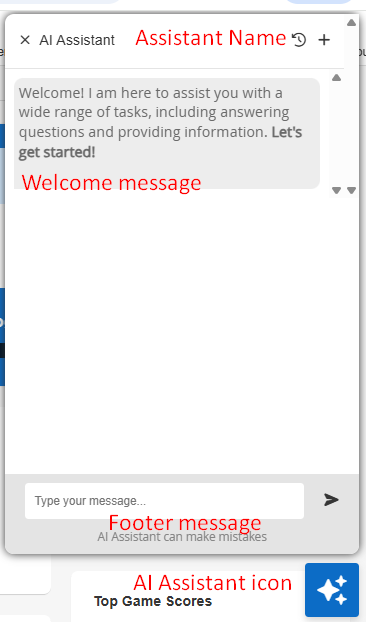
- AI Assistant Name - choose your AI Assistant Name - recommended up to 30 characters
- AI Assistant Icon
- Background Color - update icon color
- Icon image -displayed on desktop and mobile.
- Messaging
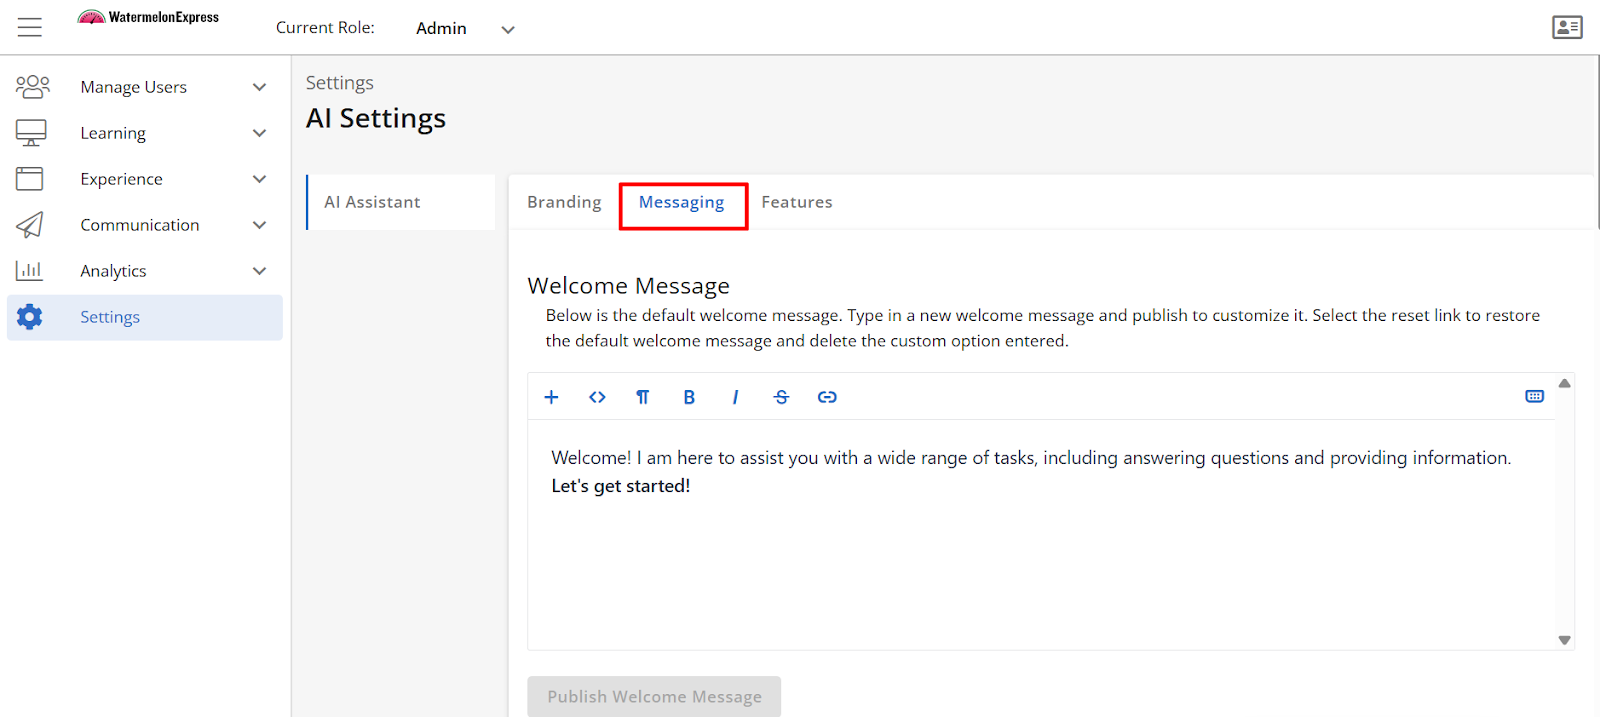
- Welcome Message - configure your welcome message. Click Publish Welcome Message when ready.
- Footer Disclaimer - configure a footer and toggle the setting on ON if you would like it to be displayed. 30 characters or less recommended. Click Publish Footer Disclaimer when ready.
- Prompts - Prompts are optional, pre-determined suggestions that appear as a button when a learner opens the AI Assistant window. You can configure Prompts to appear only on pages related to Practice Questions and Lesson modalities.
- Click Add Prompt link underneath Practice Question and/or Lesson Prompts for the new prompt line to appear. Type in your prompt and click Publish Prompts to update. To delete a prompt click Remove link on the right-hand side.
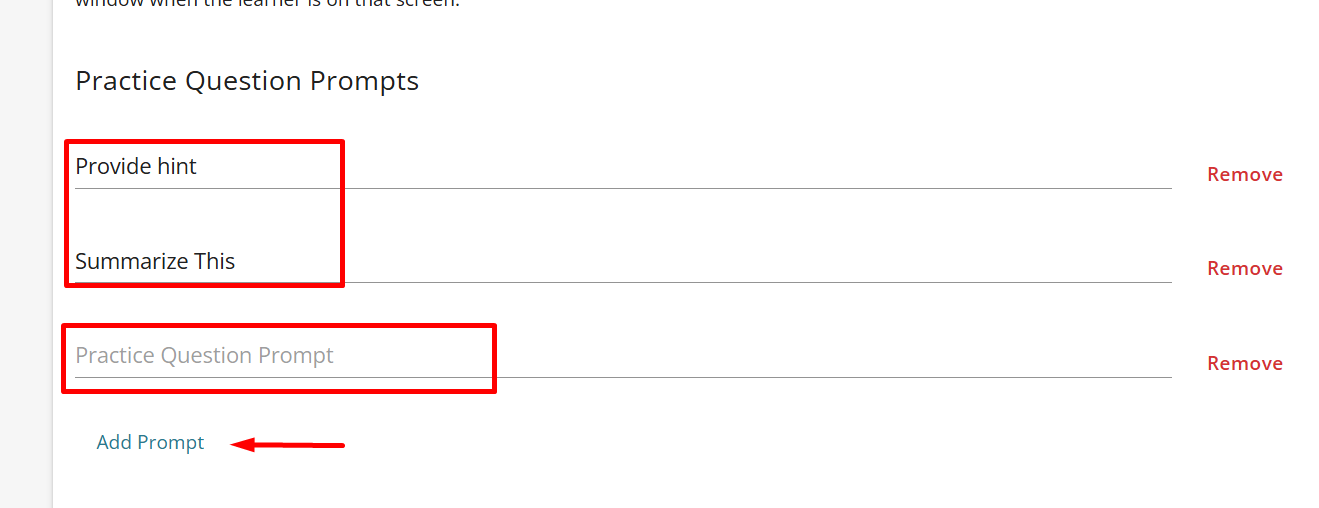
- Click Add Prompt link underneath Practice Question and/or Lesson Prompts for the new prompt line to appear. Type in your prompt and click Publish Prompts to update. To delete a prompt click Remove link on the right-hand side.
- Response Message Overrides - The AI Assistant comes with built-in default messages for certain situations. You can override these with your own custom text, so the responses match your organization’s voice and tone. Click
- No Relevant Information Override - this message appears when the AI Assistant can’t find an answer to the learner’s question. Example: “I was unable to find relevant information. Please make sure your question is related to the course content or you can try rephrasing the question..”
- Jailbreak Override - this message is shown if a learner tries to get the AI Assistant to go outside of its intended use. There are a few standard types of response outcomes where you are able to override whatever message has been generated by the AI. If left blank, the user will see whatever response was generated by the AI.
Click Publish Response Messages when ready.
- Tone of Voice
Select the tone of voice you would like the AI assistant to use in its responses. Click Publish Tone of Voice when ready.
- Features
Features section allows you to further customize AI Assistant experience by choosing to allow to show references along with the response. References shown in the AI Assistant consist of Lesson titles sourced from course content that are similar to the user's query.
- Branding
Once your branding is set and BenchPrep has completed the configuration, the AI Assistant will be ready for use in your selected courses! If you would like to configure branding for a specific branch, refer to the section below for instructions.
Configuring AI Assistant Branch Branding
Branch AI Assistant branding will inherit Tenant Branding, but it can be updated for a branch to allow for more customization. A Console Admin or a a user with a custom role with create:ai_tutor_configurations, read:ai_tutor_configurations, update:ai_tutor_configurations and delete:ai_tutor_configurations permissions assigned to a specific branch can manage the branding for that branch.
To update branding for a specific branch follow these steps:
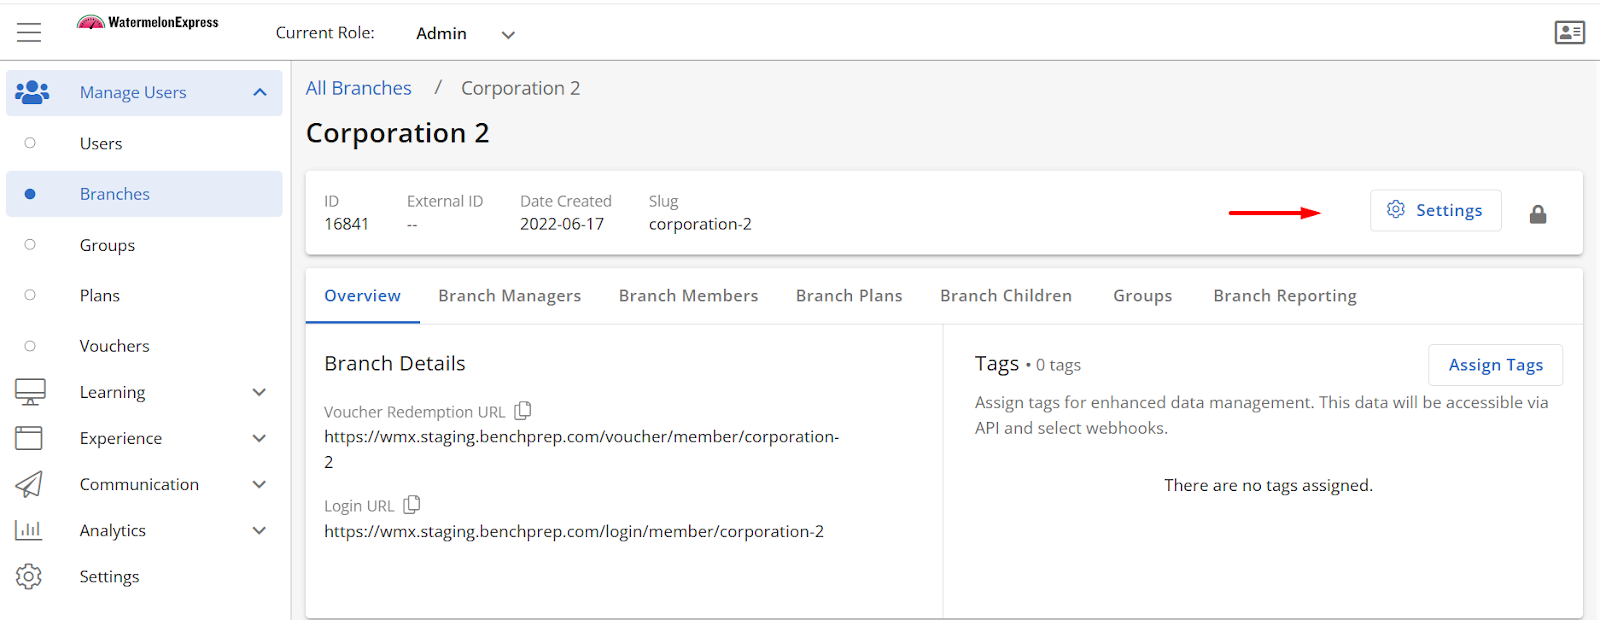
- Navigate to Console, click on Branches under Manage Users section.
- Locate the Branch you would like to update AI Assistant Branding for and click on the Name.
- Select the Settings button.
- Follow steps 2 - 3 from "Configuring AI Assistant Tenant Branding" section above to configure branding for a specific branch.

