815
815
We recommend exploring the new tools and interfaces in Console as much as possible in prep for you and your partner organization upgrade.
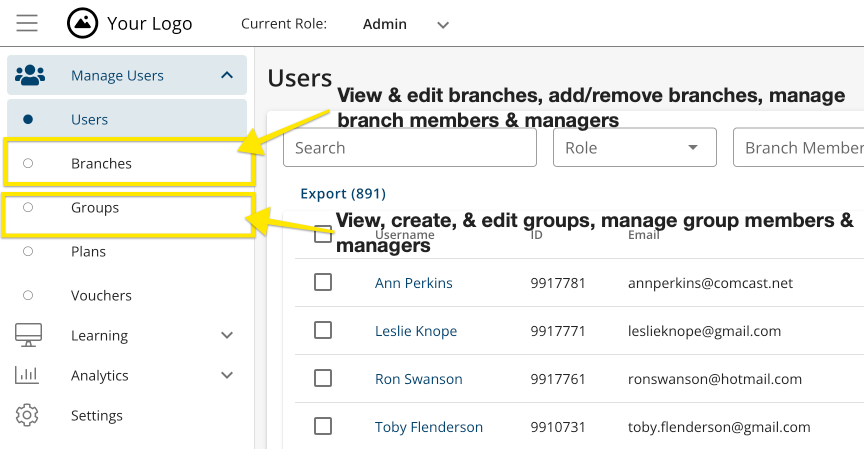
Console Admins will have access to the following in Console:
- Branches
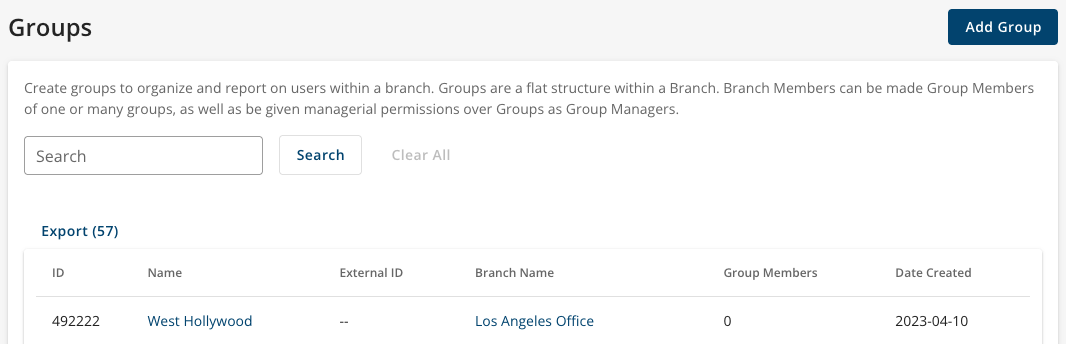
- Groups
- Branch Plans
- Branches Dashboard Reporting
- New Branch-related permissions
To ensure a seamless transition, BenchPrep has:
- Developed backward compatibility between Console and the Tenant Dashboard, Institution Admin & Boost
- Synced all B2B data to Console from Tenant Dashboard, Institution Admin & Boost
- Pre-created equivalent custom roles for Instructors, Institution/District Admins and Supervisors which will eventually provide partners with access to Console (the new custom roles have not been assigned to any user)
Continue reading to learn more about key changes and what to expect for each role in Console.
Key Changes
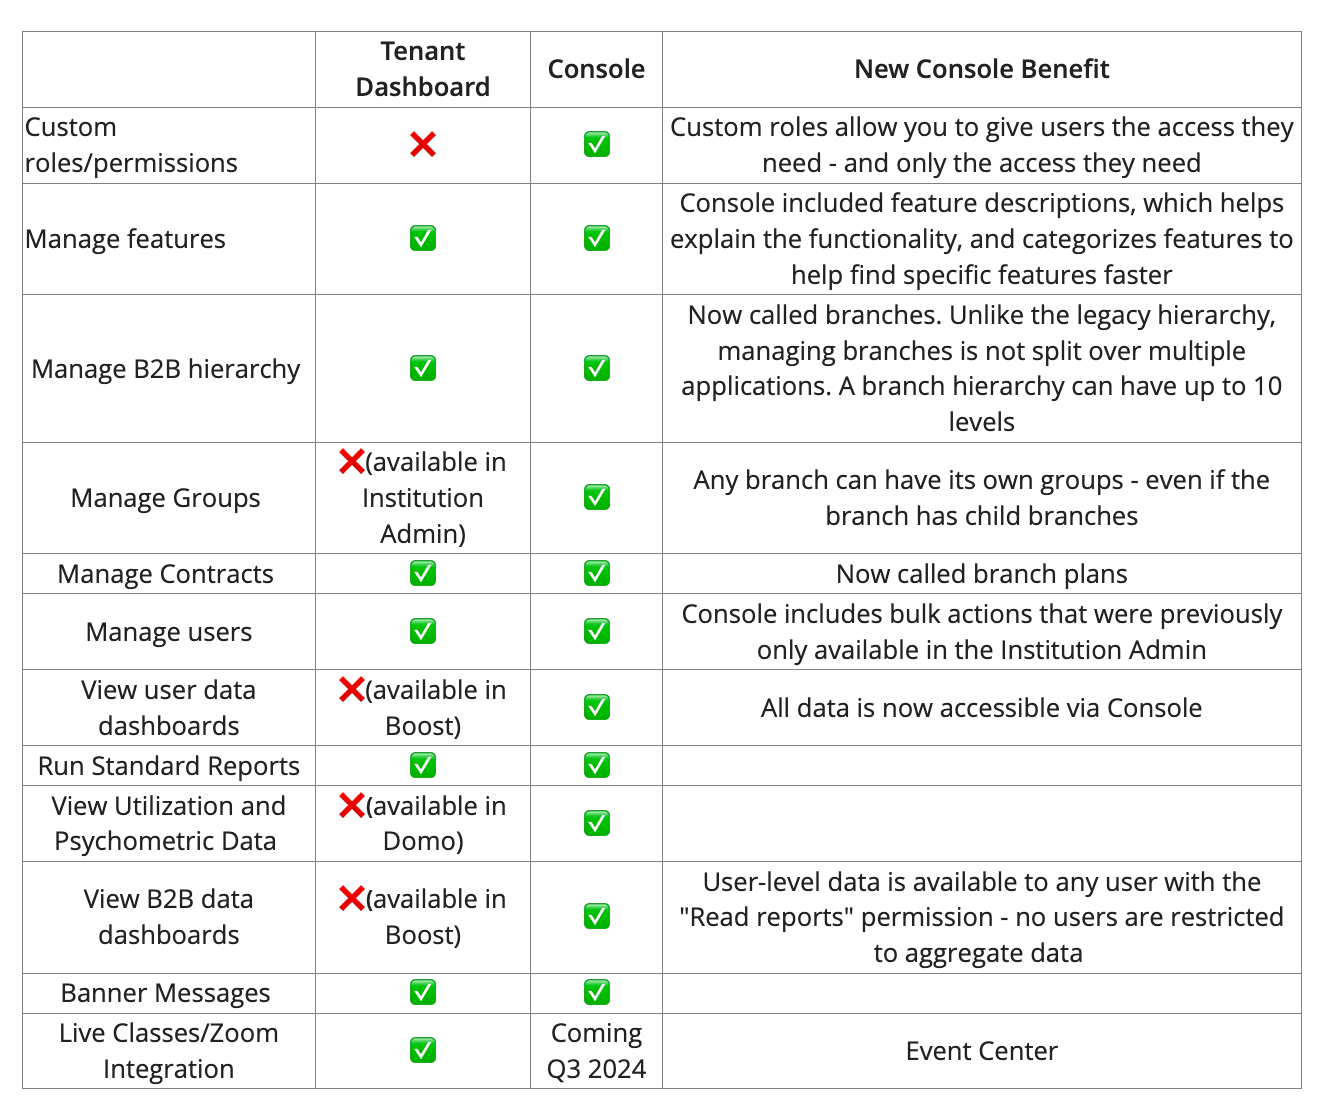
- B2B hierarchy and user management, which was previously only available via the Tenant Dashboard and Institution Admin dashboards, is now available in Console, allowing you to perform all branch-related actions from one application.
- Flexible branches replace the current rigid hierarchy of admin divisions, districts, and institutions.
- Hierarchies created via the Tenant Dashboard have been synced to Console so that you can manage them within either application.
- Branch plans replace contracts and can be associated to any branch level.
- We’ve expanded the roles and permissions you can assign to users within Console.
- Data previously exclusive to the Boost Dashboard is now available in Console.
- Feature accesses controllable at the institution level are also controllable at the branch level in Console
Using Console by Role
Tenant Admin
Console Benefits for Tenant Level Admins
- Console provides more flexibility to accommodate any business model and configure the best platform experience for a variety of use cases.
- Improved setup of branches and users with bulk actions.
- Console’s improved performance makes setup fast and simple.
- Ability to create custom roles allow Console admins or users with applicable custom role to create new hierarchies and manage Enterprise Engine toolset; this functionality is no longer limited to tenant admins.
- This allows you greater control over who can access and update your platform.
- This allows you greater control over who can access and update your platform.
How does Console compare to the Tenant Dashboard?
Moving forward, Console admins should use Console to perform actions previously exclusive to- or easier in- the Tenant Dashboard.
How to access Console?
Note: The Tenant Admin role does not provide access to Console. Your account will need the Console Admin role, or a custom role with X permissions to access the new tools in Console.
Once you have the proper role/permission, follow these steps:
- Log in to BenchPrep from your unique login URL.
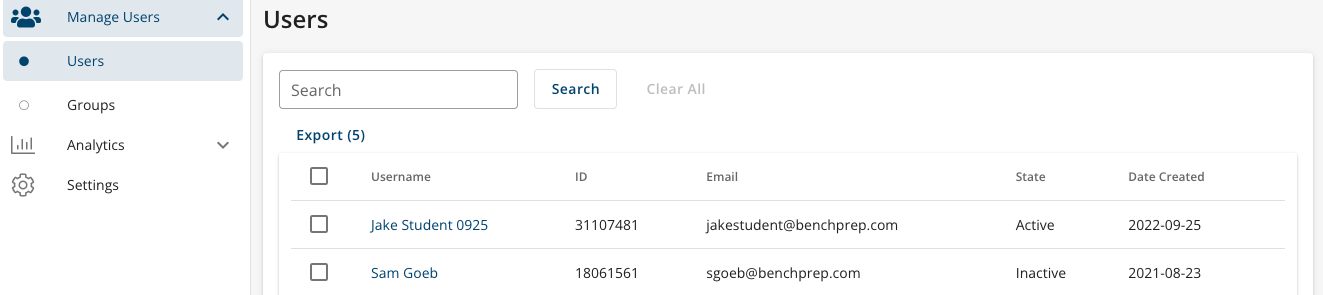
- You will be routed to the Users section of Console instead of the Tenant Dashboard. It will look like this:
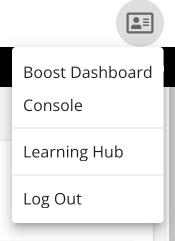
- You can navigate between Console and Tenant Dashboard using the Settings dropdown in the top right corner.


What to Explore in Console
Once logged into Console, we recommend exploring the new tools and interfaces available to Console Admins.
Specifically:
- Navigate to the Branches and Groups listing pages and view/confirm all hierarchy data has been synced from the Tenant Dashboard.
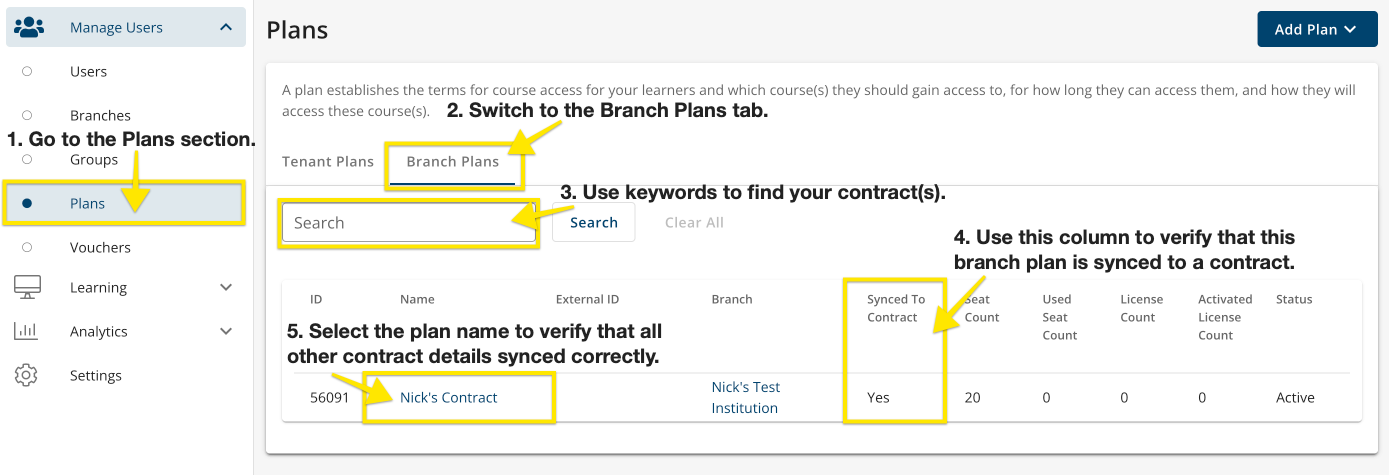
- Navigate to the Plans listing page and view/confirm all contract data has been synced from Tenant Dashboard.
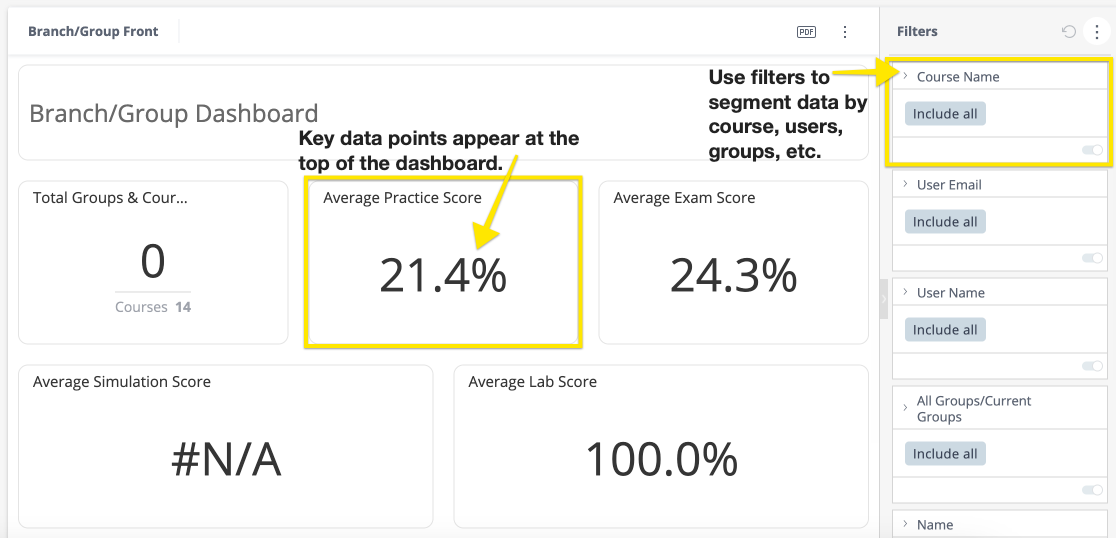
- Navigate to the Branches Dashboard and view the new analytics interface.
Note that data in Console refreshes more frequently than data in the Boost Dashboard, so data points may not necessarily match between the two. -
Navigate to the Roles/Permissions listing from Settings to view the new custom roles for instructors, institution/district admins and supervisors.


Division, District, and Institution Supervisors
Console Benefits for Supervisors
- Improved performance and speed compared to the Boost Dashboard.
- New, intuitive and responsive user interface.
- Users with the “Read reports” permission, which is included in the “Branch Supervisor” role, see user data for all users in their branch and all users in their branch’s child branches.
How does Console compare to the Boost Dashboard

How to Provide Supervisor Access to Console
To simplify the transition from the Tenant Dashboard to Console, we have created a custom role that provides a user with permissions in Console that mimic the current functionality of the division, district, and institution supervisor roles in the Boost Dashboard. This role is called “Branch Supervisor.” The level of access is determined by the scope of the role - what branch the role is assigned to.
We strongly recommend exploring this role to familiarize yourself with the user experience.
Follow these steps to assign this role to a user:
-
Go to the Branches section of Console and locate the branch that this user should have the branch supervisor role for. You can use the search bar to make this process faster.
-
Note that branches synced from the Tenant Dashboard have a lock icon next to them in the Branches listing. This not only makes legacy hierarchies easier to find, but also helps you validate that they synced from the Tenant Dashboard properly.
-
-
Identify the name and ID of the branch you want to work with.
-
In the Users section, select the user you’d like to add this role to.
-
Select the Assign Role button.
-
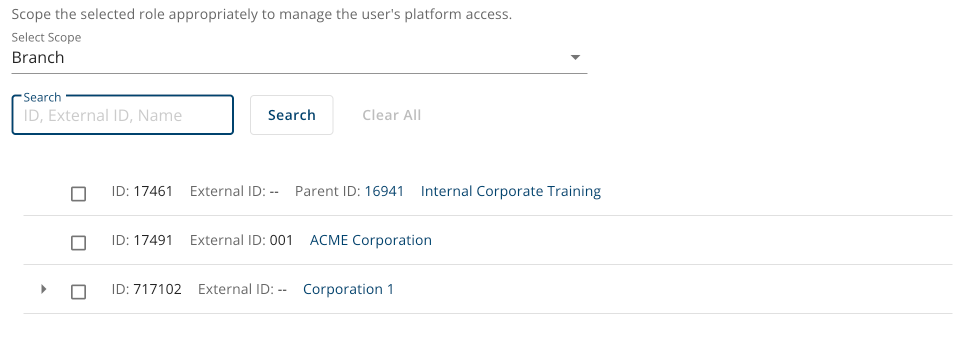
In the pop-up, select the Branch Supervisor role, then select Branch for the scope. Check the box next to the name of the branch this user should have this role for. Make sure the name and ID of the branch match the name and ID you noted down earlier - the lock icons for legacy hierarchies do not appear in this view.
-
Select the Save button.


When selecting a user to add this role to, there are two approaches we recommend:
- Create a new user in your production environment, assign the role to the user, and impersonate them.
- The Branch Supervisor is available in your staging environment. In staging, assign the Branch Supervisor role to an existing user, such as a current division supervisor, and impersonate them.
Once you’ve logged in as or impersonated a branch supervisor user, follow these steps to validate that they’ve received the proper access level:
- Branch Supervisors will be routed to the Users section of Console instead of the Boost Dashboard. It will look like this:
- You can navigate between Console and the Boost Dashboard using the Settings dropdown in the top right corner.

What to Explore in Console
Once logged into Console, we recommend exploring the Analytics section.
Specifically:
- Navigate to the Users Dashboard and view the new interface for user data.
- Navigate to the Branch Dashboard and view the new interface for aggregate data.


Note that data in Console refreshes more frequently than data in the Boost Dashboard, so data points may not necessarily match between the two.
District and Institution Admins
Console Benefits for District/Institution Admins
- Console runs significantly faster than the Institution Admin dashboard.
- Removing a user from a branch plan restores a seat to the branch plan, allowing you to reuse the seat for another user.
- Custom roles allow much more precise management of which users can perform which actions.
- A single user can manage multiple branches.
How does Console compare to the Institution Admin Dashboard?

How to Provide Supervisor Access to Console
To simplify the transition from the Tenant Dashboard to Console, we have created a custom role that provides a user with permissions in Console that mimic the current functionality of the district and institution admin roles in the Institution Admin Dashboard. This role is called “Branch Manager.” The level of access is determined by the scope of the role - what branch the role is assigned to.
We strongly recommend exploring this role to familiarize yourself with the user experience. Follow these steps to assign this role to a user:
- Go to the Branches section of Console and locate the branch that this user should have the branch manager role for. You can use the search bar to make this process faster.
- Note that branches synced from the Tenant Dashboard have a lock icon next to them in the Branches listing. This not only makes legacy hierarchies easier to find, but also helps you validate that they synced from the Tenant Dashboard properly.
- Identify the name and ID of the branch you want to work with.
- In the Users section of Console, select the user you’d like to add the branch manager role to.
- Select the Assign Role button.
- In the pop-up, select the Branch Manager role, then select the Branch for the scope. Check the box next to the name of the branch this user should have this role for.
- Select the Save button.
When selecting a user to add this role to, there are two approaches we recommend:
- Create a new user in your production environment, assign the role to the user, and impersonate them.
- The Branch Manager role is available in your staging environment. In staging, assign the Branch Supervisor role to an existing user, such as a current division supervisor, and impersonate them.
Once you’ve logged in as or impersonated a branch manager user, follow these steps to validate that they’ve received the proper access level:
- Branch managers will be routed to the Users section of Console instead of the Institution Admin Dashboard. It will look like this:
- You can navigate between Console and the Institution Admin Dashboard using the Settings dropdown in the top right corner.


What to Explore in Console
Once logged into Console, we recommend exploring the Analytics section.
- Go to the Users section and confirm you see a listing of members of the branch (and all of its child branches) you manage.
- Select a user and confirm you can assign group-level roles to that user (if your branch has groups).
- In the Plans section, check that the contracts associated to your branch and child branches are visible as branch plans. If a contract is open and has available seats, you should be able to add users to it. For more information on how to add users to branch plans, click here.
- Select a user and confirm you can assign group-level roles to that user (if your branch has groups).
- Go to the Branches section and confirm you see the branch (and all of its child branches) you manage.
- Go to the Groups section and confirm you see all existing groups of the branch (and all of its child branches) you manage.


Instructor
Console Benefits for Instructors
- Improved performance and speed compared to the Boost Dashboard.
- New, intuitive and responsive user interface.
- A single user, if desired, can manage multiple branches or groups –including branches and groups that aren’t part of the same hierarchy.

How to Provide Group Manager Access to Console
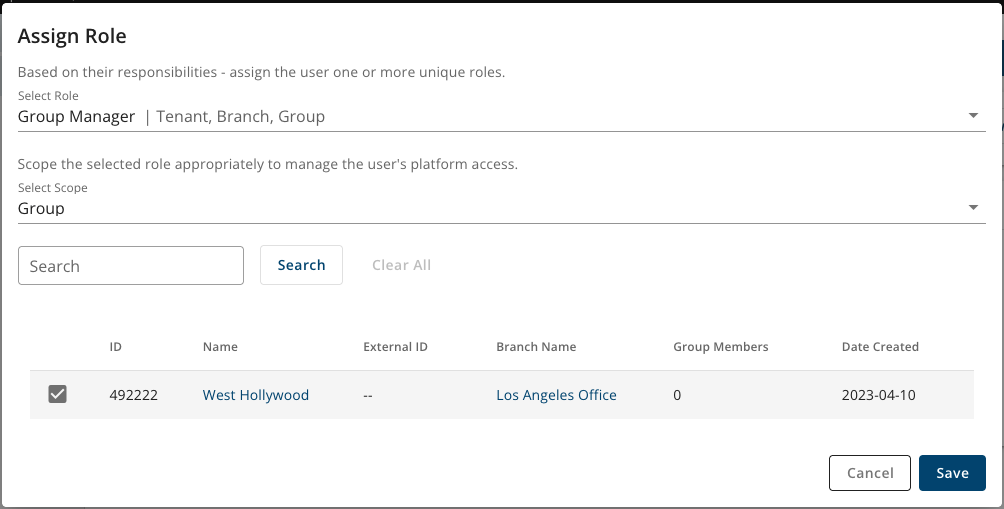
To simplify the transition from the Tenant Dashboard to Console, we have created a custom role that provides a user with permissions in Console that mimic the current functionality of the instructor role in the Boost Dashboard. This role is called Group Manager. The level of access is determined by the scope of the role - what branch the role is assigned to.
We strongly recommend exploring this role to familiarize yourself with the user experience. Follow these steps to assign this role to a user:
- Go to the Groups section of Console and locate the group that this user should have the group manager role for. You can use the search bar to make this process faster.
- Identify the name and ID of the group you want to work with.
- In the Users section, select the user you’d like to add this role to.
- Select the Assign Role button.
- In the pop-up, select the Group Manager role, then select Group for the scope. Check the box next to the name of the group this user should have this role for.
- Select the Save button.
- If the instructor currently manages multiple groups, you’ll want them to have this role scoped to each of those groups. To do that, assign them the role again, but select a different group as the scope of the role. Repeat that process as many times as needed.
- If all of the groups the instructor manages are in the same branch, and it’s okay for the instructor to see branch-level data, you can assign them this role and select the branch to be the scope of the role.

When selecting a user to add this role to, there are two approaches we recommend:
- Create a new user in your production environment, assign the role to the user, and impersonate them.
- The Group Manager role is available in your staging environment. In staging, assign the Branch Supervisor role to an existing user, such as a current division supervisor, and impersonate them.
Once you’ve logged in as or impersonated a group manager user, follow these steps to validate that they’ve received the proper access level:
- Group managers will be routed to the Users section of Console instead of the Boost Dashboard. It will look like this:
- You can navigate between Console and the Boost Dashboard using the Settings dropdown in the top right corner.


What to Explore in Console
Once logged into Console, we recommend exploring the Analytics section.
Specifically:
- Navigate to the Users Dashboard and verify that you see user data for learners in the group you manage.
- Navigate to the Branch Dashboard in the Analytics section. This dashboard will automatically be filtered to show data just for your group and its users.