
 3194
3194
Let's discuss all the basic ways you can use BenchPrep's Zoom Meetings integration feature.
In this article, we will cover:
For information on creating a Live Class, click here.
Scheduling a Zoom Meeting Within BenchPrep
Watch the video below to learn how to schedule a Zoom meeting within BenchPrep, or follow the step-by-step instructions that follow.
- Sign into your BenchPrep account
- Navigate to Tenant Dashboard. In the left-hand navigation, select Web Conferencing.
- Select Create Event > Zoom Meeting.
- Fill in all required fields (noted by *)
- Select Save.
- You will be taken to the Meeting Details page where you can proceed to edit, cancel or delete the meeting. You can also register users and download a CSV of all registrants.
Editing a Zoom Meeting
-
Navigate to Web Conferencing and locate the applicable meeting
- Select Edit

Editing a Past Meeting
Tenant Admins can edit the Description field of a past event to make additional info, such as a link to a recording of the meeting, available to attendees. Registered users will not receive an automated email when the Description of a meeting is updated.
Note: If the option “List as Available Event to all users” is checked for the meeting, all users in the tenant will see the updated Description, regardless of whether they registered for the meeting.
Editing an Upcoming Meeting
All fields in an Upcoming event can be edited. When a meeting is updated, all users registered for the event will be notified via email. This is an automated email from Zoom and cannot be configured within BenchPrep.
Example email for meeting updates:

Note: If a user selects "Cancel" at the bottom of their email, it will not impact the user’s registration within BenchPrep.
Canceling or Deleting a Zoom Meeting
- Navigate to Web Conferencing
-
Locate the applicable meeting
- Select More
- Choose Cancel Event or Delete Event
- If an event is canceled, it moves to the "Past" tab of Web Conferencing and is removed from User Portal
- If an event is deleted, it is fully removed from both Web Conferencing in Tenant Dashboard and from User Portal

Please Note:
- These actions are permanent
- This will also delete the meeting in the host’s Zoom account
- Whether a meeting is deleted or cancelled, the host is automatically notified via email. This is an automated email from Zoom and cannot currently be configured within BenchPrep.
- Registered users are not notified.
How Your Users Attend a Zoom Meeting
In order for users to register themselves for a meeting, the meeting must have the option “List as Available Event to all users” toggled.
In the User Portal, a user must:
- Navigate to My Events > Available Events
- Click Enroll in the event they want to attend.
- If the registration type is set to Manually Approved Registrations, a Tenant Admin must approve the registrant before a user can be enrolled. (The Enroll button will read “Enroll Pending” while the registration is awaiting approval.)


Once a user is enrolled in a meeting, the event will appear in Enrolled Events in User Portal. Each registered user will be notified via email of their registration. 10 minutes prior to the meeting starting, the disabled “Enrolled” button will become an enabled “Join Live” button. By selecting it, the user will be launched into the Zoom meeting. The link will remain live until the meeting duration has been reached, as scheduled in Tenant Dashboard.
If "Join before host” is turned on for the meeting, any users with the link (on or off BenchPrep’s platform) will be able to launch into the meeting before the host logs in. Otherwise, the meeting will start once the host logs into their Zoom account and begins the meeting.
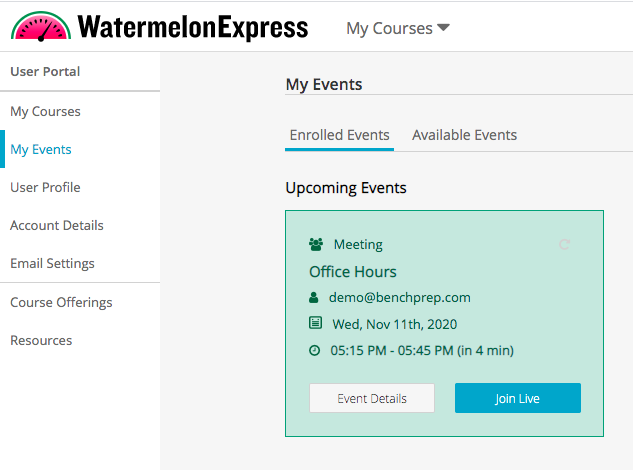
The Event Details button lists the details about a particular event:
- Meeting ID
- Passcode
- Type
- Description
- Date
- Time
- Host email
- Enrollment status
- Invitation URL - the Invitation URL will be available 10 minutes prior to the upcoming meeting


